Difference between revisions of "Enter and approval of supplier invoices/nb"
(Created page with "Med {{btn|Vis faktura}} kan du åpne og se fakturadokumentet. Dersom du har autorisasjon kan du også attestere fakturaer uten på åpne dem med knappen {{btn|Direkteatttest}}...") |
(Created page with "{| class=mandeflist !Alle |Alle fakturaer uansett om de har attestanter eller ikke |- !Kun ubehandlede |Kun fakturaer som ikke er attesterte vises |- !Kun egen att igjen |Kun...") |
||
| Line 61: | Line 61: | ||
{| class=mandeflist |
{| class=mandeflist |
||
| + | !Alle |
||
| − | |'''All''' |
||
| + | |Alle fakturaer uansett om de har attestanter eller ikke |
||
| − | |Shows all invoices, also those without approvers |
||
|- |
|- |
||
| + | !Kun ubehandlede |
||
| − | |'''Only not handled''' |
||
| + | |Kun fakturaer som ikke er attesterte vises |
||
| − | |Shows all unapproved invoices |
||
|- |
|- |
||
| + | !Kun egen att igjen |
||
| − | |'''Only own app. left''' |
||
| + | |Kun de fakturaer vises, der du er ensom gjenstående attestant |
||
| − | |Shows only the invoices whrer you are the only remaining approver |
||
|- |
|- |
||
| + | !Bokførte |
||
| − | |'''Booked''' |
||
| + | |Allerede bokførte fakturaer |
||
| − | |Shows all booked invoices |
||
|} |
|} |
||
Revision as of 16:16, 27 January 2016
Contents
Generelt
I Økonomi: Leverandørfakturaerkan du registrere leverandørsfakturaer, dersom dere anvender attestfunksjonen i Marathon.
Her kan du blant annet registrere innkommende fakturaer og se på attestovervåkingen.
Registrering innkommende – skanning
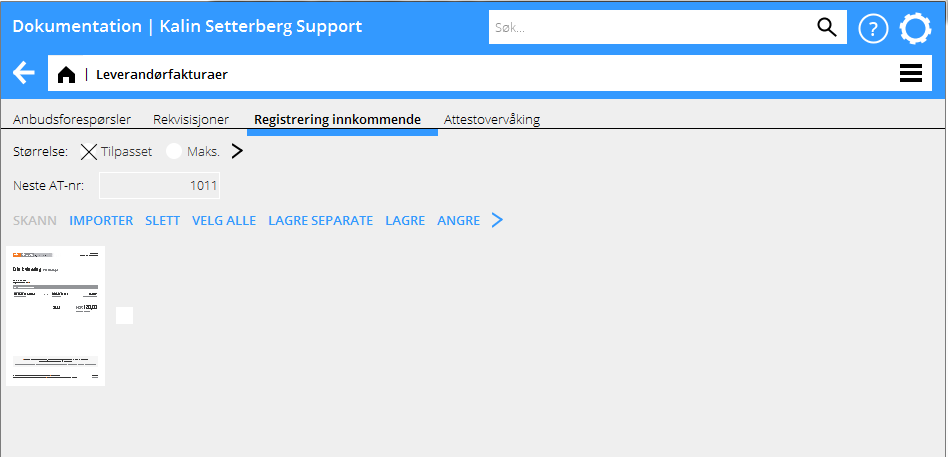
Registreringen av fakturaer begynner med å skanne inn fakturadokumentene i Økonomi: Leverandørfakturaer flik Registrering innkommende. Klikk på Skanning. Legg en eller flere fakturaer i skanneren og velg Skann. Dersom skanneren ikke er koplet til Marathon kan du anvende en annen, som du senere kan overføre til Marathon med knappen Importer.
Sjekk kvaliteten på den skannede fakturaen ved å klikke på miniatyren oppe til venstre i bilde. Marker fakturaen ved å avkrysse boksen og Lagre. Dersom en faktura inneholder flere sider avkrysser du sidene i turorden og lagrer dem sammen. Merk originalfakturaen med AT- nummeret som vises ved Neste AT - nummer.
Du kan slette en innskannet faktura ved å markere den o klikke på Slett. Med knappen Velg alle blir alle innskannede fakturaer markerte. Knappen Angre legger tilbake innskannede og lagrede, men ikke registrerte fakturaer.
Registrering innkommende
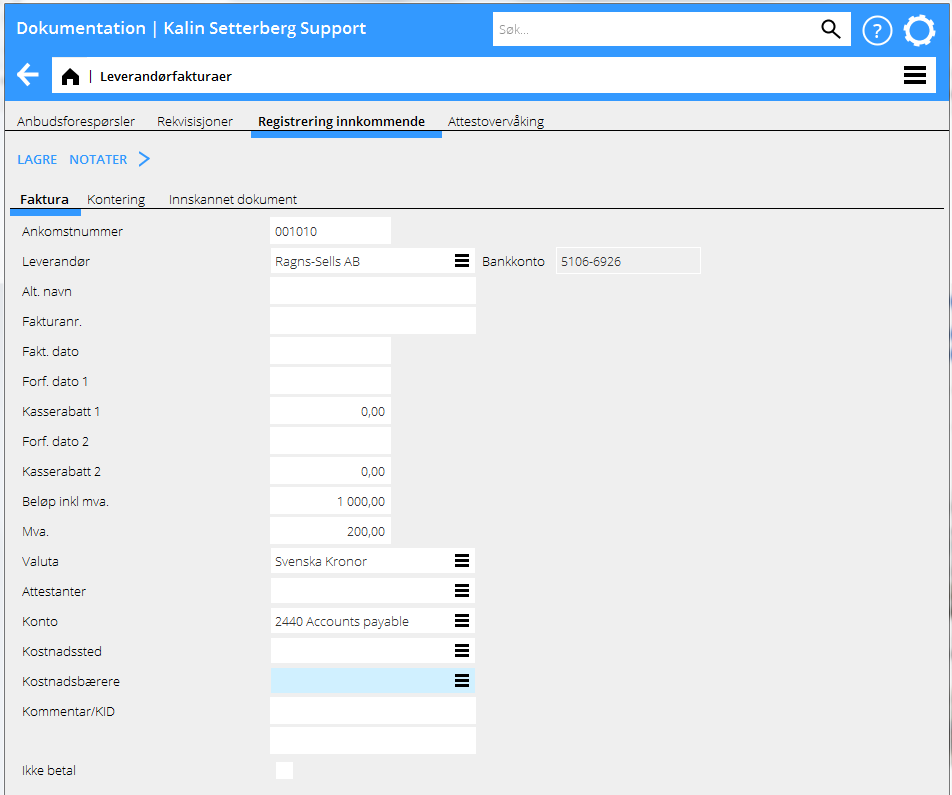
Velg Ny i Registrering innkommende. Systemet foreslår automatisk neste ankomstnummer, men du kan oppgi et annet nummer. Ankomstnummer er det nummeret som fakturaen fikk ved skanningen og er koplet til det innskannede dokumentet. Du kan se på den skannede fakturaen i fliken Innskannet dokument og sammenligne med den opprinnelige. Angi opplysninger om leverandør, fakturanummer, dato og fakturabeløp inklusive mva. (Mva. – beløper kan utregnes automatisk med eller uten desimaler ved o krysse av parametere i Grunnregister/Lev/Parametrer, fliken Fakturaer, feltet Utregning av mva. -beløp.) Velg en eller flere attestanter og lagre, eller gå videre til Kontering.
Kontering
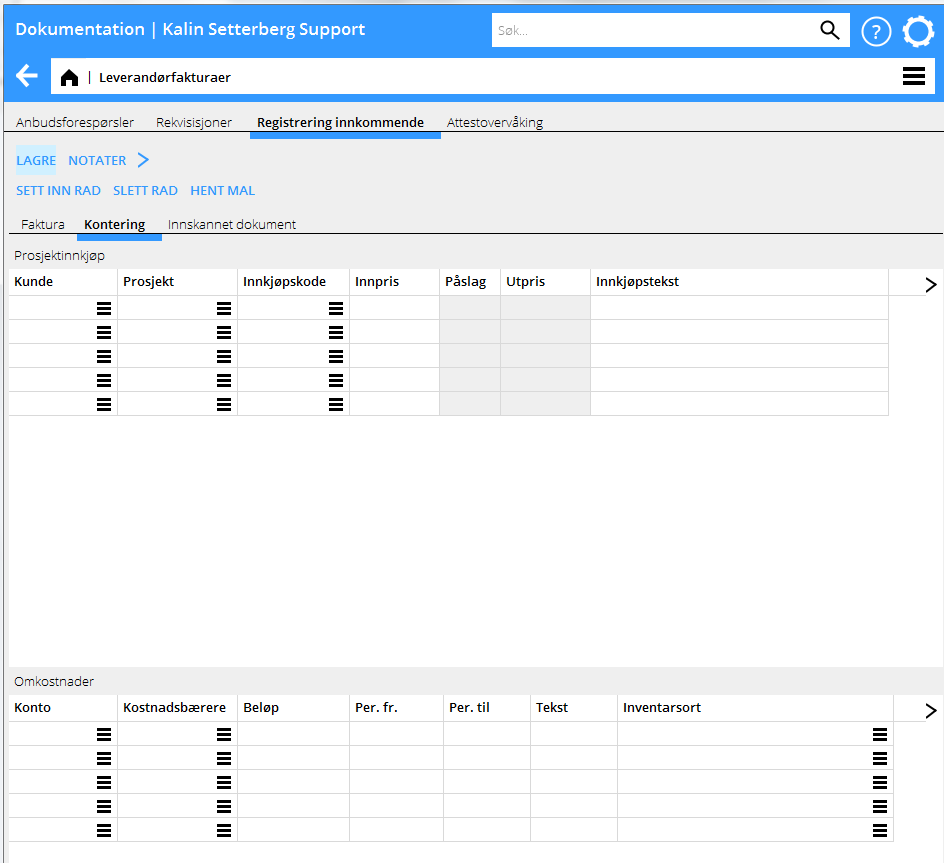
Du kan allerede nu kontere fakturaen i fliken Kontering.
Kontering av prosjektinnkjøp gjøres i den øverste tabellen. Vid kontering av prosjektinnkjøp trenger du ikke oppgi konto, fordi det allerede er forinnstilt i parametrene. Angi eventuell rekvisisjon dersom det er blitt brukt – resterende opplysninger om kunde, prosjekt, innkjøpskode og innpris blir da automatisk utfylte. Hvis ikke, angi opplysningene felt for felt. Innprisen hentes da fra fakturaregistreringen, pålegget fra innkjøpekoden i System: Grunnregister/Pro/kostnadskoder Innkjøp (og i visse fall fra prosjektet), og utprisen regnes ut automatisk. Systemet kan innstilles slik at det foreslåtte pålegget ikke er mulig å endre. Innstillingen finnes i System: Grunnregister/Pro/Parametrer, fliken Innkjøp og Øvrigt i feltet Endre innkjøpstillegg. I fliken Justering finnes ytterligere en parameter. Som påviker håndteringa av påslag og salgspris. Den heter "Avvikende innkjøpsbrutto som justering", og hvis du aktiverer den, vil differansen mellom den foreslåtte og den nye salgsprisen bli en justering.
Ved kontering av omkostnader oppgir du konto i den nederste tabellen. Kostnadssted og kostnadsbærer kan oppgis, men bare dersom kontoen i kontoplaner tillater det. Dersom kostnaden skal periodiseres oppgir du bare kostnadskontoen og periode fra og til. Balansekontoen for periodiseringer hentes fra parametrene.
Konteringen for prosjektinnkjøp eller omkostnader kan også gjøres i fakturavalutaen i feltet Beløp fakturavaluta. Dette underletter oppdeling av utenlandske fakturaer på flere ulike kontoer eller prosjekter.
Med Hent mal kan du hente in konteringsmaler som er skapte i System: Grunnregister/Lev/Konteringsmaler. Se beskrivelse under Skap konteringsmal.
Da alle skannede fakturaer er blitt ankomstregisteret sendes de til attestantene med knappen E-poste i Økonomi: Leverandørfakturaer , Attestovervåking.
Meldingen sendes til alle attestanter. Fakturaene finnes i Prosjekt: Attest hos hver attestant uansett hvis de har fått e-postmelding eller ikke.
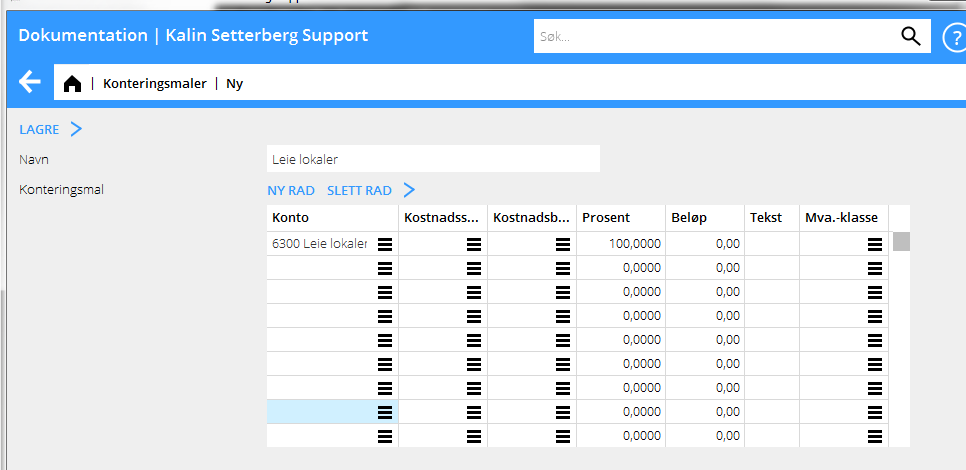
Skap konteringsmal
Konteringsmaler lages i System: Grunnregister/Lev/Konteringsmaler. Tast Ny og gi malen et navn. Oppgi konto og eventuell kostnadssted og kostnadsbærer, hvis kontoen tillater det. Angi enten en prosentuell del av et beløp, eller et beløp i NOK. Dersom du angir en prosentuell dele, vil systemet spørre etter totalbeløpet da malen brukes for å regne ut andelen med hjelp av prosentsatsen.
Attest
Attestantene kan åpne, kontere og attestere fakturaene sine for attestering og kontering i Økonomi: Attest.
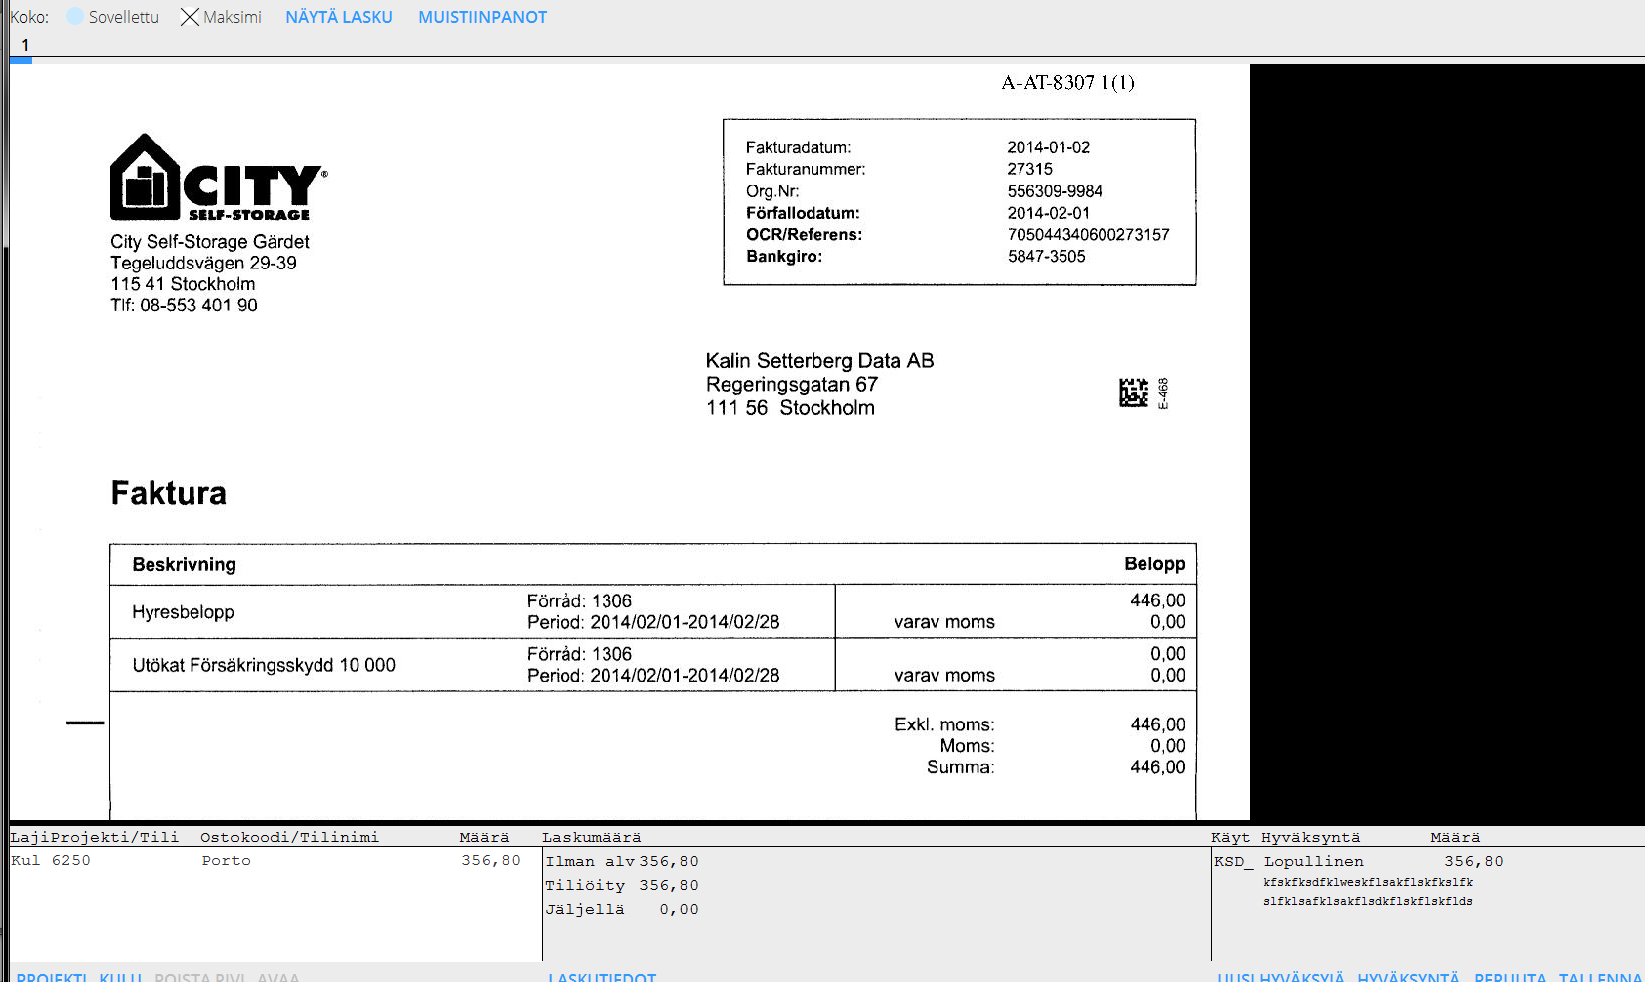
Med Vis faktura kan du åpne og se fakturadokumentet. Dersom du har autorisasjon kan du også attestere fakturaer uten på åpne dem med knappen Direkteatttest. Velg å vise
| Alle | Alle fakturaer uansett om de har attestanter eller ikke |
|---|---|
| Kun ubehandlede | Kun fakturaer som ikke er attesterte vises |
| Kun egen att igjen | Kun de fakturaer vises, der du er ensom gjenstående attestant |
| Bokførte | Allerede bokførte fakturaer |
Select an invoice and click Open.
If the invoice already is posted it is shown as one or several posting rows in the field at the bottom left side of the page. Type Pro means project purchase and Type Cost a cost invoice. The field in the middle shows a summary of the invoice with invoice amount, how much that has been posted and how much posting remains. Click on Invoice information to see other invoice details. You can also scroll in the scanned invoice in the upper part of the screen. Click on Show invoice. The function Notes shows all notes that has been made concerning the invoice. You can also make new notes there.
To post a project purchase, select Insert row Project. If you have been using purchase orders and state the PO-number, the remaining contents will be filled in automatically (client, project, purchase code and purchase price). Otherwise, fill in these fields, the purchase price will be fetched from the invoice registration. The mark-up for the purchase price comes from the purchase code in Base registers/Pro/Cost codes Purchases (and in some cases from the project). The sales price is automatically calculated. You can also use the invoice currency, which makes dividing a foreign invoice in several projects easier. The system can be set such that the suggested mark-up not can be changed. The setting is in the Base registers/PA/parameters; tab Purchases and Other, field Change purchase mark-up. In the Adjustments tab there is more alternative in handling mark-ups and sales prices. It is called Special gross purchase as adjustment. When activated, it turns the difference between the suggested and the new sales price into an adjustment.
Use the lower table for posting costs. Write the account number and possible cost centre and -object if the account allows/requires it in the chart of accounts. If the cost shall be allocated over a period (accrued), state cost account only and fill in the fields for periods. The balance sheet account for periodical allocations is fetched from the parameters.
For pre-approval, final approval, partial approval or to state that the invoice not shall be paid, press Approval and select type of approval. You can also write comments regarding the approval. Click on Save approval. You can add approvers to the invoice with the function New approver. Save the whole invoice with Save.
Watch list
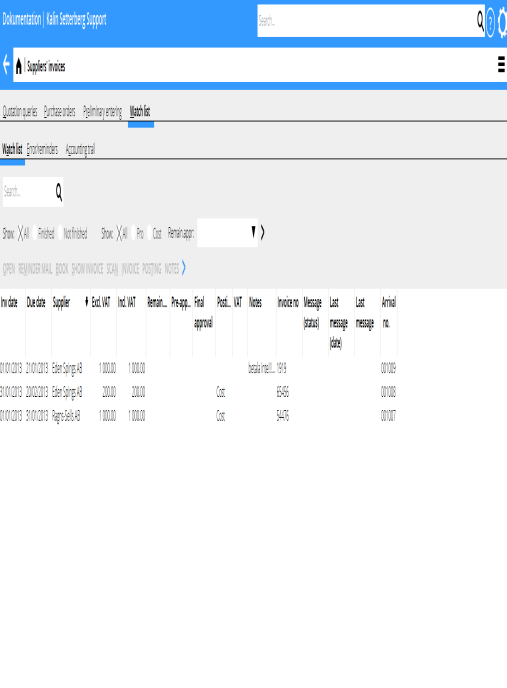
The watch list module is only used by the accounting department. The list shows all preliminary entered, but not booked invoices. List selections:
| All (1) | Shows all invoices regardless of approval status |
| Finished | Shows fully approved invoices |
| Not finished | Shows invoices with at least one remaining approver |
| All (2) | Shows all project- and cost invoices |
| Pro | Shows all project invoices |
| Cost | Shows all cost invoices |
| Rem. appr | You can select a specific approver's unapproved invoices |
| Reminder mail | Selected invoices will be sent as reminders to the approver |
| Book | Book one or several selected invoices that are fully posted and approved. Today's date is suggested as accounting date. |
| Show invoice | Shows the scanned invoice document |
| Scan | Possibility to add documents to the invoice |
| Invoice | Shows invoice information. You can also edit the information here |
| Posting | Shows posting. You can change posting here |
| Notes | Shows notes, possibility to add notes |
Move the mouse pointer over the Posting pro/cost field to see more detailed information. Move the pointer over the employee code to see how much that has been approved and possible comments. If a final approval or a posting is red and in parenthesis it indicates that the whole amount not is approved or that the approver has written a comment.
After booking project related purchases they need to be updates ti the project accounting in Backoffice: Project accounting /Update, tab Purchases. That can also be done automatically; the parameter is in Backoffice: Base registers/Pro/Parameters, tab Purchase and Other. Note that possible existing purchases must be updated manually at the time you check the parameter box.
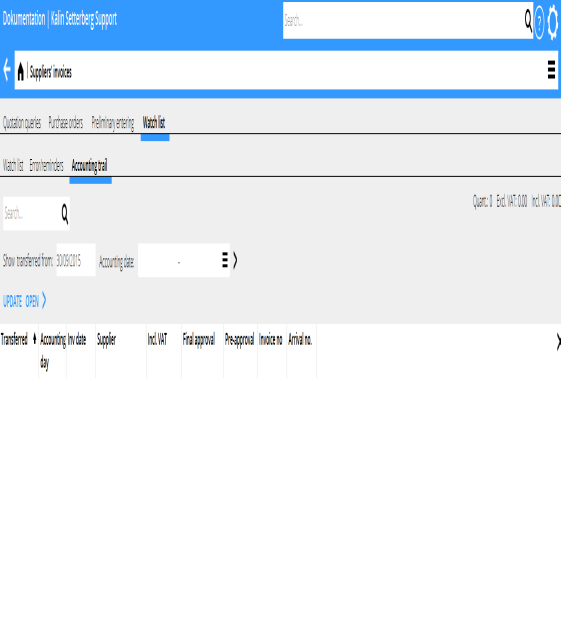
Bookkeping trail
The trail shows the booked invoices. It shows also time and approver and what type of approval it was in the columns Final approval and Pre-approval. Select an invoice and click Open. The same invoice picture and invoice information as in the approval will be shown. It is also possible to read notes here.
