Difference between revisions of "Enter vouchers/da"
(Created page with "Et enkelt bilag registreres med to eller flere konti samt beløber i debet og kredit. Andre funktioner er:") |
(Created page with "{| class=mandeflist !Hent fra |Funktion for at kopiere tidligere bilag. Bilagene vælges ud fra en liste. |- !Hent skabelon |En bilagsskabelon kan skabes i Basisregister/Bog/B...") |
||
| Line 13: | Line 13: | ||
{| class=mandeflist |
{| class=mandeflist |
||
| + | !Hent fra |
||
| − | |'''Fetch from''' |
||
| + | |Funktion for at kopiere tidligere bilag. Bilagene vælges ud fra en liste. |
||
| − | |Copy earlier voucher. Select from a list. |
||
|- |
|- |
||
| + | !Hent skabelon |
||
| − | |'''Import template''' |
||
| + | |En bilagsskabelon kan skabes i Basisregister/Bog/Bilagsskabeloner. Se beskrivelse under Skab bilagsskabelon |
||
| − | |You can create a voucher template in Backoffice: Base registers/GL/Voucher templates. Read more in create voucher template. |
||
|- |
|- |
||
| + | !Importer |
||
| − | |'''Import''' |
||
| − | | |
+ | |Importerer sie-filer (Sverige) |
|- |
|- |
||
| + | !Kreditér i anden periode |
||
| − | |'''Reverse in another period''' |
||
| + | |Skaber et krediteret bilag med anden regnskabsdato. |
||
| − | |Credits a voucher with another accounting date. |
||
|- |
|- |
||
| + | !Regnskabsdato + I dag |
||
| − | |'''Accounting date+ today''' |
||
| + | |Feltet skal altid være udfyldt før andre oplysninger kan registreres. Klik på I dag for at vælge dagens dato. Den angivne dato vil blive foreslået også i næste bilag. |
||
| − | |Accounting day must always be stated before other contents can be entered. Click on Today to fetch today's date, other dates are stated manually. The given date will be suggested in the next voucher. |
||
|- |
|- |
||
| + | !Overskrift |
||
| − | |'''Header''' |
||
| + | |Denne overskrift vises på startsiden til bilagsregistreringen og er søgbar. |
||
| − | |The header is shown on the start page of the entering program and is searchable. |
||
|- |
|- |
||
| + | !Bilagsnummer |
||
| − | |'''Voucher number''' |
||
| + | |Bilagsnummer hentes automatisk fra {{pth|System|Basisregister/BOG/Bilagsserier}}. |
||
| − | |Voucher number comes automatically from Base registers: GL/Voucher series. |
||
|- |
|- |
||
| + | !Konto |
||
| − | |'''Account''' |
||
| + | |Opgiv konto |
||
| − | |State account. |
||
|- |
|- |
||
| + | !Omkostningssted/-bærer |
||
| − | |'''Cost centre/-object''' |
||
| + | |Udfyld omkostningssted og – bærer dersom kontoen kræver/tillader dette. |
||
| − | |Enter cost centre and cost object if the account demands/allows it. |
||
|- |
|- |
||
| + | !Debet/Kredit |
||
| − | |'''Debit/Credit''' |
||
| + | |Angiv beløb |
||
| − | |Enter amounts. |
||
|- |
|- |
||
| + | !Dimensioner |
||
| − | |'''Dimensions''' |
||
| + | |Hvis I bruger dimensioner, vises de som separate kolonner. Oprettes i {{pth|System|Basisregister/BOG/Parametre}}, fanebladet {{flik|Dimensioner}}. Manuelle dimensioner redigeres i {{pth|System|Basisregister/BOG/Dimensioner}}. |
||
| − | |If your company uses dimensions, they are shown as separate columns. Dimensions are determined in Base registers/GL/Parameters, tab Dimensions. Edit manual dimensions in Base registers/GL/Dimensions. |
||
|- |
|- |
||
| + | !Tekst |
||
| − | |'''Text''' |
||
| + | |Angiv eventuel tekst (25 tegn). Vises inde i hovedbogen og i kontospecifikationen |
||
| − | |Optional text field (25 characters). The text is shown in the General ledger and Account specification. |
||
|- |
|- |
||
| + | !Summering |
||
| − | |'''Sums''' |
||
| + | |Længst nede summeres debet- respektive kreditkolonnerne. Et bilag der ikke balancerer, kan ikke gemmes. |
||
| − | |At the bottom of the table the debit- and credit columns are summarized. A voucher must balance before it can be saved. |
||
|- |
|- |
||
| + | !Skab momskontering |
||
| − | |'''Create VAT posting''' |
||
| + | |Hvis I bruger Marathons indgående momshåndtering, kan I skabe en automatik kontering af moms. Systemet beregner konteringen efter hvor meget der er opmærket med de forskellige momsklasser. Systemet henter den momskonto, som er angivet på momsklassen |
||
| − | |If you use Marathon's input VAT handling, you can create an automatic VAT posting (based on the VAT classes defined in Base registers/GL/VAT classes). Marathon calculates input VAT after how much there has been marked with VAT class and fetches the correct account from its definition. |
||
|- |
|- |
||
| + | !Udfyld |
||
| − | |'''Fill''' |
||
| + | |Hvis et konto er blevet angivet, fylder denne funktion automatisk resterende beløb ud, så at bilaget skulle balancere. |
||
| − | |Fills automatically remaining amount so that the voucher shall balance, provided that account has been stated. |
||
|- |
|- |
||
| − | + | !Rest |
|
| + | |Viser hvor stort beløb der er tilbage før bilaget balancerer. |
||
| − | |Shows remaining amount |
||
|} |
|} |
||
Revision as of 13:48, 11 February 2016
Contents
Registrering af bilag uden integration til andet delsystem
Bilag registreres i Økonomi: Verifikationer/Registrering af bilag. Standardserien har præfikset BO, men flere bilagsserier kan skabes i System: Basisregister/Bog/Verifikationsserier. Fælles for alle er, at de består af to tegn, hvoraf den ene er B.
Vælg serie og tast Ny. Registreringen begyndes altid ved at opgive regnskabsdato.
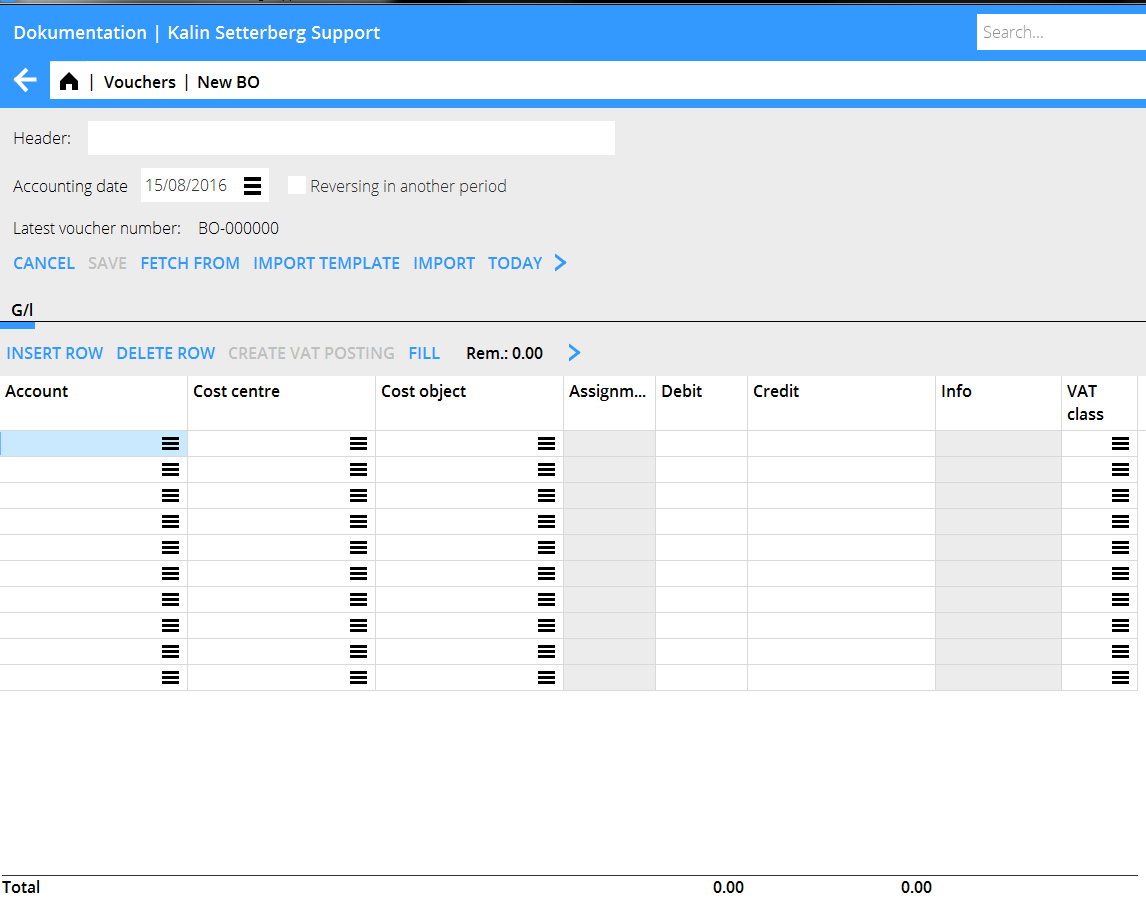
Et enkelt bilag registreres med to eller flere konti samt beløber i debet og kredit. Andre funktioner er:
| Hent fra | Funktion for at kopiere tidligere bilag. Bilagene vælges ud fra en liste. |
|---|---|
| Hent skabelon | En bilagsskabelon kan skabes i Basisregister/Bog/Bilagsskabeloner. Se beskrivelse under Skab bilagsskabelon |
| Importer | Importerer sie-filer (Sverige) |
| Kreditér i anden periode | Skaber et krediteret bilag med anden regnskabsdato. |
| Regnskabsdato + I dag | Feltet skal altid være udfyldt før andre oplysninger kan registreres. Klik på I dag for at vælge dagens dato. Den angivne dato vil blive foreslået også i næste bilag. |
| Overskrift | Denne overskrift vises på startsiden til bilagsregistreringen og er søgbar. |
| Bilagsnummer | Bilagsnummer hentes automatisk fra System: Basisregister/BOG/Bilagsserier. |
| Konto | Opgiv konto |
| Omkostningssted/-bærer | Udfyld omkostningssted og – bærer dersom kontoen kræver/tillader dette. |
| Debet/Kredit | Angiv beløb |
| Dimensioner | Hvis I bruger dimensioner, vises de som separate kolonner. Oprettes i System: Basisregister/BOG/Parametre, fanebladet Dimensioner. Manuelle dimensioner redigeres i System: Basisregister/BOG/Dimensioner. |
| Tekst | Angiv eventuel tekst (25 tegn). Vises inde i hovedbogen og i kontospecifikationen |
| Summering | Længst nede summeres debet- respektive kreditkolonnerne. Et bilag der ikke balancerer, kan ikke gemmes. |
| Skab momskontering | Hvis I bruger Marathons indgående momshåndtering, kan I skabe en automatik kontering af moms. Systemet beregner konteringen efter hvor meget der er opmærket med de forskellige momsklasser. Systemet henter den momskonto, som er angivet på momsklassen |
| Udfyld | Hvis et konto er blevet angivet, fylder denne funktion automatisk resterende beløb ud, så at bilaget skulle balancere. |
| Rest | Viser hvor stort beløb der er tilbage før bilaget balancerer. |
Create voucher template
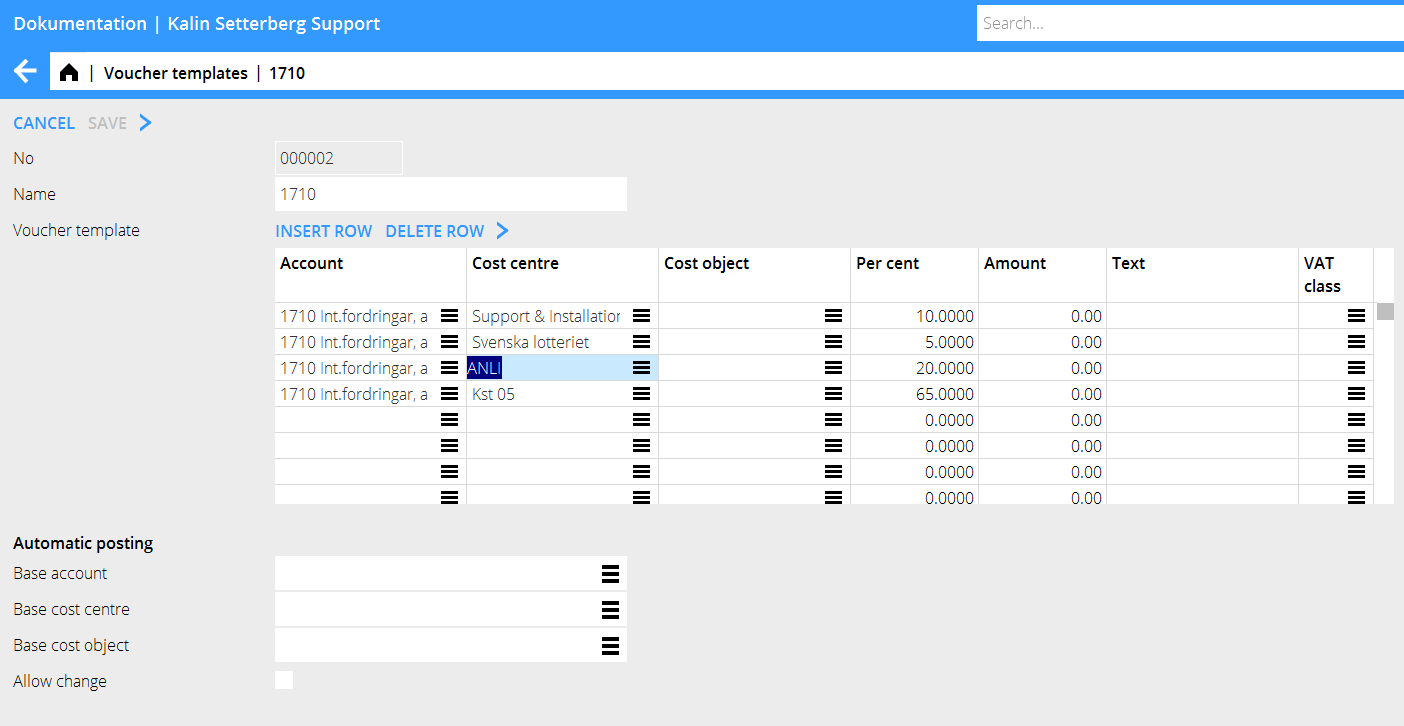
Create voucher templates in Base registers/GL/Voucher templates. Press New and give the template a name. Enter amount and possible cost centre or/and cost object, if the account allows it. Enter either a part of the amount in per cent or the monetary amount in your currency. If you use per cents the system asks for the total amount and calculates the part with the percentage you have entered.
Enter voucher with assignment to another subsystem
If the entered account is assigned to another subsystem, a yellow tab will appear, with an abbreviation of the subsystem name. In the tab you shall enter contents that concerns the subsystem. Below a description of the most common integrations.
Client payments
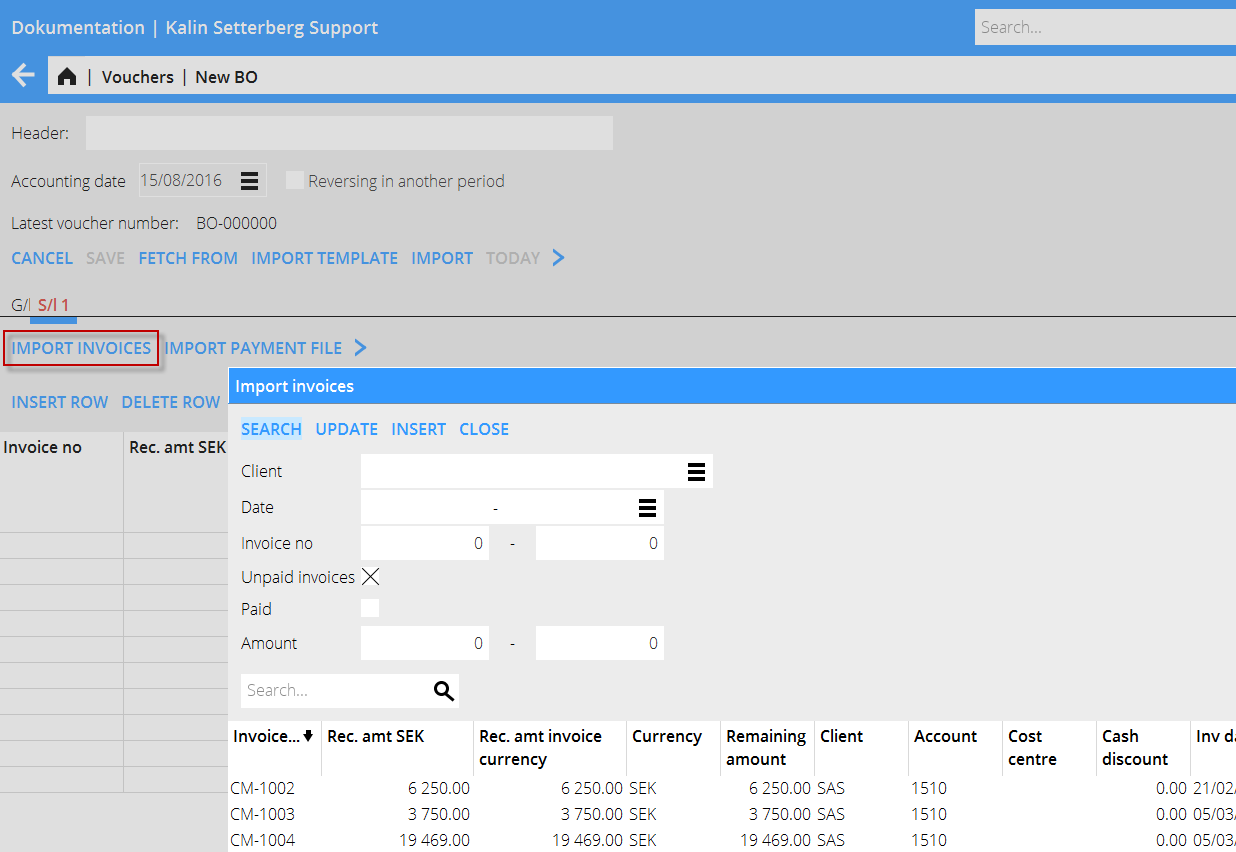
The account receivable is assigned to the sales ledger, which means that when you enter the account, the system creates a tab called SL followed by the tab number. Register the payments in the tab. Enter invoice number or search invoices with the function Import Invoices. You can search with client, date, invoice number, etc.
The whole invoice amount is fetched into the table. If only a part of the invoice has been paid, write the received amount over the amount in the Rec. amt (your currency) – field. If the payment is in a foreign currency this field is empty and you must write in the amount that the bank has received. The currency discrepancy that might occur is automatically posted on an account defined for that (Base registers/SL/Parameters: Acc for currency rate profits and Acc for currency rate losses).
If a foreign invoice is partly paid, write the received amount both in Rec. amt (your currency) and Rec. amt invoice currency. The remaining difference will be a residue and a possible rate discrepancy (if received amount in your currency divided with the rate doesn't correspond with the amount in the field Rec. amt Invoice, the difference will be a rate discrepancy).
After registration of the invoices, go back to the GL tab and enter an account for the payment (e.g. bank account). If you press the function Fill here, the remaining will be posted on the account.
Supplier payments
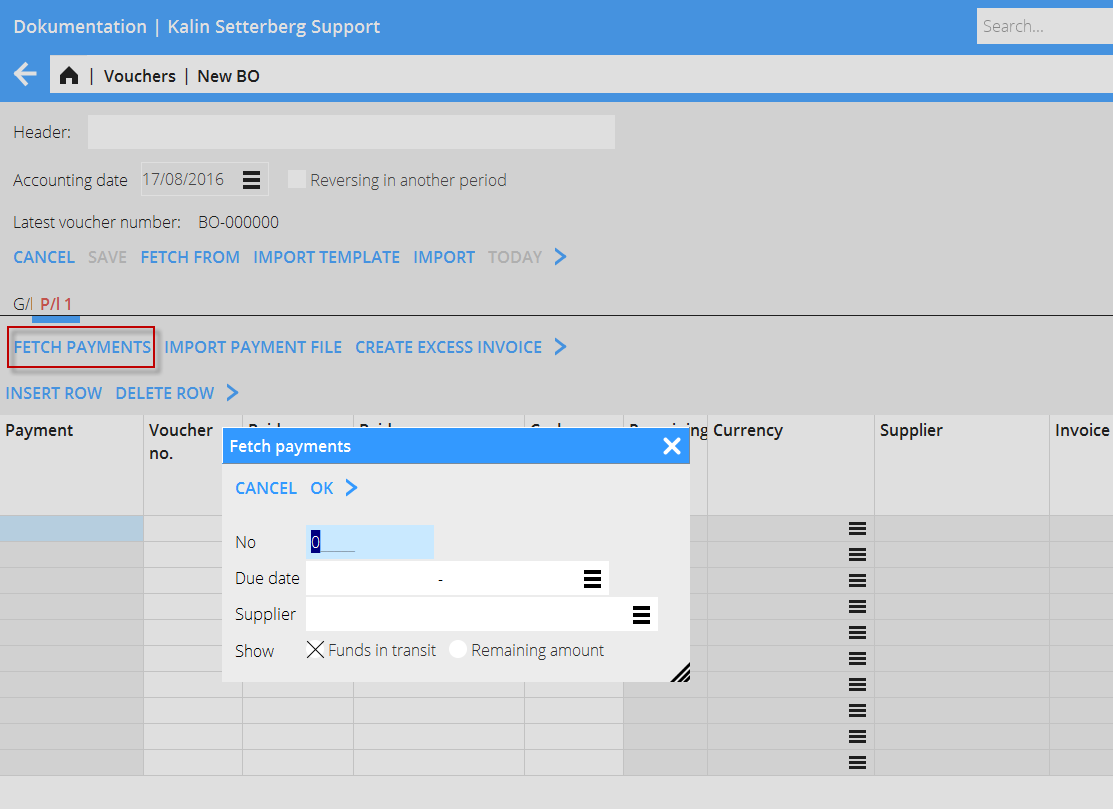
The account payable is assigned to the purchase ledger, which means that when you enter the account, the system creates a tab called PL followed by the tab number. Register the payments in the tab. Enter invoice number of the paid invoice or search a created payment with the function Fetch payments. Here you can search on payment number, date or supplier. You can also find invoices with residues. Ther e is also a function for importing a payment file.
The whole invoice amount is fetched into the table. If only a part of the invoice has been paid, write the paid amount over the amount in the Rec. amt (your currency) – field. If the payment is in a foreign currency this field is empty and you must write in the amount that the bank has sent. The currency discrepancy that might occur is automatically posted on an account defined for that (Base registers/SL/Parameters: Acc for currency rate profits and Acc for currency rate losses).
If a foreign invoice is partly paid, write the paid amount both in Rec. amt (your currency) and Rec. amt invoice currency. The remaining difference will be a residue and a possible rate discrepancy (if received amount in your currency divided with the rate doesn't correspond with the amount in the field Rec. amt Invoice, the difference will be a rate discrepancy).
After registration of the invoices, go back to the GL tab and enter an account for the payment (e.g. bank account). If you press the function Fill here, the remaining will be posted on the account.
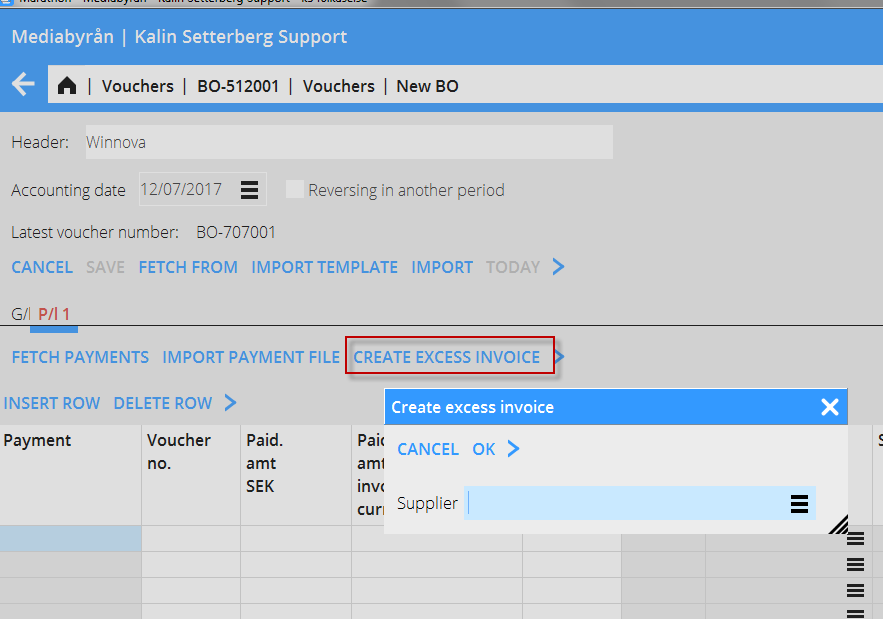
Create excess invoice
With this function, you can register a pre-paid amount in the purchase ledger directly, even when the supplier's invoice hasn't arrived yet. The payment gets an LA -number.
Enter supplier and an amount.
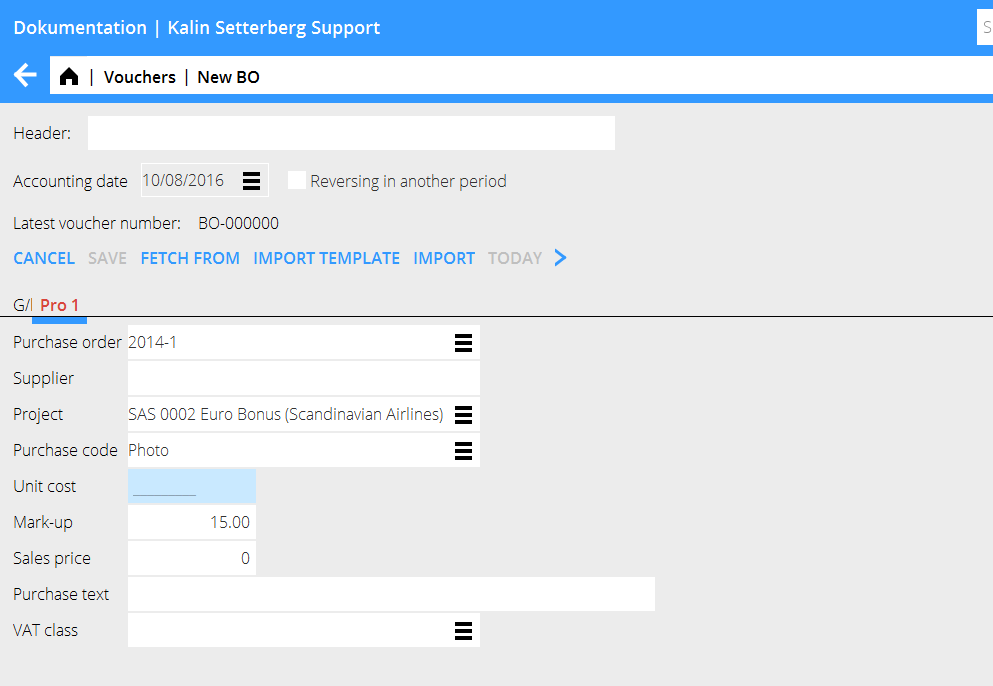
Enter project purchase
The account for project purchases is assigned to the project management, which means that when you enter the account, the system creates a tab called PRO followed by the tab number. Register purchases that shall be charged a project in the tab. Enter project, purchase code and a purchase price. The sales price is automatically calculated with the mark-up percentage that has been defined on the purchase code. In many cases the mark -up can be changed (there is a parameter setting for that option) if you want to change it. Write optional purchase text. If you have been using purchase orders at the project purchase, you can enter it here and the system will fetch all contents from it. Make the contrary posting in the tab GL.
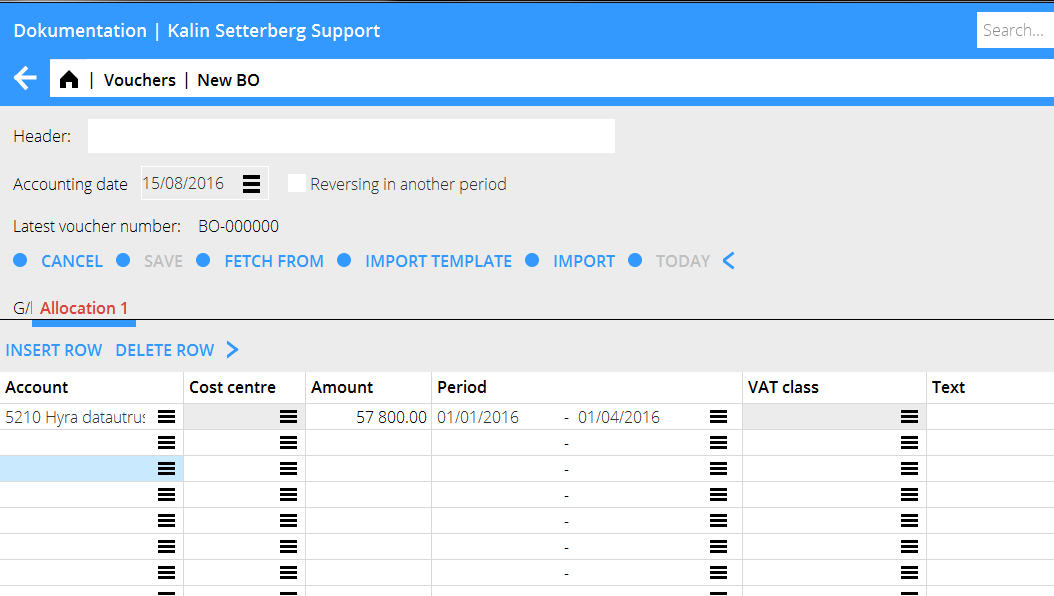
Enter periodical allocations
The account for accruals (periodical allocations) is assigned to periodical allocations, which means that when you enter the account, the system creates a tab called Allocations followed by the tab number. Enter the costs that shall be allocated over a certain period. Enter cost account, amount and the period for the allocation. You can enter the date in two different ways: MMYY– MMYY or DDMMYY. In the first case the amount is allocated evenly on all months, in the latter depending on how many days each month has. Make the contrary posting in the GL tab
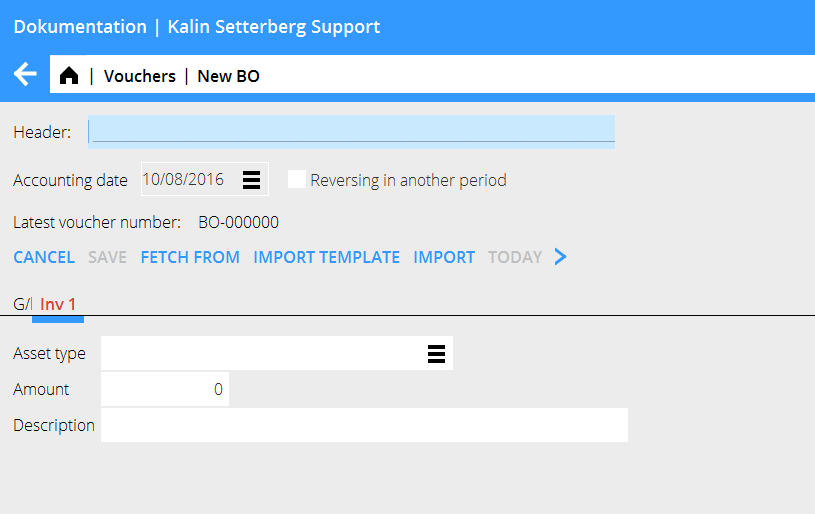
Enter assets (inventories)
The account for inventories is assigned to the inventory ledger, which means that when you enter the account, the system creates a tab called INV. If the acquisition account only is connected to one asset type, it will show automatically. If not, select asset type. Write amount and a possible description. Make the contrary posting in the GL tab.
Correct a voucher
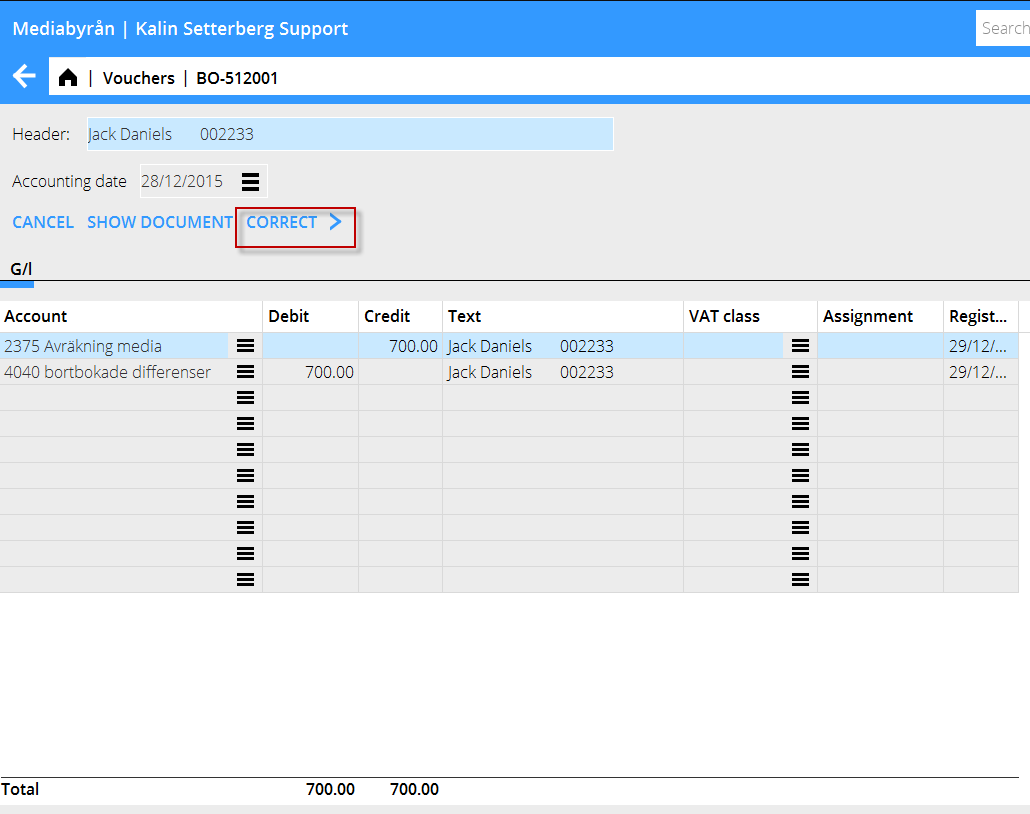
Select the voucher that you want to correct and press Open. Then press Correct.
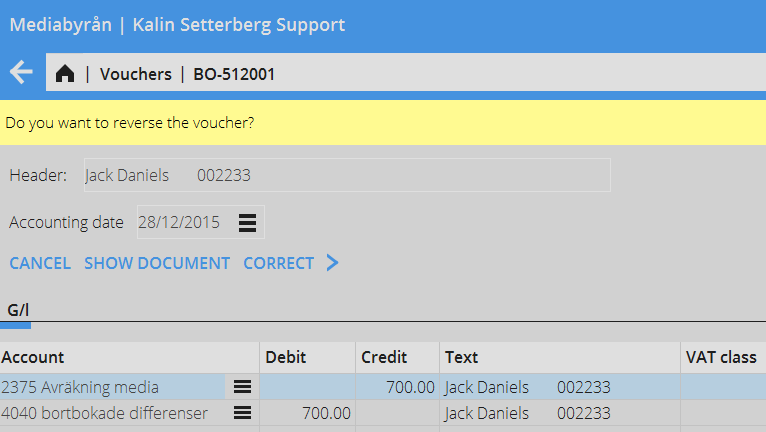
Marathon asks you if you want to reverse the voucher.
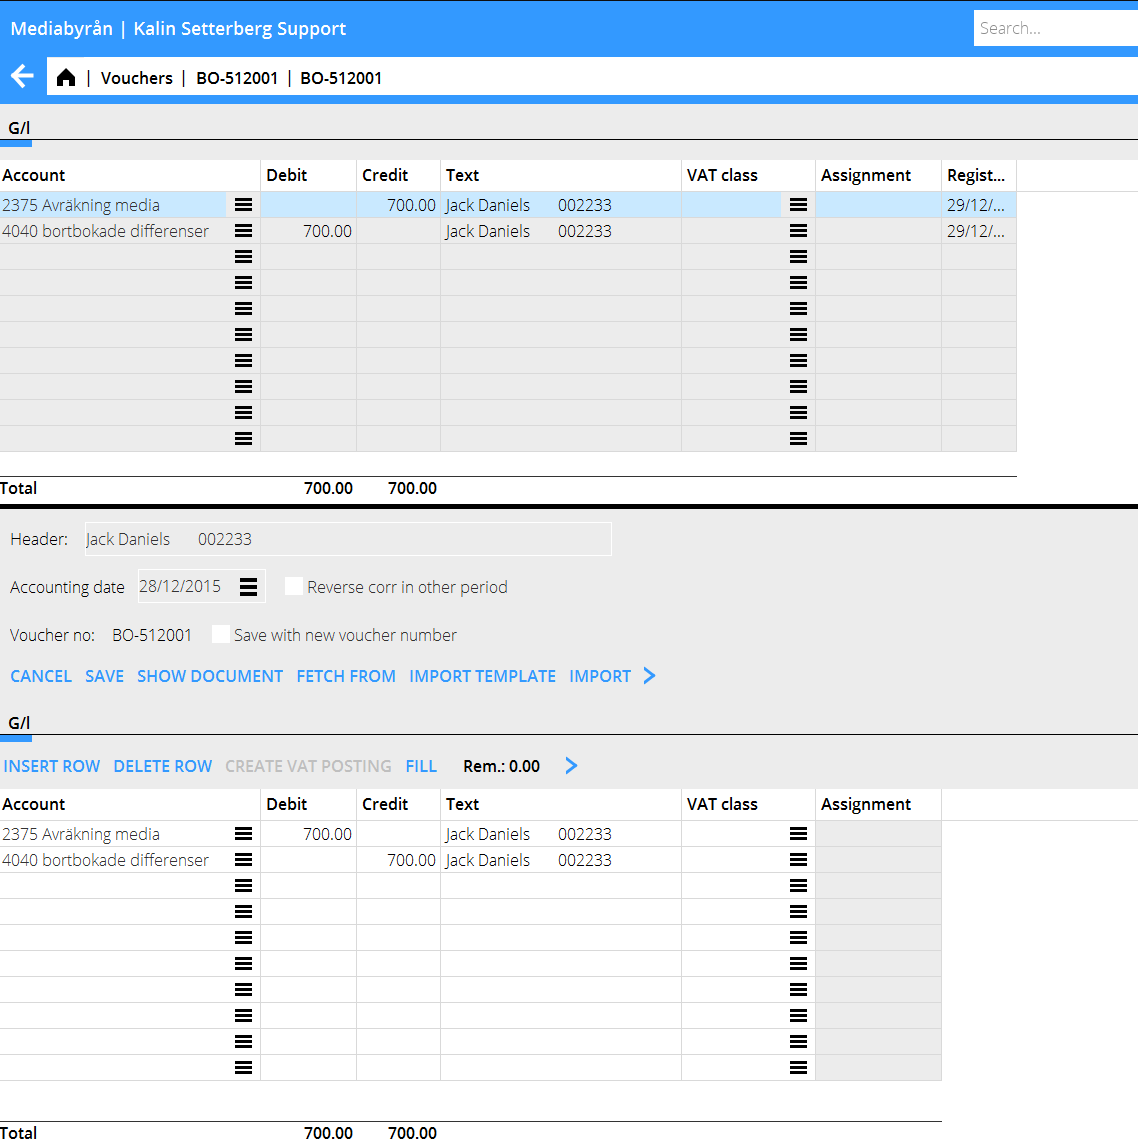
Click on Yes if you want to reverse the whole voucher. If you want to reverse the correction in another period, check the box Reverse corr in another period and select Reversing date at the top of the screeen.
The reversing can also be saved with the same date, but with a new voucher number. Use “Save withnew voucher number”.
Select No if the voucher shall be corrected and not reversed. Make the correction in the lower table. Also here you can reverse the correction in another period and/or save with the same date but a new voucher number.
