Difference between revisions of "Resource planning"
(Created page with "__FORCETOC__ <translate> == General == The resource planning is found in Backoffice/Project accounting and is used to plan the employees’ daily or weekly working time. {{...") |
|||
| (24 intermediate revisions by 2 users not shown) | |||
| Line 2: | Line 2: | ||
<translate> |
<translate> |
||
| − | == General == |
+ | == General == <!--T:1--> |
| + | <!--T:2--> |
||
| − | The resource planning is found in |
+ | The resource planning is found in Project: Resource planning and is used to plan the employees’ daily or weekly working time. |
| + | <!--T:3--> |
||
{{ExpandImage|PRO-RES-EN-Bild1.png}} |
{{ExpandImage|PRO-RES-EN-Bild1.png}} |
||
| + | <!--T:4--> |
||
Select colours for project types under the Cog wheel/Settings under the tab Project accounting: |
Select colours for project types under the Cog wheel/Settings under the tab Project accounting: |
||
| + | <!--T:6--> |
||
| ⚫ | |||
| ⚫ | |||
| − | |||
| ⚫ | |||
| + | <!--T:7--> |
||
{{ExpandImage|PRO-RES-EN-Bild3.png}} |
{{ExpandImage|PRO-RES-EN-Bild3.png}} |
||
| + | <!--T:8--> |
||
The planning can be made per group, staff category and working team. |
The planning can be made per group, staff category and working team. |
||
| − | + | These are connected with the employee in System: Base registers/PRO/Employee. |
|
| − | + | It is also possible to plan on client teams and to include additional employees to the selection. |
|
| + | <!--T:9--> |
||
{| class=mandeflist |
{| class=mandeflist |
||
|'''Group''' |
|'''Group''' |
||
| − | |Planning per group. Register group in Base registers/Pro/Groups and connect to employee in Base registers/Pro/Employees. |
+ | |Planning per group. Register group in System: Base registers/Pro/Groups and connect to employee in Base registers/Pro/Employees. |
|- |
|- |
||
|'''Staff category''' |
|'''Staff category''' |
||
| − | |Planning per staff category. Register in Base registers/Pro/Staff categories and connect to employee in Base registers/Pro/Employees |
+ | |Planning per staff category. Register in System: Base registers/Pro/Staff categories and connect to employee in Base registers/Pro/Employees. |
|- |
|- |
||
|'''Working team''' |
|'''Working team''' |
||
| − | |Planning per working team. Register in Base registers/Pro/Working teams and connect to employee in Base registers/Pro/Employees |
+ | |Planning per working team. Register in System: Base registers/Pro/Working teams and connect to employee in Base registers/Pro/Employees |
|- |
|- |
||
|'''Client team''' |
|'''Client team''' |
||
| − | |Planning per team. Team is stated on the client in Base registers/Pro/Clients/Projects – tab Team. |
+ | |Planning per team. Team is stated on the client in System: Base registers/Pro/Clients/Projects – tab Team. |
|- |
|- |
||
|'''Additional employee''' |
|'''Additional employee''' |
||
|Possibility to add employees to the selection. |
|Possibility to add employees to the selection. |
||
|- |
|- |
||
| + | |'''Favourites''' |
||
| − | |'''F{{ExpandImage|PRO-RES-EN-gen-bmc7YmFzZTY0LGlWQk9SdzBL22c3.png}}avourites''' |
||
|If you only want the list to show your favourites, click on the far left column. Shift between favourites and all by clicking on the column header. |
|If you only want the list to show your favourites, click on the far left column. Shift between favourites and all by clicking on the column header. |
||
|} |
|} |
||
| − | == To plan resources == |
+ | == To plan resources == <!--T:10--> |
| + | <!--T:11--> |
||
You can plan time per week or per day. Double click on an employee’s day or select the day in the chart and click Open. |
You can plan time per week or per day. Double click on an employee’s day or select the day in the chart and click Open. |
||
| + | <!--T:12--> |
||
{{ExpandImage|PRO-RES-EN-Bild4.png}} |
{{ExpandImage|PRO-RES-EN-Bild4.png}} |
||
| + | <!--T:13--> |
||
If you are planning per week, enter all hours on Monday. When you select itemization level “Week”, you will have the overview of the week. |
If you are planning per week, enter all hours on Monday. When you select itemization level “Week”, you will have the overview of the week. |
||
| + | <!--T:14--> |
||
Enter project -id, comment, estimated hours and job code. All fields are not mandatory. Click OK to save and CANCEL to cancel your planning. |
Enter project -id, comment, estimated hours and job code. All fields are not mandatory. Click OK to save and CANCEL to cancel your planning. |
||
| − | == To allocate resources == |
+ | == To allocate resources == <!--T:15--> |
| + | <!--T:16--> |
||
Select one or several employees. Select day or an interval of days for the allocation. Click ALLOCATE. |
Select one or several employees. Select day or an interval of days for the allocation. Click ALLOCATE. |
||
| + | <!--T:17--> |
||
{{ExpandImage|PRO-RES-EN-Bild5.png}} |
{{ExpandImage|PRO-RES-EN-Bild5.png}} |
||
| + | <!--T:18--> |
||
{| class=mandeflist |
{| class=mandeflist |
||
|'''Whole amount…''' |
|'''Whole amount…''' |
||
| Line 70: | Line 82: | ||
|} |
|} |
||
| ⚫ | |||
| − | == == |
||
| − | |||
| ⚫ | |||
| + | <!--T:20--> |
||
Right click on a planned day (Ctrl + mouse click on Macs). You can also select several days to edit at the same time. |
Right click on a planned day (Ctrl + mouse click on Macs). You can also select several days to edit at the same time. |
||
| ⚫ | |||
| + | <!--T:21--> |
||
| ⚫ | |||
| + | |||
| + | <!--T:22--> |
||
{| class=mandeflist |
{| class=mandeflist |
||
|'''Copy''' |
|'''Copy''' |
||
| Line 94: | Line 108: | ||
|} |
|} |
||
| − | == Other functions == |
+ | == Other functions == <!--T:23--> |
| + | <!--T:24--> |
||
{| class=mandeflist |
{| class=mandeflist |
||
|'''Arrows''' |
|'''Arrows''' |
||
| Line 104: | Line 119: | ||
|} |
|} |
||
| + | <!--T:25--> |
||
{{ExpandImage|PRO-RES-EN-Bild7.png}} |
{{ExpandImage|PRO-RES-EN-Bild7.png}} |
||
| + | <!--T:26--> |
||
{| class=mandeflist |
{| class=mandeflist |
||
|'''Export''' |
|'''Export''' |
||
| − | | |
+ | |Click EXPORT if you want to print out the planning to Excel. The printout shows the actual view of the screen. The planned time and hours from the calendar is written under each employee. If the planned hours exceeds the calendar hours, the amount is written in red. |
| + | |} |
||
| + | |||
| + | <!--T:27--> |
||
| ⚫ | |||
| + | |||
| + | <!--T:28--> |
||
| + | {| class=mandeflist |
||
|- |
|- |
||
|'''Undo''' |
|'''Undo''' |
||
| Line 114: | Line 138: | ||
|} |
|} |
||
| ⚫ | |||
| − | == == |
||
| − | |||
| − | == == |
||
| − | |||
| − | == == |
||
| − | |||
| ⚫ | |||
| + | <!--T:30--> |
||
{| class=mandeflist |
{| class=mandeflist |
||
|'''Planned time''' |
|'''Planned time''' |
||
| Line 127: | Line 146: | ||
|- |
|- |
||
|'''Used time''' |
|'''Used time''' |
||
| − | |If selected, the list shows the reported time from |
+ | |If selected, the list shows the reported time from Time reporting. |
|- |
|- |
||
|'''Empty rows''' |
|'''Empty rows''' |
||
| Line 133: | Line 152: | ||
|- |
|- |
||
|'''Sums''' |
|'''Sums''' |
||
| − | | |
+ | |Summarises the day’s planned time. |
|- |
|- |
||
|'''Do not sort''' |
|'''Do not sort''' |
||
| Line 139: | Line 158: | ||
|} |
|} |
||
| − | == Selection– Details == |
+ | == Selection– Details == <!--T:31--> |
| + | <!--T:32--> |
||
{| class=mandeflist |
{| class=mandeflist |
||
|'''Details''' |
|'''Details''' |
||
| Line 149: | Line 169: | ||
|- |
|- |
||
|'''Available resources''' |
|'''Available resources''' |
||
| − | |Colour settings can be made in FUNCTIONS the upper left corner; select SETTINGS and then Project accounting. Select rates of utilization for the different colours. In the example below, red colour indicates that |
+ | |Colour settings can be made in FUNCTIONS the upper left corner; select SETTINGS and then Project accounting. Select rates of utilization for the different colours. In the example below, red colour indicates that the person is fully booked; green indicates that there is some time left and white that there is no planned time at all. If there is only a little time left for planning, the TOTAL- column will be yellow. |
|} |
|} |
||
| + | <!--T:33--> |
||
{{ExpandImage|PRO-RES-EN-Bild9.png}} |
{{ExpandImage|PRO-RES-EN-Bild9.png}} |
||
| − | == List == |
+ | == List == <!--T:34--> |
| + | <!--T:35--> |
||
| − | If you select ''List''instead of overview, the program shows a list per project; what is planned and what has been registered. You can select type of project: You can deepen on date, employee, code, project or details. You can also deepen on a certain record, just click on a row to see details. |
+ | If you select ''List'' instead of overview, the program shows a list per project; what is planned and what has been registered. You can select type of project: You can deepen on date, employee, code, project or details. You can also deepen on a certain record, just click on a row to see details. |
| ⚫ | |||
| + | <!--T:36--> |
||
| ⚫ | |||
| + | |||
| + | <!--T:37--> |
||
{| class=mandeflist |
{| class=mandeflist |
||
|'''Delete''' |
|'''Delete''' |
||
| − | |On |
+ | |On itemisation level “List”, deepening on “Details”, the Delete-button is activated. Select one or several rows (press Ctrl-key and select rows) and click on DELETE. |
|- |
|- |
||
|'''Project''' |
|'''Project''' |
||
| Line 167: | Line 192: | ||
|} |
|} |
||
| − | == Move == |
+ | == Move == <!--T:38--> |
| + | <!--T:39--> |
||
The function is used for moving hours on project – or employee level to other days. Select periods in the date fields (from –to). |
The function is used for moving hours on project – or employee level to other days. Select periods in the date fields (from –to). |
||
The period determines the first moving date and also limits amount of hours that can be moved. |
The period determines the first moving date and also limits amount of hours that can be moved. |
||
| + | <!--T:40--> |
||
Select deepening Project or Employee. Then, select project or person and click on Move. You will see a list of planned time for the project/person you’ve chosen. |
Select deepening Project or Employee. Then, select project or person and click on Move. You will see a list of planned time for the project/person you’ve chosen. |
||
| + | <!--T:41--> |
||
State how many working days the hours will be moved ahead. You can also write a date in the field To (start date). The columns New date and Left after moving are updated after each moving. |
State how many working days the hours will be moved ahead. You can also write a date in the field To (start date). The columns New date and Left after moving are updated after each moving. |
||
| + | <!--T:42--> |
||
New date shows the day of the planned move. |
New date shows the day of the planned move. |
||
| + | <!--T:43--> |
||
Left after moving shows the day after the move has been done. |
Left after moving shows the day after the move has been done. |
||
| + | <!--T:44--> |
||
Confirm by saving. Note, that a move cannot be undone. |
Confirm by saving. Note, that a move cannot be undone. |
||
| − | == |
+ | == Time reporting == <!--T:45--> |
| + | <!--T:46--> |
||
You can import project, comments and hours from the resource planning into the day report. Click the button IMPORT FROM RESOURCE PLANNING. |
You can import project, comments and hours from the resource planning into the day report. Click the button IMPORT FROM RESOURCE PLANNING. |
||
| + | <!--T:47--> |
||
{{ExpandImage|PRO-RES-EN-Bild11.png}} |
{{ExpandImage|PRO-RES-EN-Bild11.png}} |
||
| + | <!--T:48--> |
||
Click on RESOURCE PLANNING to see a weekly overview of your planned time. |
Click on RESOURCE PLANNING to see a weekly overview of your planned time. |
||
| − | + | If you click the box REPORTED, you can compare your planned and used time. |
|
| + | <!--T:49--> |
||
| − | + | {{ExpandImage|PRO-RES-EN-Bild12.png}} |
|
| + | == Project: Queries == <!--T:50--> |
||
| − | == Client and project == |
||
| + | <!--T:51--> |
||
| − | If the parameter ”Show resource planned in project analysis” is checked (in Base register/Pro/Parameters/Clients and projects), two columns are shown in the project analysis view: Planned 1 and WIP 2. |
+ | If the parameter ”Show resource planned in project analysis” is checked (in System: Base register/Pro/Parameters/Clients and projects), two columns are shown in the project analysis view: Planned 1 and WIP 2. |
| + | <!--T:52--> |
||
Planned shows sales price fees for all future time that has been planned on the project and WIP 2 shows WIP+ Planned. |
Planned shows sales price fees for all future time that has been planned on the project and WIP 2 shows WIP+ Planned. |
||
| + | <!--T:53--> |
||
{{ExpandImage|PRO-RES-EN-grafik16.png}} |
{{ExpandImage|PRO-RES-EN-grafik16.png}} |
||
| + | <!--T:54--> |
||
| − | A project’s resource planning is shown in |
+ | A project’s resource planning is shown in Project: Questions/Project, under the tab FEES. The list shows the planned time and the time so far reported on the project. You can select a time interval and sort the list per employee, code, date or details. You can also use quick search. |
| + | <!--T:55--> |
||
{{ExpandImage|PRO-RES-EN-grafik8.png}} |
{{ExpandImage|PRO-RES-EN-grafik8.png}} |
||
| − | == Reports == |
+ | == Reports == <!--T:56--> |
| − | |||
| ⚫ | |||
| + | <!--T:57--> |
||
| − | {{ExpandImage|PRO-RES-EN-grafik15.jpg}} |
||
| ⚫ | |||
| + | <!--T:59--> |
||
| − | [[Category:PRO-RES-EN]] |
||
| + | [[Category:PRO-RES-EN]] [[Category:Manuals]] [[Category:Projects]] |
||
</translate> |
</translate> |
||
Latest revision as of 14:36, 17 December 2018
Contents
General
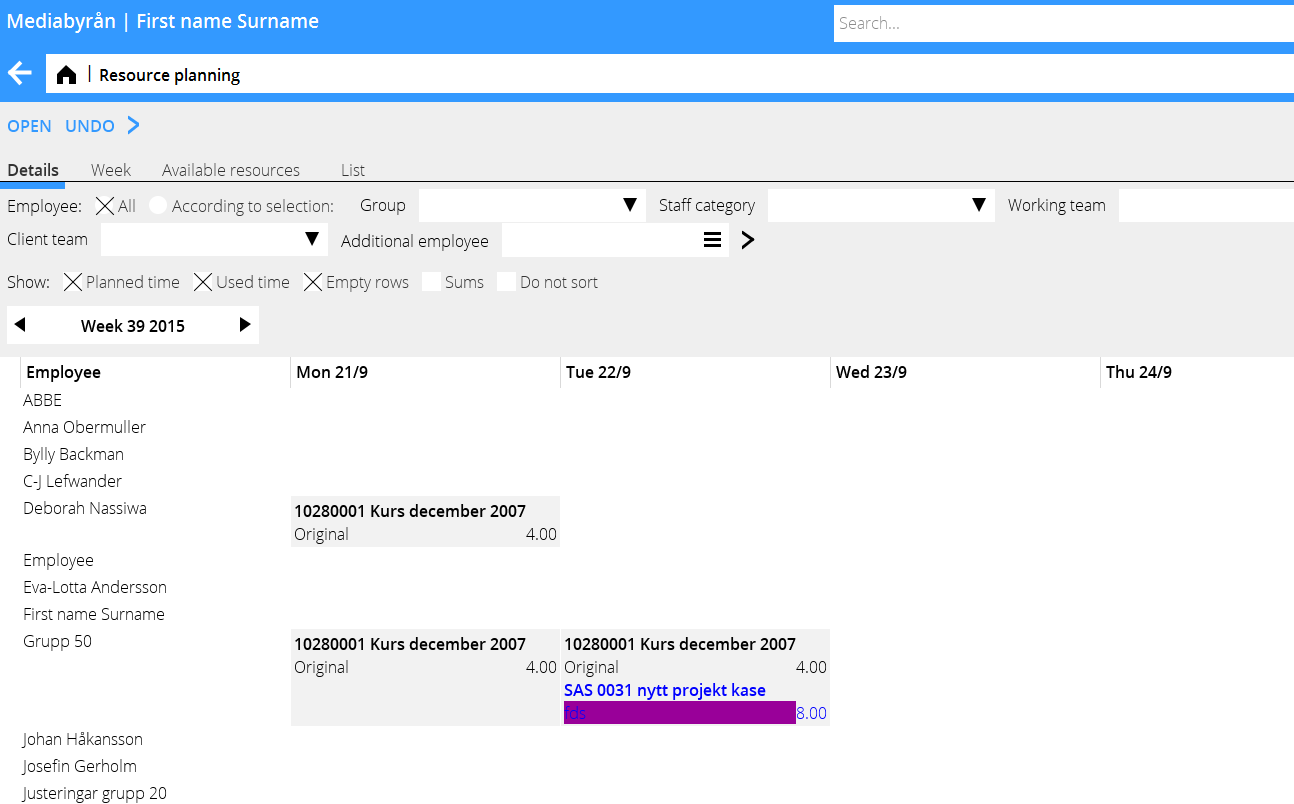
The resource planning is found in Project: Resource planning and is used to plan the employees’ daily or weekly working time.
Select colours for project types under the Cog wheel/Settings under the tab Project accounting:
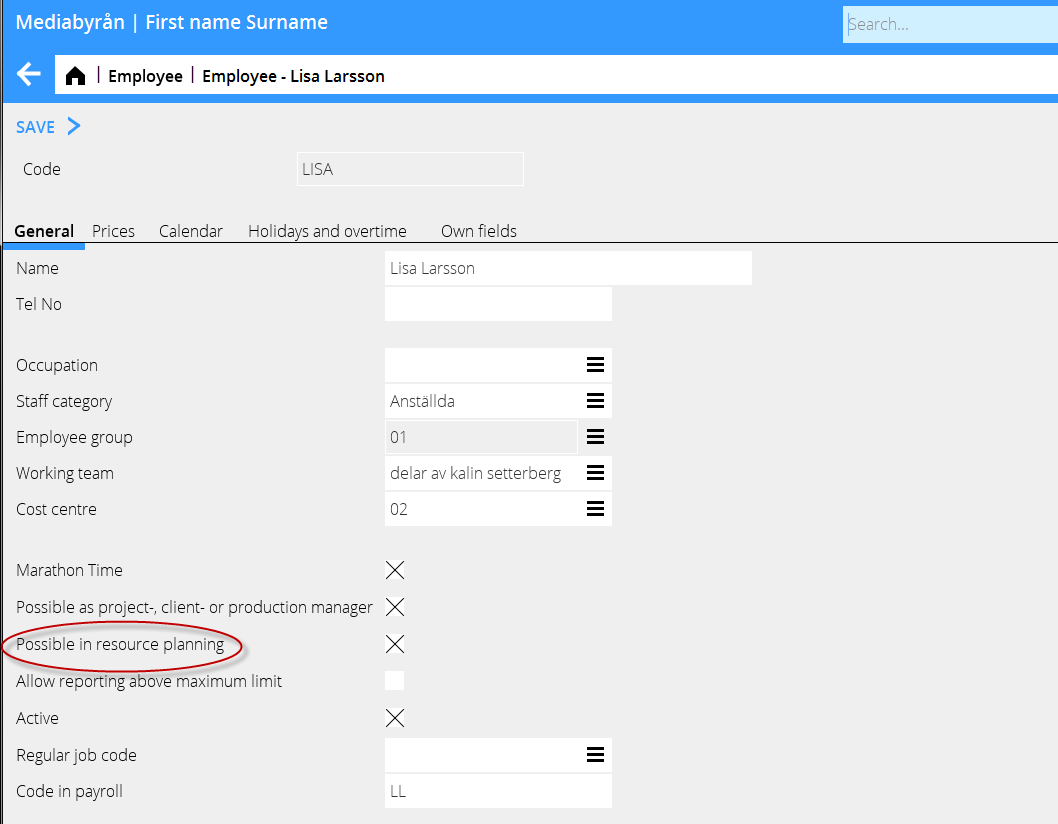
Choose the employees that shall be selectable in the resource planning program in System: Base registers/Pro/Employees.
The planning can be made per group, staff category and working team. These are connected with the employee in System: Base registers/PRO/Employee. It is also possible to plan on client teams and to include additional employees to the selection.
| Group | Planning per group. Register group in System: Base registers/Pro/Groups and connect to employee in Base registers/Pro/Employees. |
| Staff category | Planning per staff category. Register in System: Base registers/Pro/Staff categories and connect to employee in Base registers/Pro/Employees. |
| Working team | Planning per working team. Register in System: Base registers/Pro/Working teams and connect to employee in Base registers/Pro/Employees |
| Client team | Planning per team. Team is stated on the client in System: Base registers/Pro/Clients/Projects – tab Team. |
| Additional employee | Possibility to add employees to the selection. |
| Favourites | If you only want the list to show your favourites, click on the far left column. Shift between favourites and all by clicking on the column header. |
To plan resources
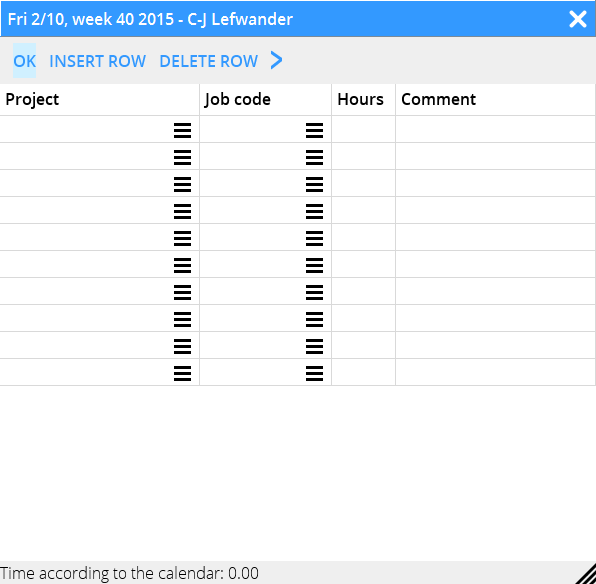
You can plan time per week or per day. Double click on an employee’s day or select the day in the chart and click Open.
If you are planning per week, enter all hours on Monday. When you select itemization level “Week”, you will have the overview of the week.
Enter project -id, comment, estimated hours and job code. All fields are not mandatory. Click OK to save and CANCEL to cancel your planning.
To allocate resources
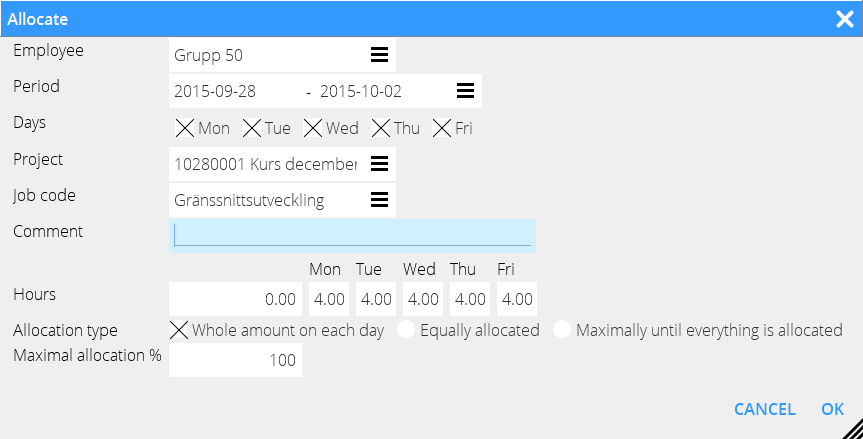
Select one or several employees. Select day or an interval of days for the allocation. Click ALLOCATE.
| Whole amount… | The amount of hours written in the hours-field will be allocated to all selected days and all selected employees. |
| Equally allocated | The hours written in the hours-field will be divided and equally allocated between the selected days and employees. |
| Maximally until all… | The hours written in the hours-field will be allocated to the employees in alphabetical order. |
| Maximal allocation % | Percentage of hours regarding Equally allocated and Max allocated. Useful e.g. when an employee shall work a part of a day with a project. |
To edit planned days
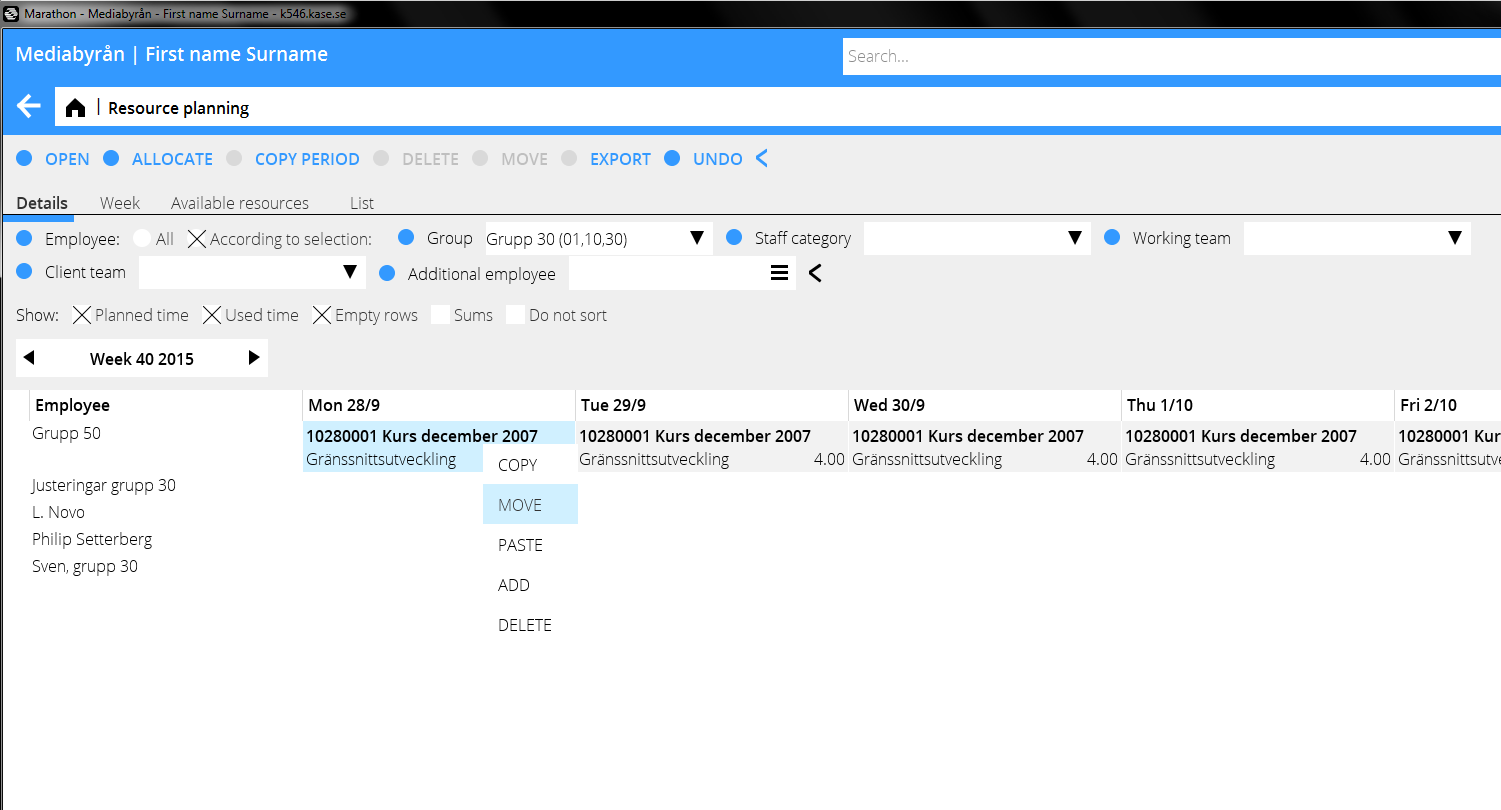
Right click on a planned day (Ctrl + mouse click on Macs). You can also select several days to edit at the same time.
| Copy | It is possible to copy a planned day or employee. |
| Move | The selected day can be moved/pasted into another date or employee. |
| Paste | Paste the copied day to another day or another employee. It replaces earlier information. Before pasting, you will have a question if you want to replace existing information. |
| Add | A copied or moved day can be pasted into the selected day without replacing existing information. The new information will be added to the existing. |
| Delete | All information in the selected day will be deleted. |
Other functions
| Arrows | Move between weeks with the arrows. |
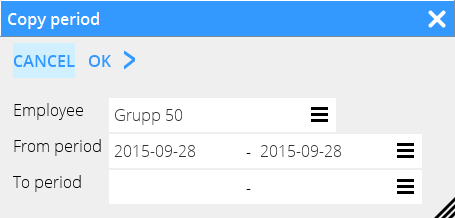
| Copy period | This function enables copying of selected employee(s) and period to another period. |
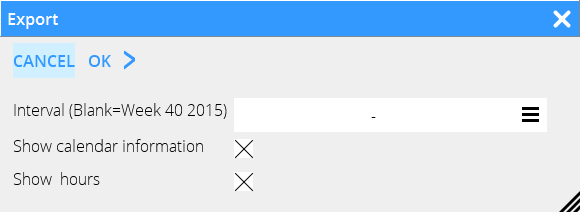
| Export | Click EXPORT if you want to print out the planning to Excel. The printout shows the actual view of the screen. The planned time and hours from the calendar is written under each employee. If the planned hours exceeds the calendar hours, the amount is written in red. |
| Undo | This function undoes your last input. |
Selection – Show
| Planned time | If selected, the list shows the planned time from the resource planning. |
| Used time | If selected, the list shows the reported time from Time reporting. |
| Empty rows | If you want to see all rows, even those without planned time, tick Empty rows. |
| Sums | Summarises the day’s planned time. |
| Do not sort | Select/deselect for sorting in alphabetical order. |
Selection– Details
| Details | This selection shows a weekly resource planning per day and employee. |
| Week | Shows the planned time per week |
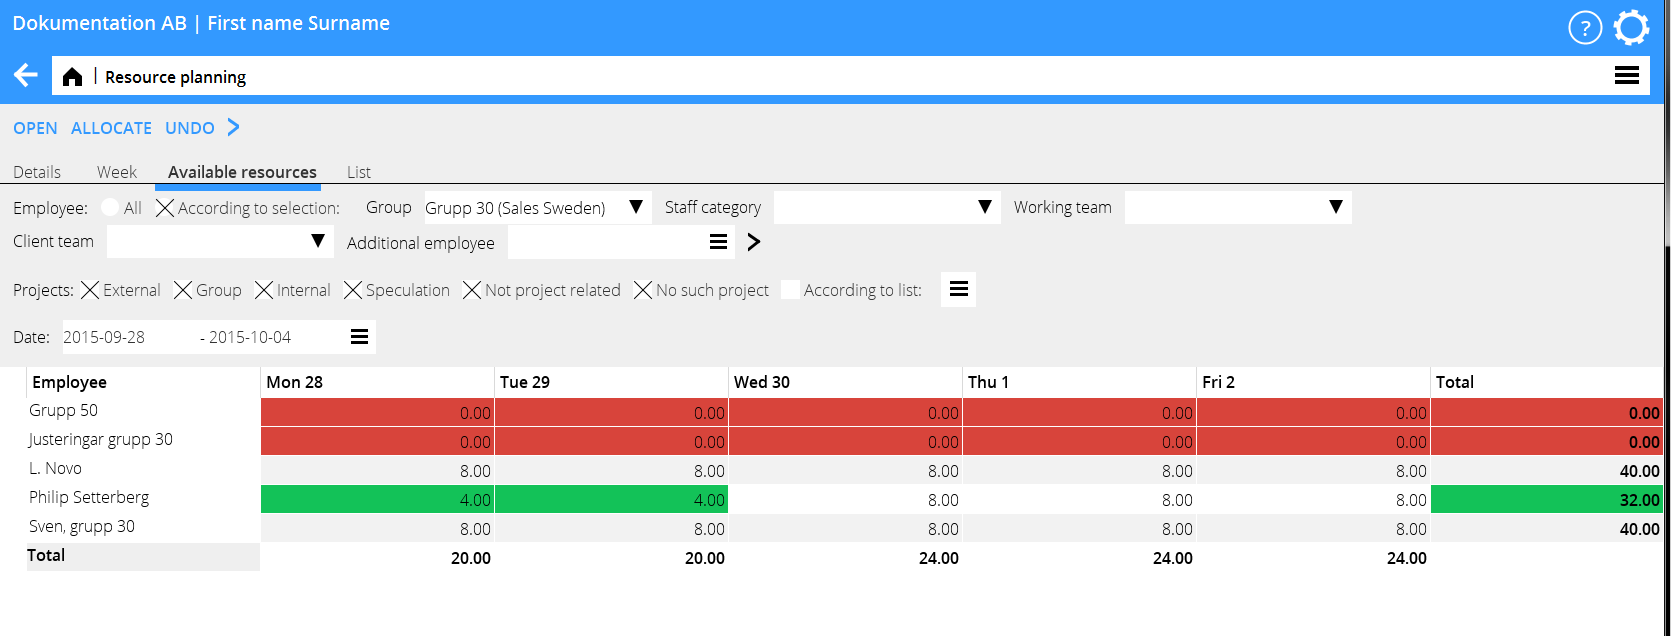
| Available resources | Colour settings can be made in FUNCTIONS the upper left corner; select SETTINGS and then Project accounting. Select rates of utilization for the different colours. In the example below, red colour indicates that the person is fully booked; green indicates that there is some time left and white that there is no planned time at all. If there is only a little time left for planning, the TOTAL- column will be yellow. |
List
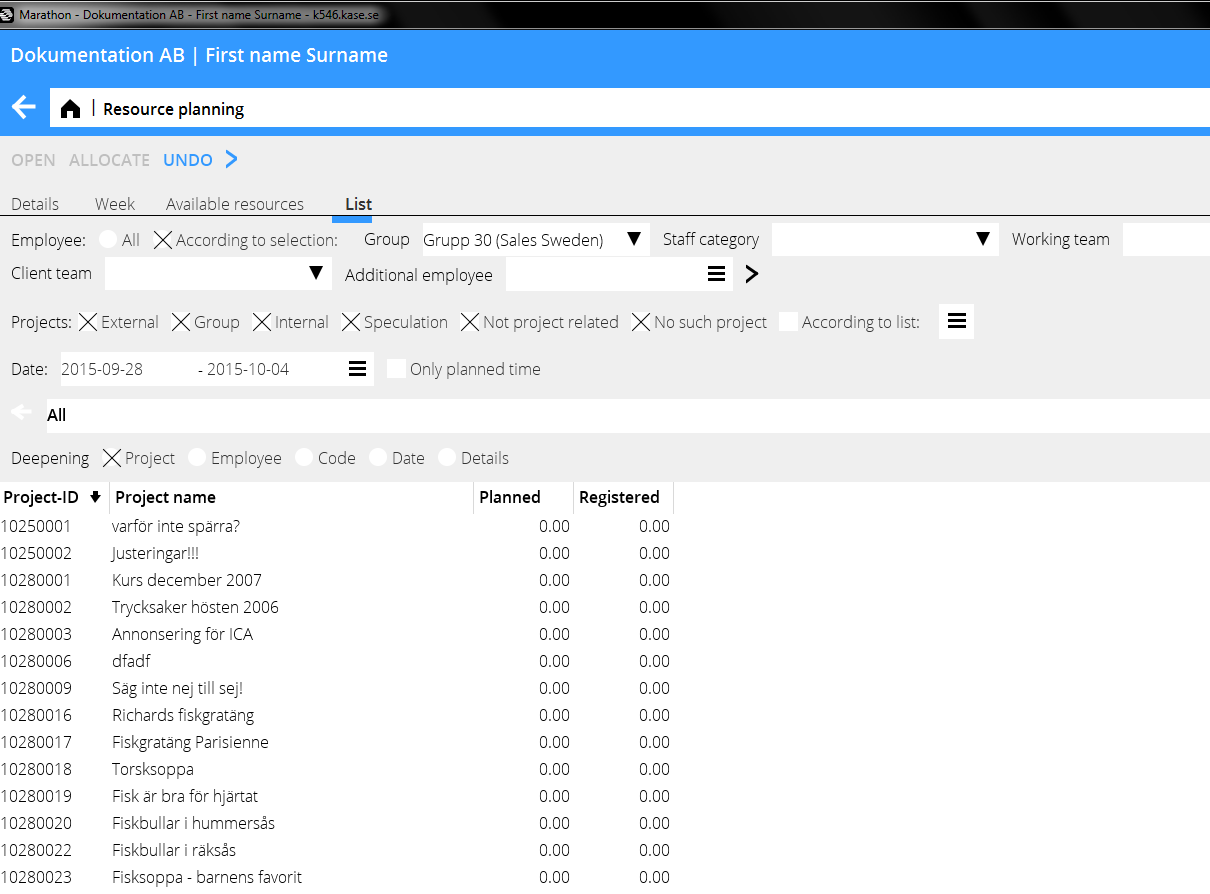
If you select List instead of overview, the program shows a list per project; what is planned and what has been registered. You can select type of project: You can deepen on date, employee, code, project or details. You can also deepen on a certain record, just click on a row to see details.
| Delete | On itemisation level “List”, deepening on “Details”, the Delete-button is activated. Select one or several rows (press Ctrl-key and select rows) and click on DELETE. |
| Project | Selection “All” shows all projects. “External” projects are E, G and J (external, group and speculations). “No spec” shows all except speculations. “According to list” opens a project list where you can select projects. |
Move
The function is used for moving hours on project – or employee level to other days. Select periods in the date fields (from –to). The period determines the first moving date and also limits amount of hours that can be moved.
Select deepening Project or Employee. Then, select project or person and click on Move. You will see a list of planned time for the project/person you’ve chosen.
State how many working days the hours will be moved ahead. You can also write a date in the field To (start date). The columns New date and Left after moving are updated after each moving.
New date shows the day of the planned move.
Left after moving shows the day after the move has been done.
Confirm by saving. Note, that a move cannot be undone.
Time reporting
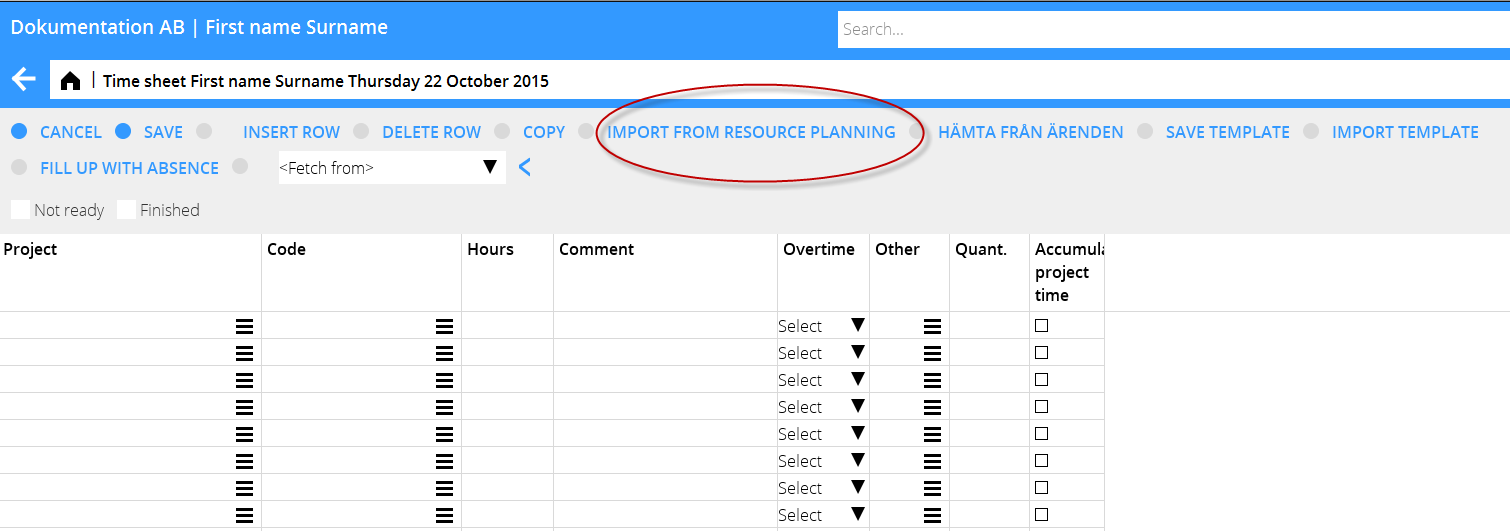
You can import project, comments and hours from the resource planning into the day report. Click the button IMPORT FROM RESOURCE PLANNING.
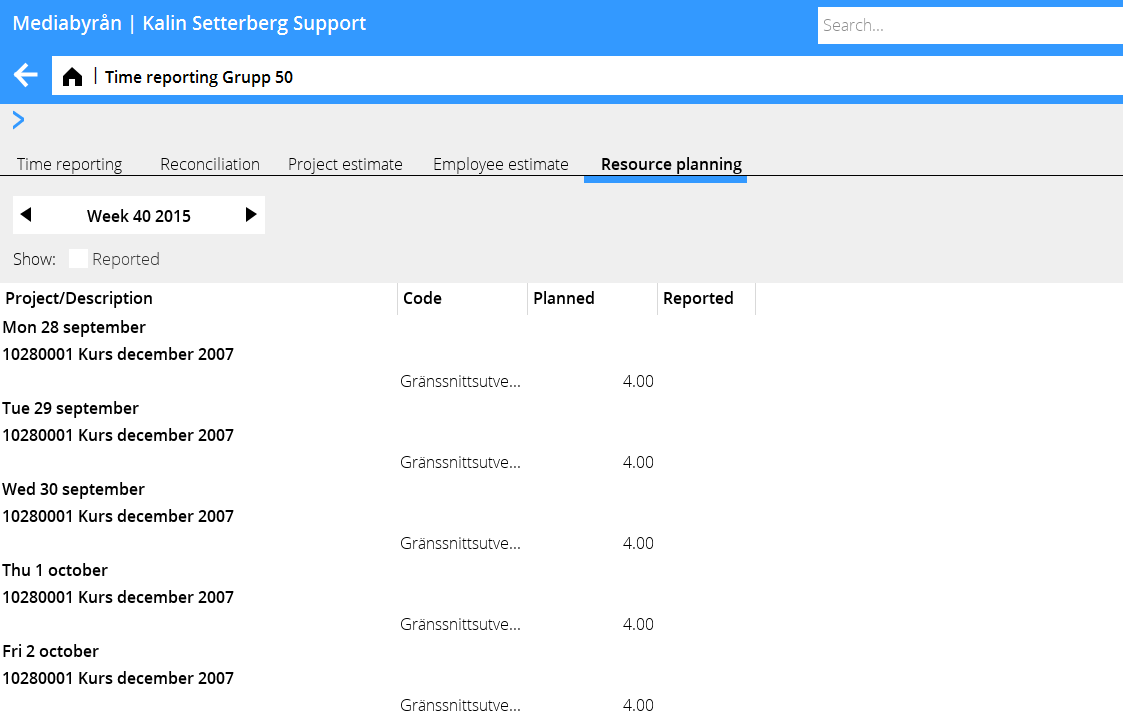
Click on RESOURCE PLANNING to see a weekly overview of your planned time. If you click the box REPORTED, you can compare your planned and used time.
Project: Queries
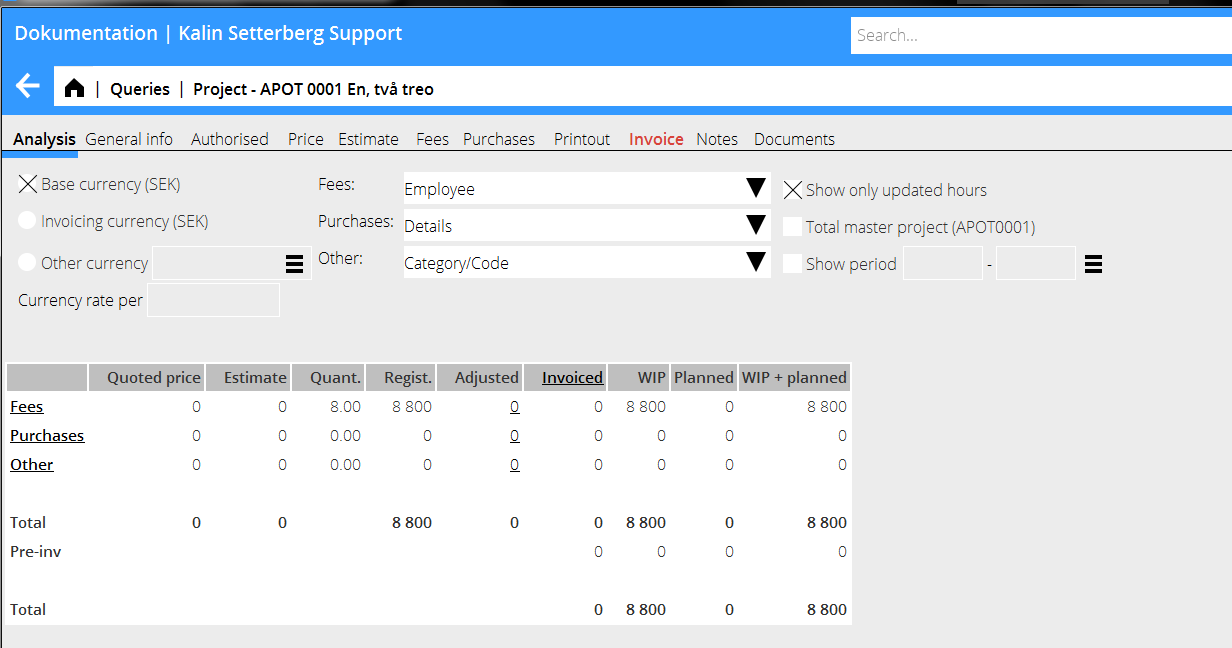
If the parameter ”Show resource planned in project analysis” is checked (in System: Base register/Pro/Parameters/Clients and projects), two columns are shown in the project analysis view: Planned 1 and WIP 2.
Planned shows sales price fees for all future time that has been planned on the project and WIP 2 shows WIP+ Planned.
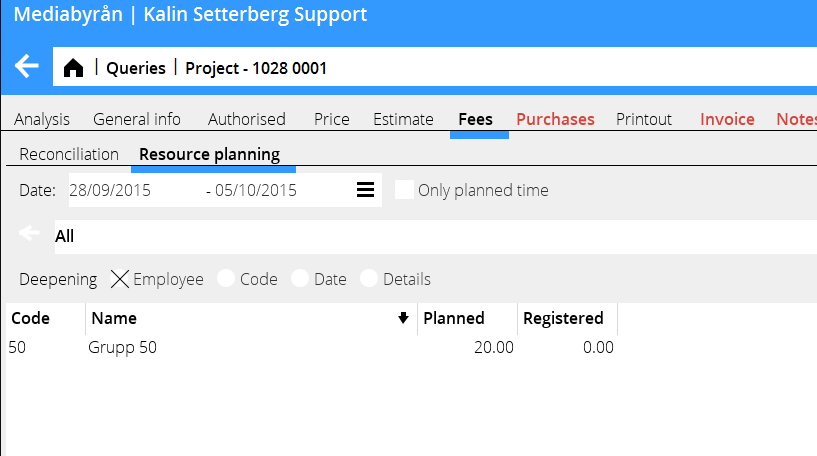
A project’s resource planning is shown in Project: Questions/Project, under the tab FEES. The list shows the planned time and the time so far reported on the project. You can select a time interval and sort the list per employee, code, date or details. You can also use quick search.
Reports
You can activate the data definition “Resource planned time” in Reports and use it as a column in your reports.
