Difference between revisions of "Invoicing/sv"
(Created page with "=== Utskrift faktura ===") |
(Created page with "När omfattningen och texten är färdigställda väljs Spara för att komma till fliken Fakturor. Markera fakturan och välj Utskrift. Flera fakturor kan markeras (med hjälp...") |
||
| Line 76: | Line 76: | ||
=== Utskrift faktura === |
=== Utskrift faktura === |
||
| + | När omfattningen och texten är färdigställda väljs Spara för att komma till fliken Fakturor. Markera fakturan och välj Utskrift. |
||
| − | Save the invoice when the text and the invoice content are ready. Saving takes you to the Invoice tab. Select Printout. You can select several invoices (by pressing down the Ctrl key while selecting and print them out at one time |
||
| + | Flera fakturor kan markeras (med hjälp av Ctrl-tangenten) och skrivas ut samtidigt. |
||
{{ExpandImage|PRO-IN-EN-grafik7.png}} |
{{ExpandImage|PRO-IN-EN-grafik7.png}} |
||
Revision as of 09:27, 28 July 2015
Contents
Förberedelser
Kontrollera i avprickningslistan i Backoffice/Projektredovisning/Avprickning tid att alla har tidrapporterat. Uppdatera Arvode, Inköp och Övrigt i Backoffice/Projektredovisning/Uppdatera.
Skapa faktura
Faktureringsproceduren ser lite olika ut beroende på vilken typ av faktura som avses och om fakturafliken i Kund och Projekt används eller inte (se separata avsnitt). En faktura består av en fakturatext och en omfattning, dessa måste stämma överens för att fakturan ska kunna skriva ut.
Skapa faktura där fakturatext finns
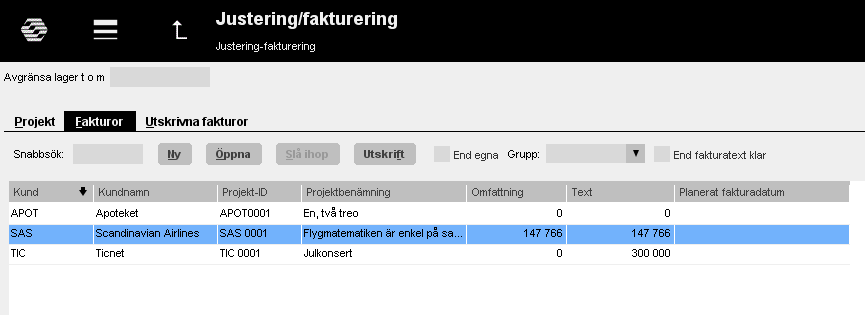
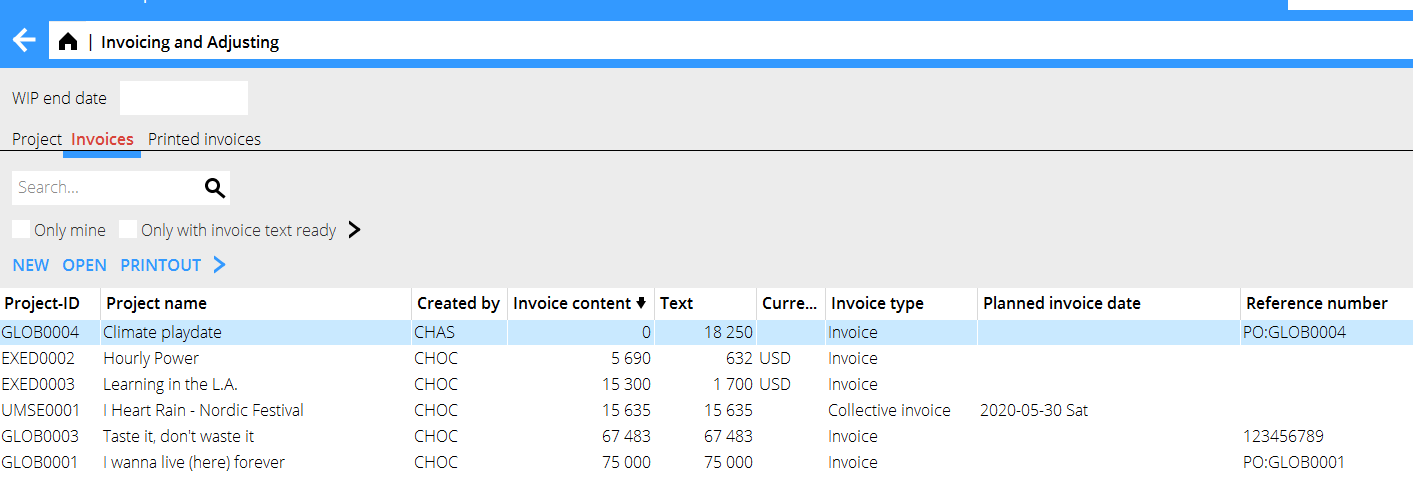
Faktureringen sker i Backoffice/Projektredovisning/Justering/Fakturering. Fliken Fakturor lyser rött när det finns en eller flera fakturatexter skapade i Kund och Projekt, och om det finns outskrivna fakturor på ett projekt.
Gå in på fliken Fakturor, markera en faktura och välj Öppna.
Omfattning
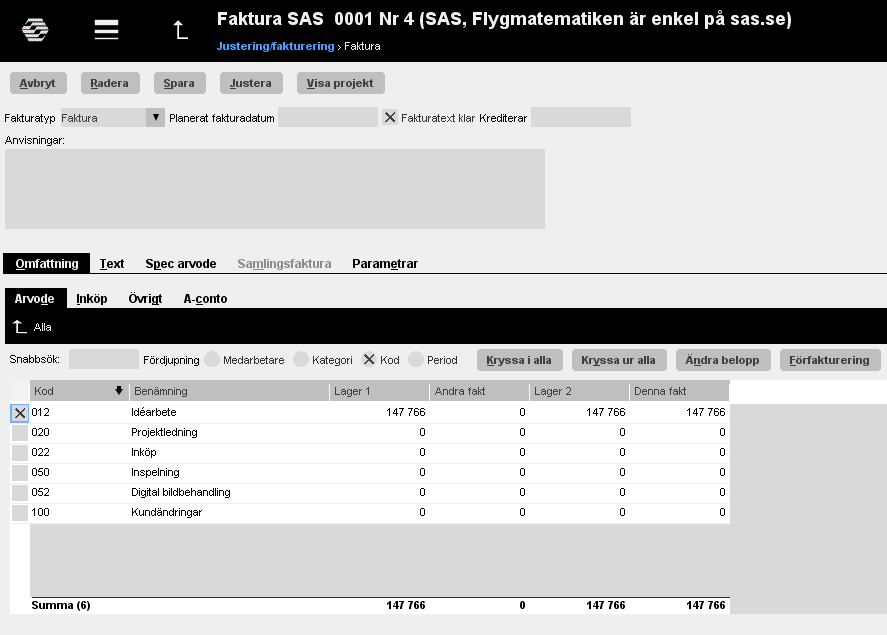
fliken Omfattning visas vad som finns i lager. Omfattningen är uppdelad på Arvode, Inköp, Övrigt och A-conto. Kryssa i de rader som ska ingå i fakturan. Hela lagerbeloppet på den raden flyttas då till rutan Denna fakt. Om inte allt ska faktureras finns det möjlighet att delfakturera genom att markera raden och trycka på Ändra belopp. Fyll i det belopp som ska faktureras. Möjlighet att fördjupa sig på medarbetare, kategori, kod och period finns.
| Kryssa i alla | Kryssar i alla fakturarader, och flyttar beloppen till rutan Denna fakt |
| Kryssa ur alla | Kryssar ur alla fakturarader |
| Ändra belopp | Spara kvar belopp i lager genom att sänka beloppet. Ange det belopp som ska faktureras, återstående belopp ligger kvar i lager. |
| Förfakturering | Används enbart om s.k. förfakturering tillåts (parameterinställning). Ange förfaktureringskoden (om den inte är förinställd) och belopp som ska faktureras. |
Justering
Eventuella justeringar görs av det upparbetade lagret för att få lagernivåerna att stämma med det som ska faktureras. En nedskrivning alternativt uppskrivning av lagret görs.
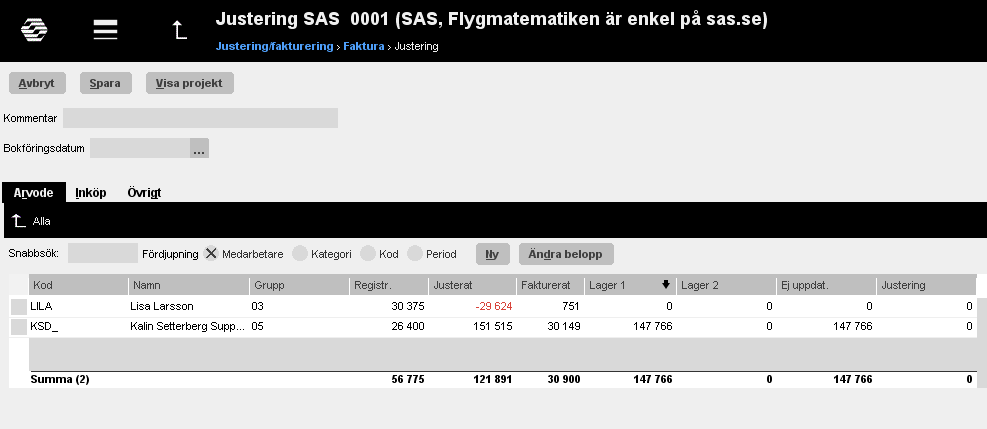
Om fakturan är öppen, tryck på Justera. I projektlistan görs en justering genom att trycka på knappen Ny Justering. Gör därefter enligt nedan beroende på om det finns ett lager att justera mot eller inte.
| Ändra belopp | Markera en rad och klicka på Ändra belopp. Ange det belopp (+/-) som ska justeras alternativt fyll i det belopp som ska bli kvar i rutan Lager. Markera flera rader om justeringen ska göras proportionellt mot lager/registrerat. |
| Ny | Om det inte finns något i lager eller registrerat på projektet, eller om en justering ska riktas mot något annat än lager/registrerat, används Ny för att göra en justering. Fyll i Medarbetare, Kod, Period och Belopp. |
| Kommentar | Möjlighet att skriva en justeringskommentar. |
| Bokföringsdatum | Obligatoriskt datum för justeringar. |
| Registrerat | Belopp som registrerats in på projektet. |
| Justerat | Visar vad som totalt är justerat på projektet. |
| Lager 1 | Visar allt som registrerats och justerats, men inte fakturerats. |
| Fakturerat | ' Visar vad som fakturerats på projektet.Ej uppdaterat'''' Visar de belopp som finns med i skapade men ej utskrivna fakturor.Lager 2' Visar Lager 1 minus Ej uppdaterat.Justering'''' Visar om det finns någon ny justering som inte sparats. |
Utskrift faktura
När omfattningen och texten är färdigställda väljs Spara för att komma till fliken Fakturor. Markera fakturan och välj Utskrift. Flera fakturor kan markeras (med hjälp av Ctrl-tangenten) och skrivas ut samtidigt.
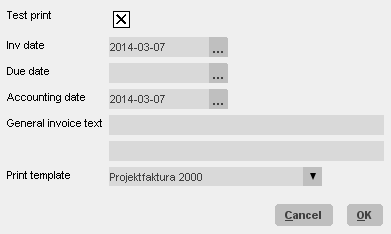
| Test print | Make a test print to check how the invoice looks. |
| Invoice date | Today’s date is suggested. |
| Due date | Fetched from the project, but can be overwritten |
| Accounting date | Today’s date is suggested. |
| General invoice text | An optional text to be printed out on all invoices. |
| Printout template | Select your company’s template |
Go to Backoffice: Project accounting/Invoicing-Adjusting. You can either open the tab Invoices and select New for a new invoice or open the tab Project and make a selection in the list:
| Smallest WIP amt | The WIP can be limited to a smallest WIP amount. |
| WIP 2 | Shows the total WIP minus the amounts released in other |
| Status | Choose between all, active, invoice released, pre-invoice released, collective invoice released. |
| Invoices exist | Choose between none, started and ready. |
| To be closed | Choose if you want to see projects that have been marked with “To be closed” in Client and Project. (This is a message from project managers to the accounting department that a project is ready for closing.) |
Use the grey search box at the far right in the heading row to select the columns that you want to see in the project list. The columns you have selected will be saved on your user name.
| Show project | Link to the analysis view in Client and Project. Edit general project information under the tab General. |
| Test invoice | Shows what there is in the project’s WIP on an invoice printout. |
| New adjustment | Possible adjustments of the WIP in order for the values to agree with what shall be invoiced (read more in the chapter Adjustment). |
| New invoice | Start working with the new invoice if the invoice text not is created in Client and Project. |
| Change status | Close, deactivate or activate project. Before a project can be closed, WIP has to be zero; there may not be any not deducted pre-invoices or not updated time or purchases on it. |
Select New invoice to create a new invoice. Follow the instructions about Invoice content and Adjustment, and create an invoice text with help of the following chapter
Text
You can either write own text and amount or use a text suggestion. You can edit the suggested text. You can also add own rows and subtotals and write new text and amounts.
| Create text | Choose this if you want to catch up the WIP on the project or to invoice from the cost estimate. |
Select first if the amounts shall be based on estimated values ( and in that case which estimate) or on the amounts that are actual in WIP. You can also select amounts based on Invoice content.
| Detail level | Select level of details in the invoice concerning fees, purchases and other. |
| Subtotal | Select subtotal levels. |
| Import text | If the invoice shall be similar to a previous invoice, you can import text from it. Then you can edit the text and amounts to fit in the new invoice. |
| Instruction | The project managers can write instructions as complement to the invoice text. The instruction is not shown on the invoice, only in the analysis tab in Client and Project for each invoice respectively. |
| Invoicing fee | If an invoicing fee has been set and shall be charged in this invoice, check the box. |
Create pre-invoice
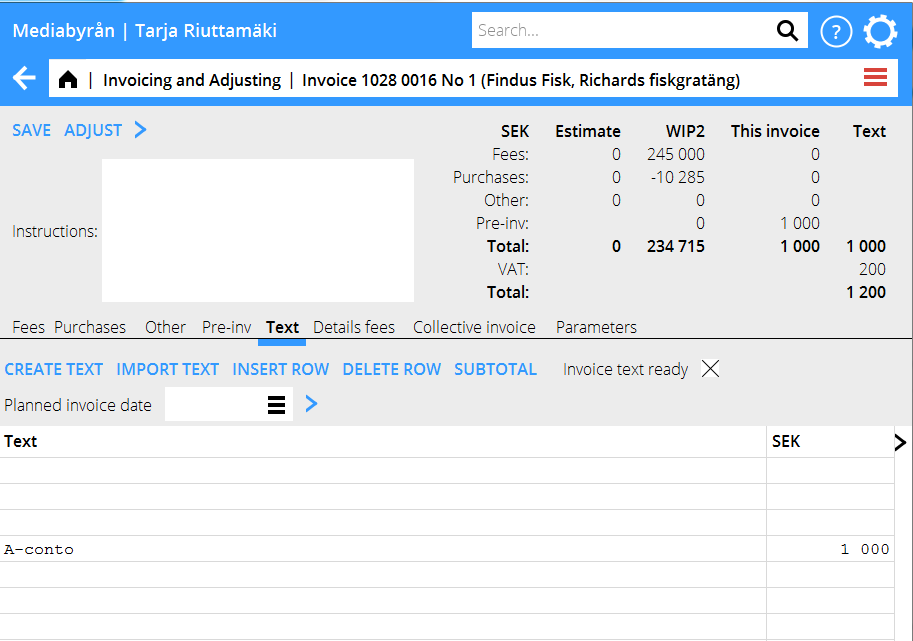
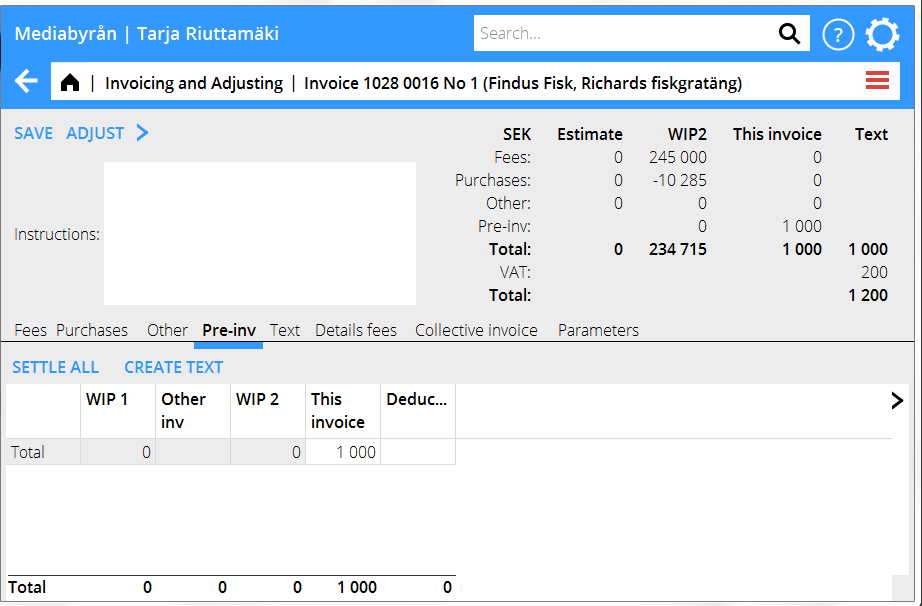
Under the pre-invoiced tab, you can register the amounts that shall be pre-invoiced as invoice content. State the amount to be invoices in the column “This invoice”. It is possible to invoice pre-invoice amounts together with amounts from WIP in the same invoice.
If pre-invoicing has been set to be divided in fees, purchases and other (in the parameters), they are separated. This can be of interest in different reports
| Pre-invoice deduction | Open the tab Pre-invoice and fill in the amount to be deducted or select “Deduct all”. The amounts to be deducted are shown in the tabs Fees, Purchases and Other. The process is the same as in standard invoicing. |
Create collective invoice
Collective invoicing means that you invoice several projects on the same client on one invoice. The requirements are::
That the projects have the same client code
That all the projects have the same client number.
That collective invoicing I s allowed on the project.
That the projects have the same invoicing currency at the time of printout.
Go to one of the projects that shall be in the invoice and select Invoice type “Collective Invoice”. Open the tab Collective invoice. Then fetch the other projects that shall be in the same invoice. Select also the one that you currently have opened. In Invoice content you can now see all the WIP: s of the projects together. Select what to invoice.
Note, that possible adjustments on the projects involved have to be made before they are put together to a collective invoice. To make an adjustment, mark the project in the search list in the Project tab and select “New adjustment” (read more in Adjusting).
Merge invoices
An alternative for collective invoices is that you prepare all invoices separately, and then merge them. This method is usable for example when you use excess invoicing, or when the project managers are writing invoice text in Frontoffice, when collective invoicing is not possible. The invoicing process is the same as when making standard invoices. When the invoices are ready, , select them and click on the button Merge. Select project. In the text tab you have now a section per project, with project name and code as heading for each section. The text is editable.
Parameters
If the project has another invoicing address then what is stated on the client, use an “invoicing client”. Invoice clients can be fetched in the tab Parameters on the project.
If you wish to allocate fees, purchases and other tyou can select a period in the Parameters tab. Note, that the function “Automatic transfer to S/L” has to be checked in Base registers/PRO/Parameters, under the tab Invoicing. Otherwise period cannot be chosen here. Also state an account for periodical allocation in the same tab.
Reprint invoice
It is possible to reprint invoices under the tab Printout
| Only mine | Shows the invoices you have been printing out. |
| Group | You can select to see a list with only invoices for a certain group. |
| Printout | Reprints selected invoice. |
Select which invoices to show in the dropdown menu according to printout time. Use the quick search field for free text search
Credit invoice
To credit an invoice, go to the tab Printed invoices. Find the invoice and click on ”Credit”. A similar invoice is created, but in credit.
Select possible test print. Today's date is suggested as credit invoice date, but it can be overwritten. Select printing template and then OK.
