Difference between revisions of "Pocket Expense reports/sv"
(Updating to match new version of source page) |
(Updating to match new version of source page) |
||
| Line 1: | Line 1: | ||
<htmltag tagname="style">p a.image{border:1px rgb(0,0,0) solid;box-sizing:content-box;}</htmltag> |
<htmltag tagname="style">p a.image{border:1px rgb(0,0,0) solid;box-sizing:content-box;}</htmltag> |
||
| + | <div class="mw-translate-fuzzy"> |
||
| − | En kort beskrivning över hur du lägger in dina utlägg via Marathons Pocket -app. |
+ | En kort beskrivning över hur du lägger in dina utlägg via Marathons Pocket -app. |
| + | </div> |
||
| + | <div class="mw-translate-fuzzy"> |
||
| − | Gå till Utlägg från huvudmenyn. Tryck på ”Ny Utläggsredovisning”. |
+ | Gå till Utlägg från huvudmenyn. Tryck på ”Ny Utläggsredovisning”. |
| − | |||
| + | </div> |
||
| − | {{ExpandImage|MP-UTL-SV-Bild1.png}} |
||
| + | <div class="mw-translate-fuzzy"> |
||
Skriv sedan Rubrik för utlägget |
Skriv sedan Rubrik för utlägget |
||
| + | </div> |
||
| + | <div class="mw-translate-fuzzy"> |
||
| − | {{ExpandImage|MP-UTL-SV-Bild2.png}} |
||
| ⚫ | |||
| − | |||
| + | </div> |
||
| ⚫ | |||
| − | |||
| − | {{ExpandImage|MP-UTL-SV-Bild3.png}} |
||
| + | <div class="mw-translate-fuzzy"> |
||
Lägg till underlag (kvitto) med Lägg till bild. Fyll sedan i belopp, moms och om inköpet ska registreras mot ett projekt och inköpskod. |
Lägg till underlag (kvitto) med Lägg till bild. Fyll sedan i belopp, moms och om inköpet ska registreras mot ett projekt och inköpskod. |
||
| + | </div> |
||
| + | Select thereafter Type and the other requested information (amount, VAT, and if the purchase is connected to a certain project and purchase code, and possible quantity and text. If you are unsure about expense type, select "None" and write a more comprehensive text instead. |
||
| − | {{ExpandImage|MP-UTL-SV-Bild4.png}} |
||
| + | After saving you can add more receipts. |
||
| − | När utlägget är färdigt ändrar du status till Inlämnad. |
||
| + | When all the receipts are registered, tap '''Submitted'''. Your report will thereafter be approved and then disbursed. |
||
| − | {{ExpandImage|MP-UTL-SV-Bild5.png}} |
||
| + | On the start page for Expense reports you can see expenses not yet booked and disbursed under the tab '''Expenses''''. You can still edit these and add more receipts |
||
| − | Under denna vy har du översikt på egna gjorda utlägg. |
||
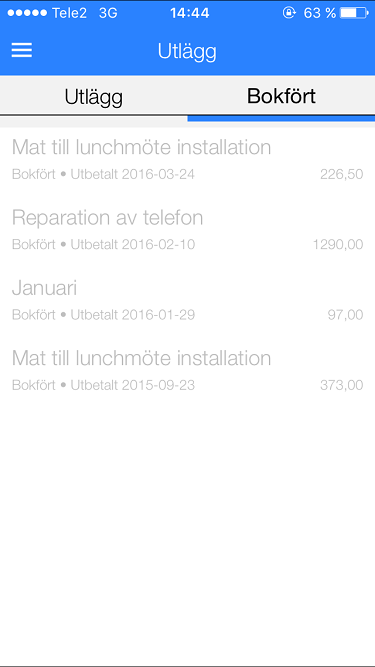
| + | Open the tab '''Booked''' to see previous expense reports and their disbursement dates. If your company disburses expenses via the payroll system, you cannot see the disbursement date here. |
||
| − | {{ExpandImage|MP-UTL-SV-Bild6.png}} |
||
| − | I fliken Bokfört kan du se egna utlägg som blivit bokförda och utbetalda. |
||
{{ExpandImage|MP-UTL-SV-Bild7.png}} |
{{ExpandImage|MP-UTL-SV-Bild7.png}} |
||
Revision as of 10:03, 12 May 2020
En kort beskrivning över hur du lägger in dina utlägg via Marathons Pocket -app.
Gå till Utlägg från huvudmenyn. Tryck på ”Ny Utläggsredovisning”.
Skriv sedan Rubrik för utlägget
Välj sedan Nytt kvitto.
Lägg till underlag (kvitto) med Lägg till bild. Fyll sedan i belopp, moms och om inköpet ska registreras mot ett projekt och inköpskod.
Select thereafter Type and the other requested information (amount, VAT, and if the purchase is connected to a certain project and purchase code, and possible quantity and text. If you are unsure about expense type, select "None" and write a more comprehensive text instead.
After saving you can add more receipts.
When all the receipts are registered, tap Submitted. Your report will thereafter be approved and then disbursed.
On the start page for Expense reports you can see expenses not yet booked and disbursed under the tab Expenses'. You can still edit these and add more receipts
Open the tab Booked to see previous expense reports and their disbursement dates. If your company disburses expenses via the payroll system, you cannot see the disbursement date here.
