Difference between revisions of "Resource planning/fi"
(Created page with "== Suunniteltujen päivien muokkaus ==") |
(Created page with "Muokkaa suunniteltua päivää oikeaklikkamalla sitä (Ctrl + klikkaus Macilla). On mahdollista valita useita päiviä ja muokata ne yhdellä kertaa.") |
||
| Line 74: | Line 74: | ||
== Suunniteltujen päivien muokkaus == |
== Suunniteltujen päivien muokkaus == |
||
| + | Muokkaa suunniteltua päivää oikeaklikkamalla sitä (Ctrl + klikkaus Macilla). On mahdollista valita useita päiviä ja muokata ne yhdellä kertaa. |
||
| − | Right click on a planned day (Ctrl + mouse click on Macs). You can also select several days to edit at the same time. |
||
{{ExpandImage|PRO-RES-EN-Bild6.png}} |
{{ExpandImage|PRO-RES-EN-Bild6.png}} |
||
Revision as of 13:30, 7 January 2016
Contents
Yleistä
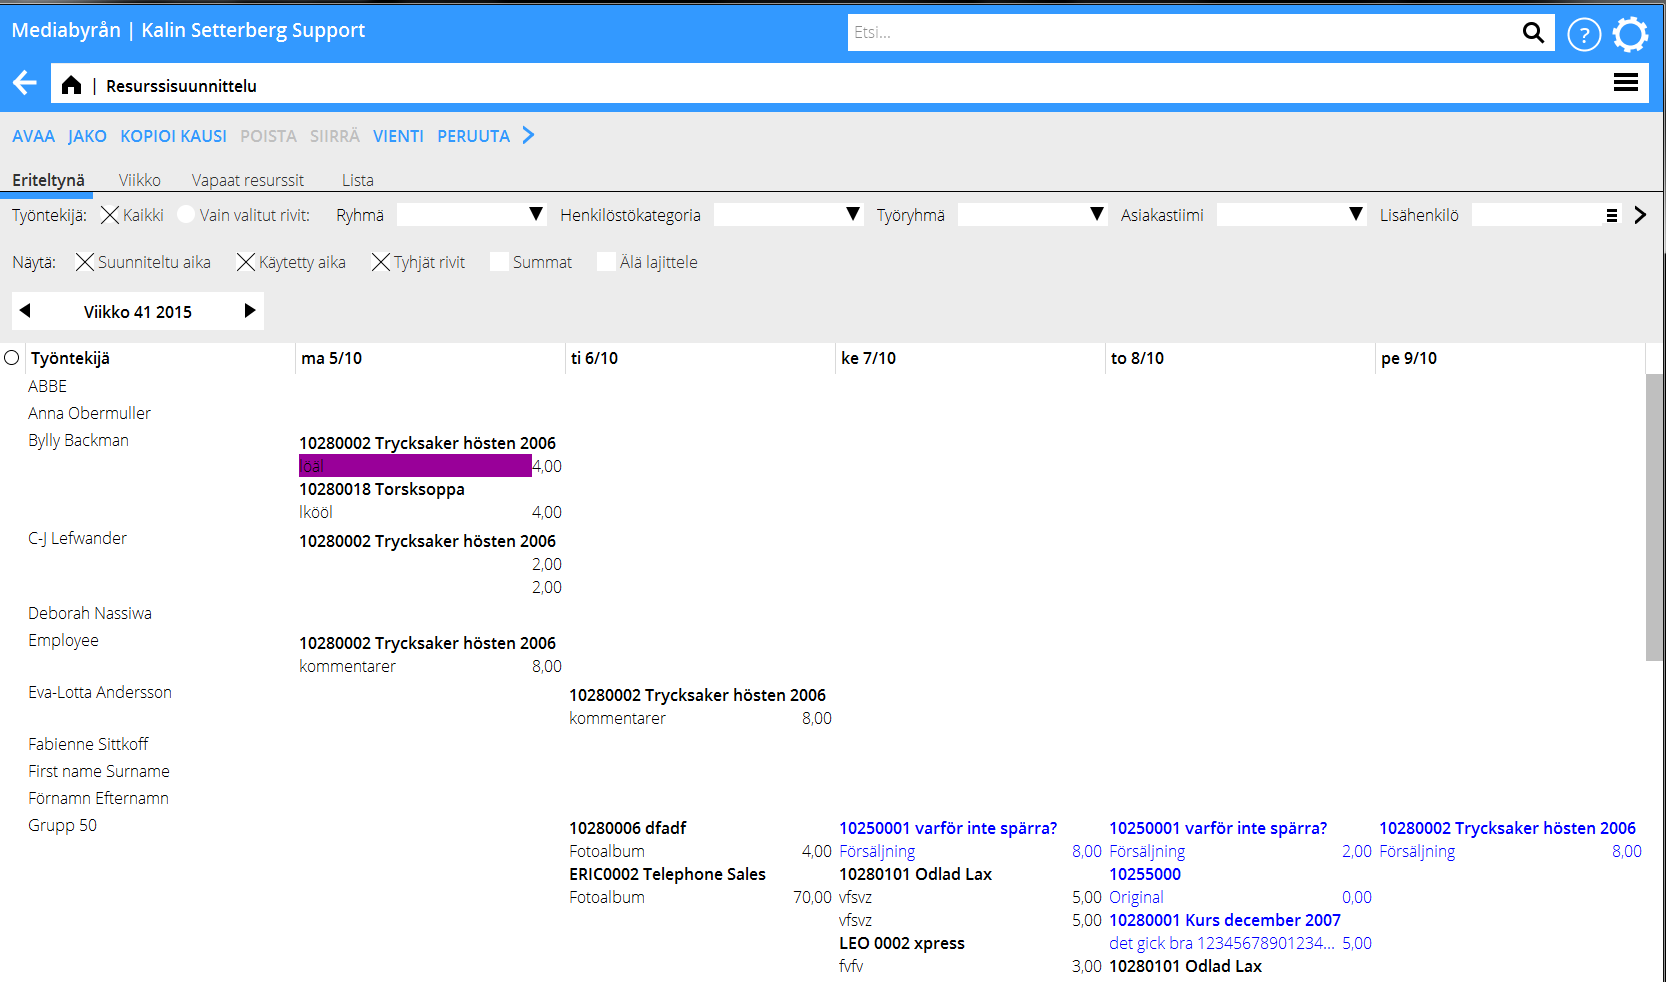
Resurssisuunnittelu löytyy Prjektiosiosta. Resurssisuunnittelussa voit suunnitella työntekijöiden tunteja päivittäin tai viikoittain.
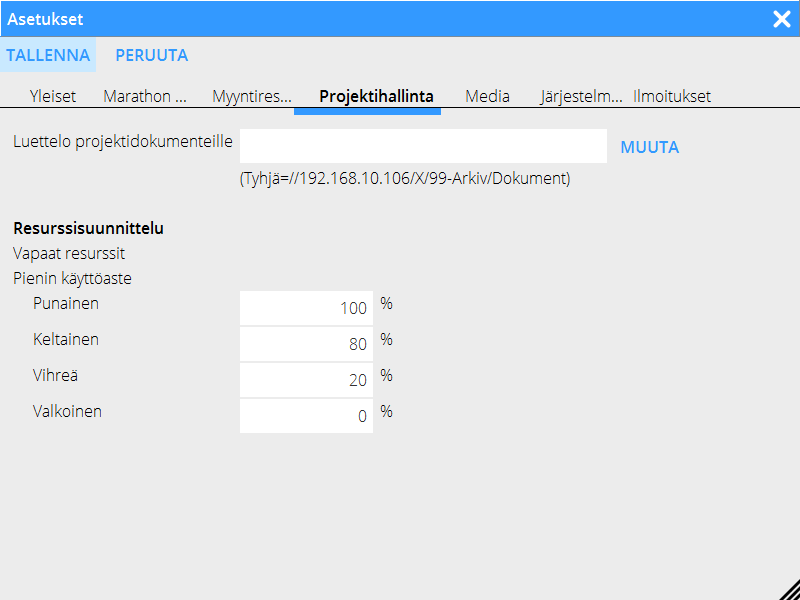
Projektilajien värimerkinnät voi valita Asetuksissa, joka löytyy hammaspyörän alta, välilehdeltä Projektihallinta:
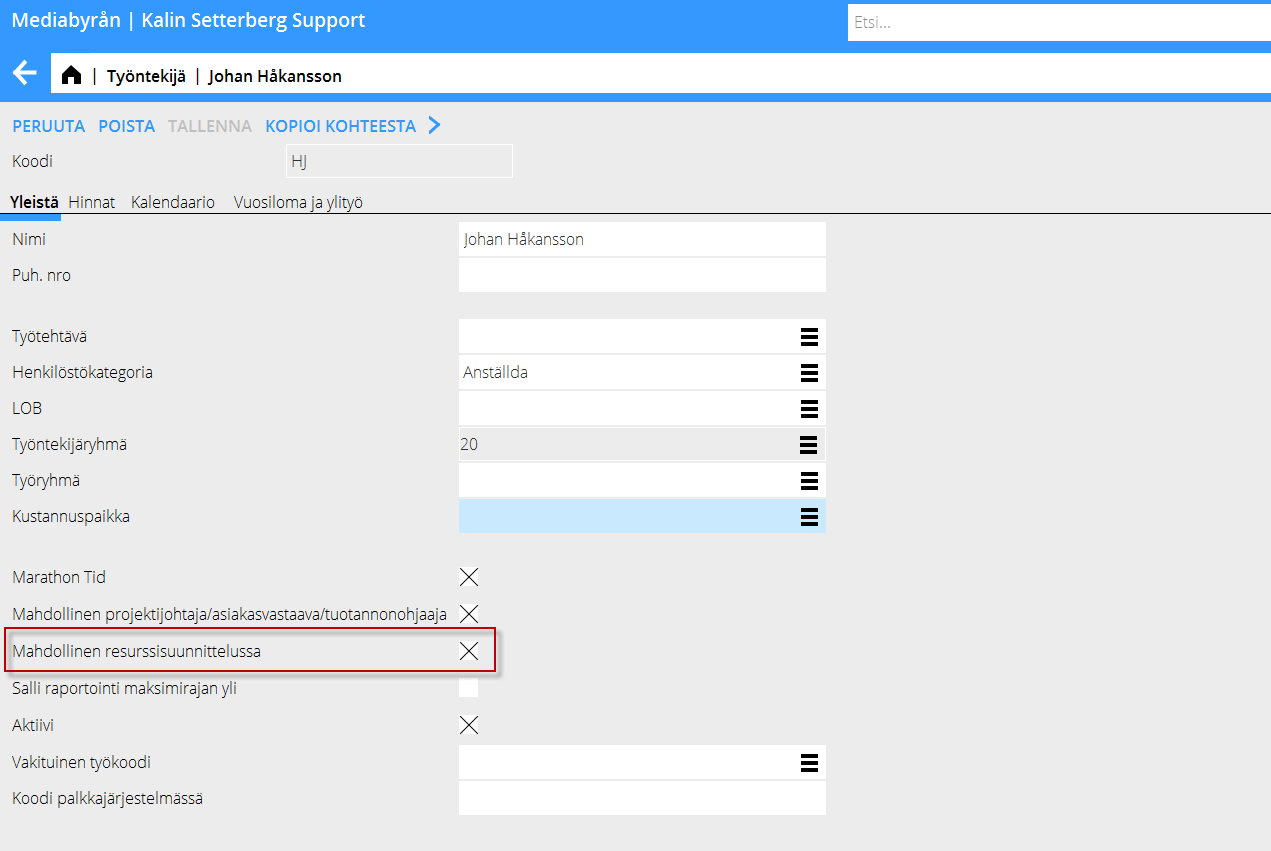
Työntekijät, jotka voivat olla resurssisuunnittelussa, valitaan ohjelmassa Perusrekisterit/Pro/Työntekijät.
Voit laatia suunnittelun ryhmälle, henkilöstökategorialle tai työryhmälle. Ne yhdistetään yksittäiseen työntekijään ohjelmassa Perusrekisteri/Pro/Työntekijä. Suunnittelun voi myös laatia asiakastiimeittäin. Ylimääräisiä työntekijöitä voi myös lisätä valikoimaan.
| Ryhmä | Suunnittelu ryhmittäin. Ryhmät luodaan ohjelmassa Perusrekisterit/Pro/Ryhmät ja yhdistetään työntekijään ohjelmassa Perusrekisterit/Pro/Työntekijät. |
|---|---|
| Henkilöstökategoria | Suunnittelu henkilöstökategorioittain.
Kategoriat luodaan ohjelmassa Perusrekisterit/Pro/Henkilöstökategoriat ja yhdistetään työntekijään ohjelmassa Perusrekisterit/Pro/Työntekijät. |
| Työryhmä | Suunnittelu työryhmittäin.
Työryhmät luodaan ohjelmassa Perusrekisteri/Pro/Työryhmät ja yhdistetään työntekijään ohjelmassa Perusrekisterit/Pro/Työntekijät. |
| Asiakastiimi | Tiimikohtainen suunnittelu. Tiimi ilmoitetaan asiakastietoihin ohjelmassa Perusrekisterit/Pro/Asiakkaat ja Projektit, välilehdellä Tiimi. |
| Lisähenkilö | Valikoimaan on mahdollista lisätä yksi tai useampi henkilö. |
| Suosikit | Merkitse suosikkisi klikkaamalla saraketta uloimpana vasemmalla. Klikkaa sarakkeen otsikkoa jos haluat nähdä kaikki koodit, ja klikkaa taas kun haluat pelkät suosikit. |
Resurssien suunnittelu
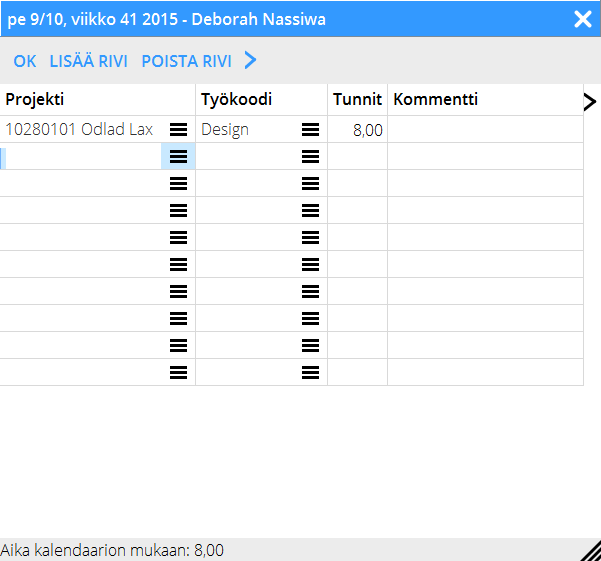
Resursseja voi suunnitella per päivä tai per viikko. Kaksoisklikkaa työntekijän päivää tai valitse päivä ja klikkaa Avaa.
Jos suunnittelet ajan viikoittain, laita kaikki ajat maanantaille. Näet yleiskuvan kun valitset erittelytason ”Viikko”.
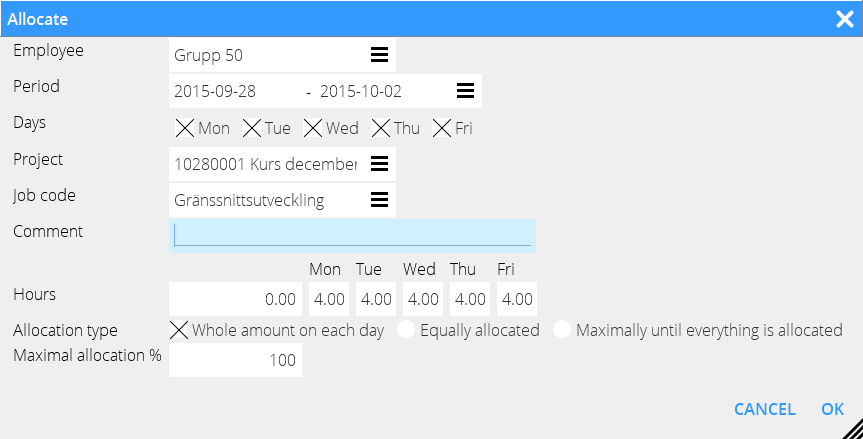
Voit ilmoittaa/hakea projektitunnuksen, kirjoittaa kommentin, arvioidut tunnit ja työkoodin. Tallenna
Resurssien jako
Valitse yksi tai useampi työntekijä ja yksi tai useampi päivä ja paina Jako.
| Koko tuntimäärä… | Tuntimäärä, jonka ilmoitit Tunnit -kenttään tulee jokaiselle valitsemillesi päiville ja työntekijälle. |
|---|---|
| Tasaisesti jaettu | Ilmoitetut tunnit jaetaan tasan valitsemiesi päivien ja työntekijöiden kesken. |
| Maksimaalisesti kunnes.. | Tunnit jaetaan työntekijöille aakkosjärjestyksessä kunnes kaikki tunnit ovat jaetut. |
| Maksimaalinen jako % | Tässä ilmoitetaan prosenttiosuus tunneista Tasaisesti jaetulle ja Maksimaalisesti kunnes kaikki on jaetulle. |
Suunniteltujen päivien muokkaus
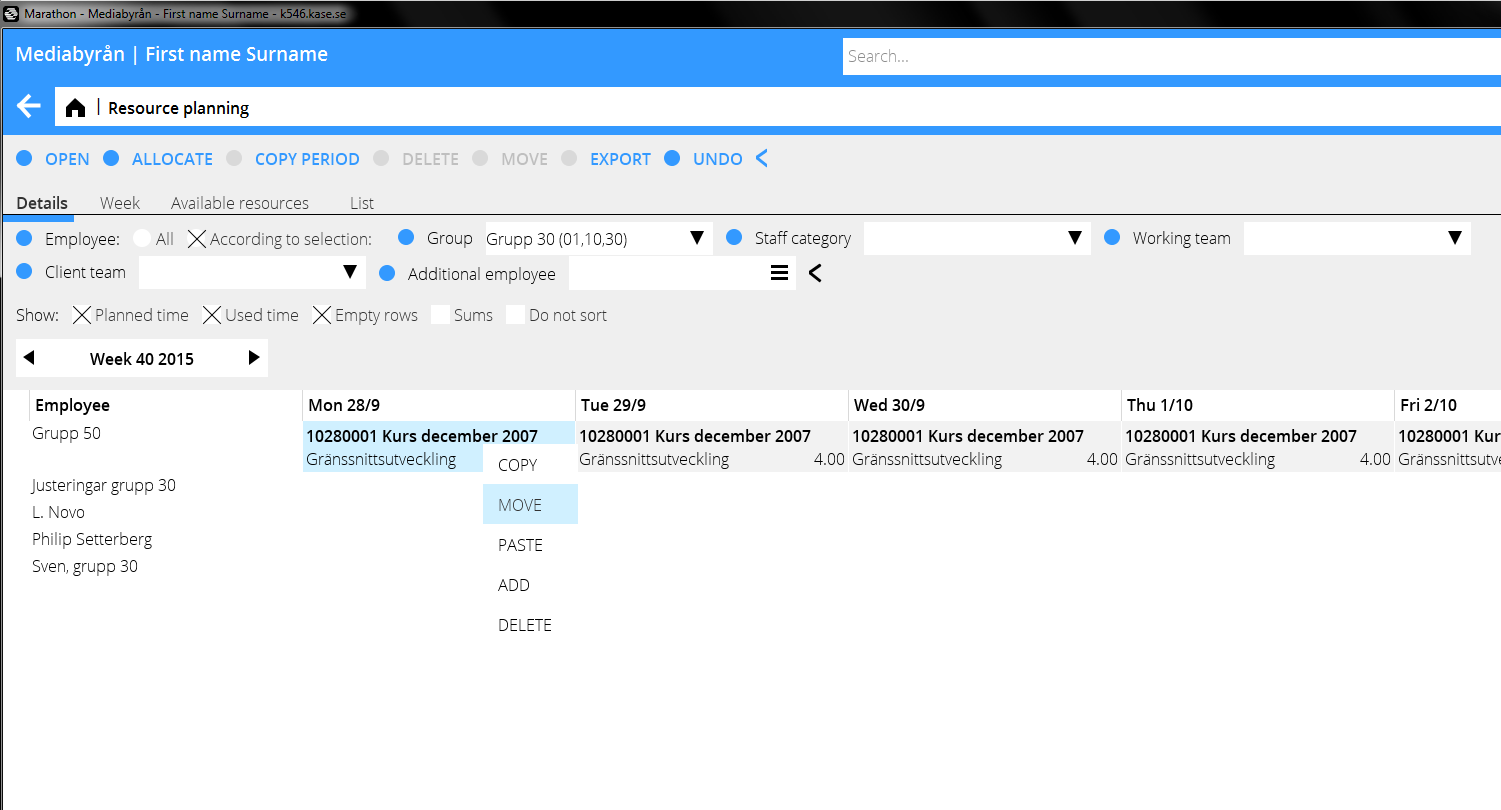
Muokkaa suunniteltua päivää oikeaklikkamalla sitä (Ctrl + klikkaus Macilla). On mahdollista valita useita päiviä ja muokata ne yhdellä kertaa.
| Copy | It is possible to copy a planned day or employee. |
| Move | The selected day can be moved/pasted into another date or employee. |
| Paste | Paste the copied day to another day or another employee. It replaces earlier information. Before pasting, you will have a question if you want to replace existing information. |
| Add | A copied or moved day can be pasted into the selected day without replacing existing information. The new information will be added to the existing. |
| Delete | All information in the selected day will be deleted. |
Other functions
| Arrows | Move between weeks with the arrows. |
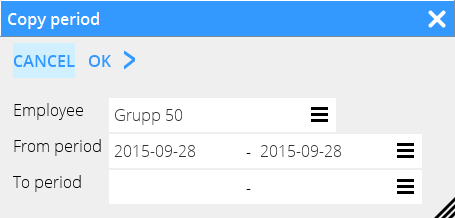
| Copy period | This function enables copying of selected employee(s) and period to another period. |
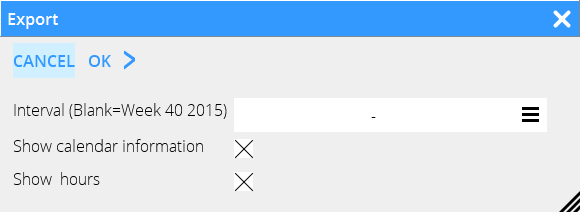
| Export | Click EXPORT if you want to print out the planning to Excel. The printout shows the actual view of the screen. The planned time and hours from the calendar is written under each employee. If the planned hours exceeds the calendar hours, the amount is written in red. |
| Undo | This function undoes your last input. |
Selection – Show
| Planned time | If selected, the list shows the planned time from the resource planning. |
| Used time | If selected, the list shows the reported time from Time reporting. |
| Empty rows | If you want to see all rows, even those without planned time, tick Empty rows. |
| Sums | Summarises the day’s planned time. |
| Do not sort | Select/deselect for sorting in alphabetical order. |
Selection– Details
| Details | This selection shows a weekly resource planning per day and employee. |
| Week | Shows the planned time per week |
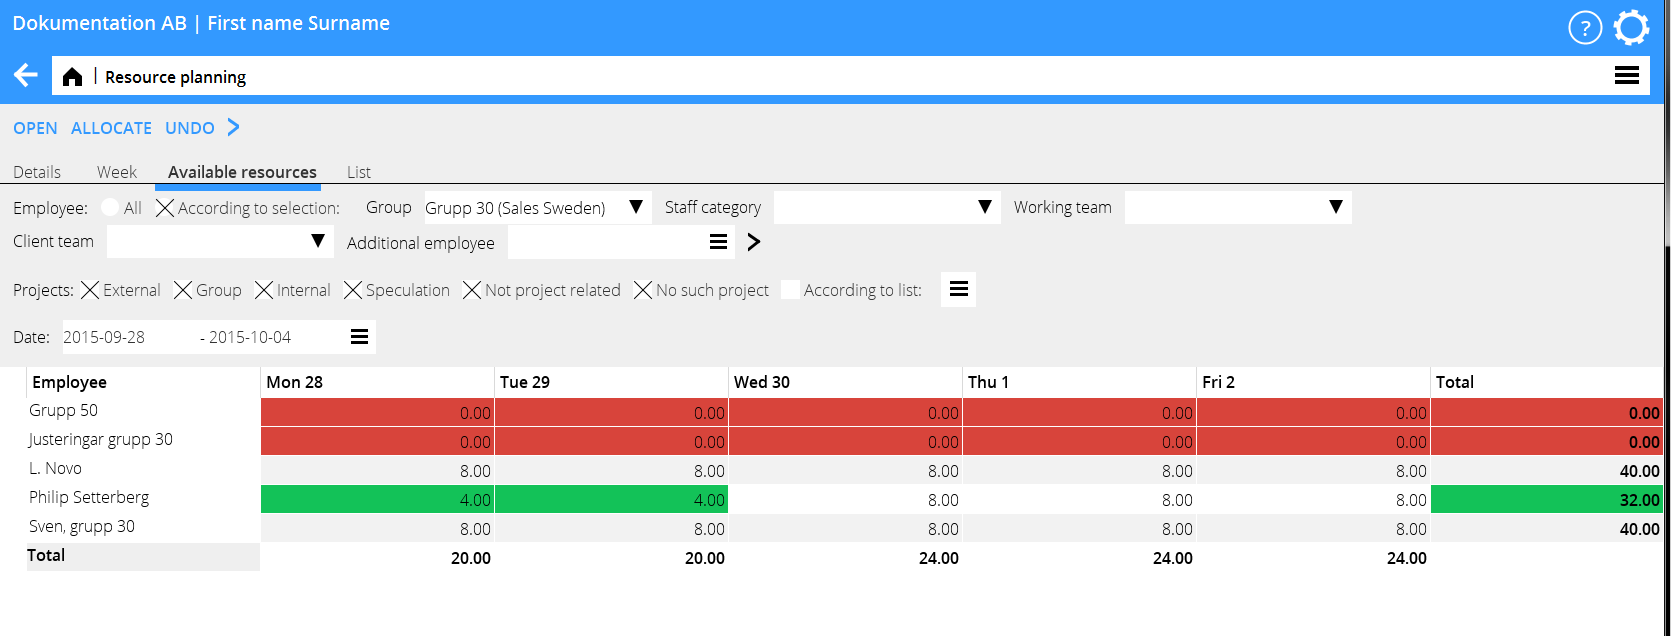
| Available resources | Colour settings can be made in FUNCTIONS the upper left corner; select SETTINGS and then Project accounting. Select rates of utilization for the different colours. In the example below, red colour indicates that the person is fully booked; green indicates that there is some time left and white that there is no planned time at all. If there is only a little time left for planning, the TOTAL- column will be yellow. |
List
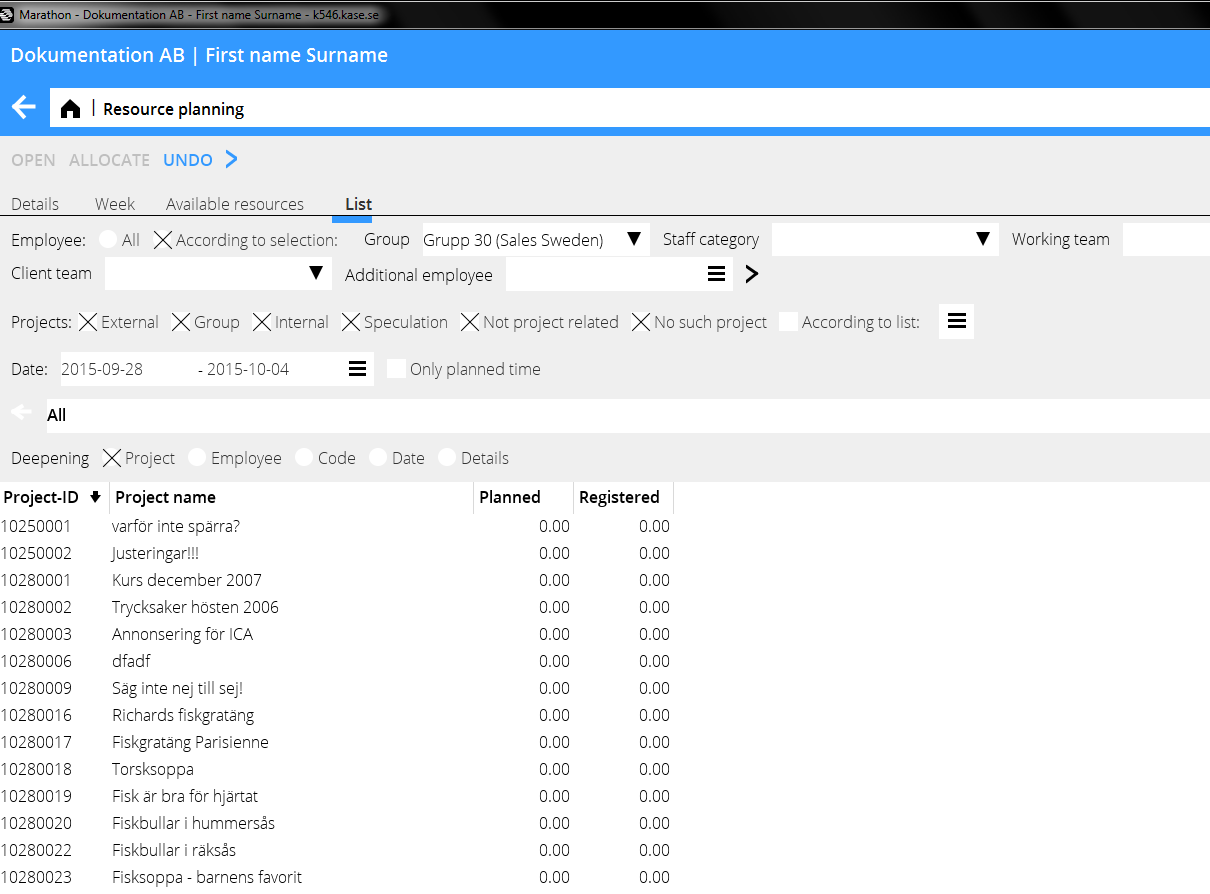
If you select List instead of overview, the program shows a list per project; what is planned and what has been registered. You can select type of project: You can deepen on date, employee, code, project or details. You can also deepen on a certain record, just click on a row to see details.
| Delete | On itemisation level “List”, deepening on “Details”, the Delete-button is activated. Select one or several rows (press Ctrl-key and select rows) and click on DELETE. |
| Project | Selection “All” shows all projects. “External” projects are E, G and J (external, group and speculations). “No spec” shows all except speculations. “According to list” opens a project list where you can select projects. |
Move
The function is used for moving hours on project – or employee level to other days. Select periods in the date fields (from –to). The period determines the first moving date and also limits amount of hours that can be moved.
Select deepening Project or Employee. Then, select project or person and click on Move. You will see a list of planned time for the project/person you’ve chosen.
State how many working days the hours will be moved ahead. You can also write a date in the field To (start date). The columns New date and Left after moving are updated after each moving.
New date shows the day of the planned move.
Left after moving shows the day after the move has been done.
Confirm by saving. Note, that a move cannot be undone.
Time reporting
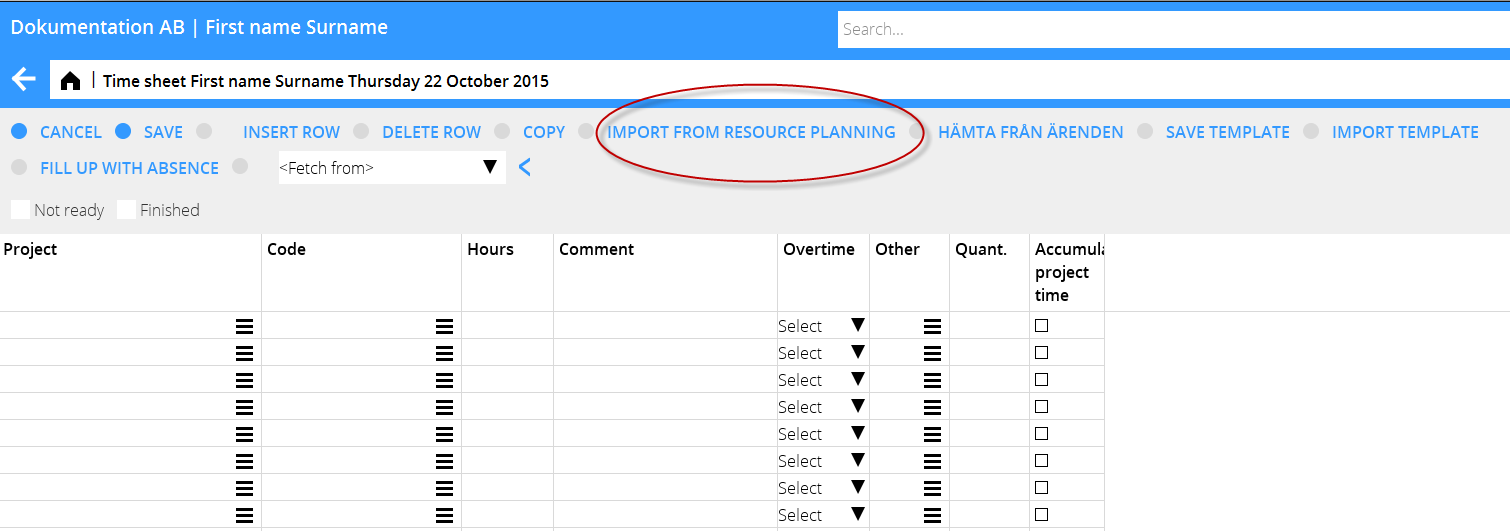
You can import project, comments and hours from the resource planning into the day report. Click the button IMPORT FROM RESOURCE PLANNING.
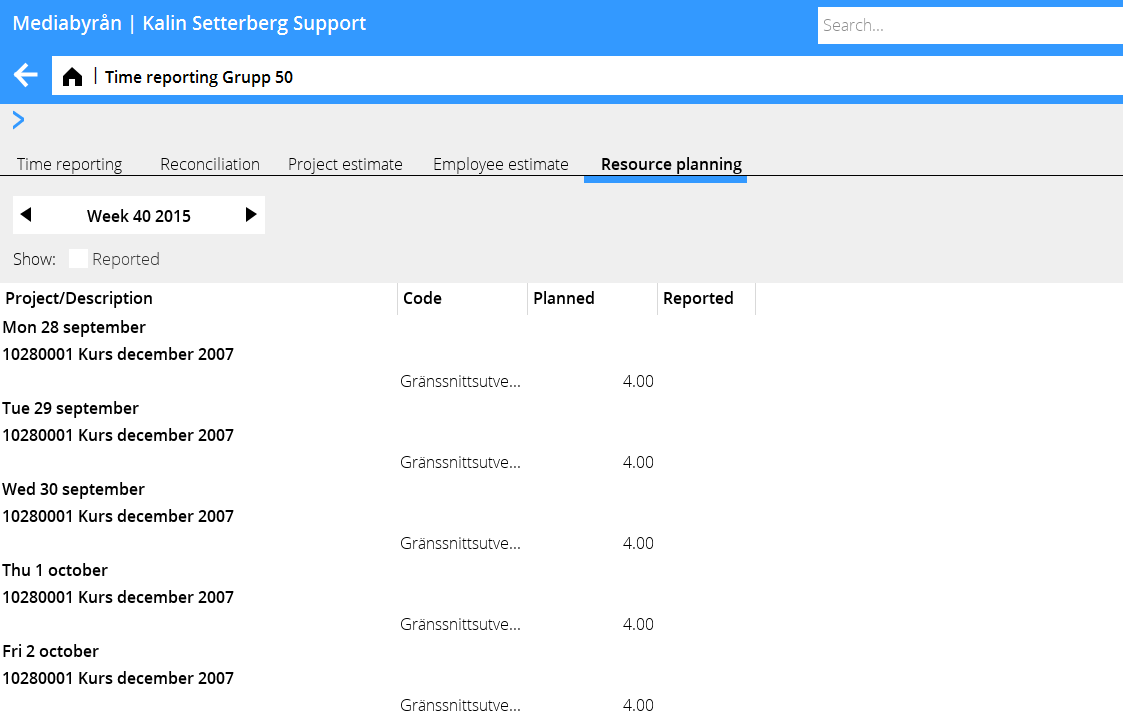
Click on RESOURCE PLANNING to see a weekly overview of your planned time. If you click the box REPORTED, you can compare your planned and used time.
Project: Queries
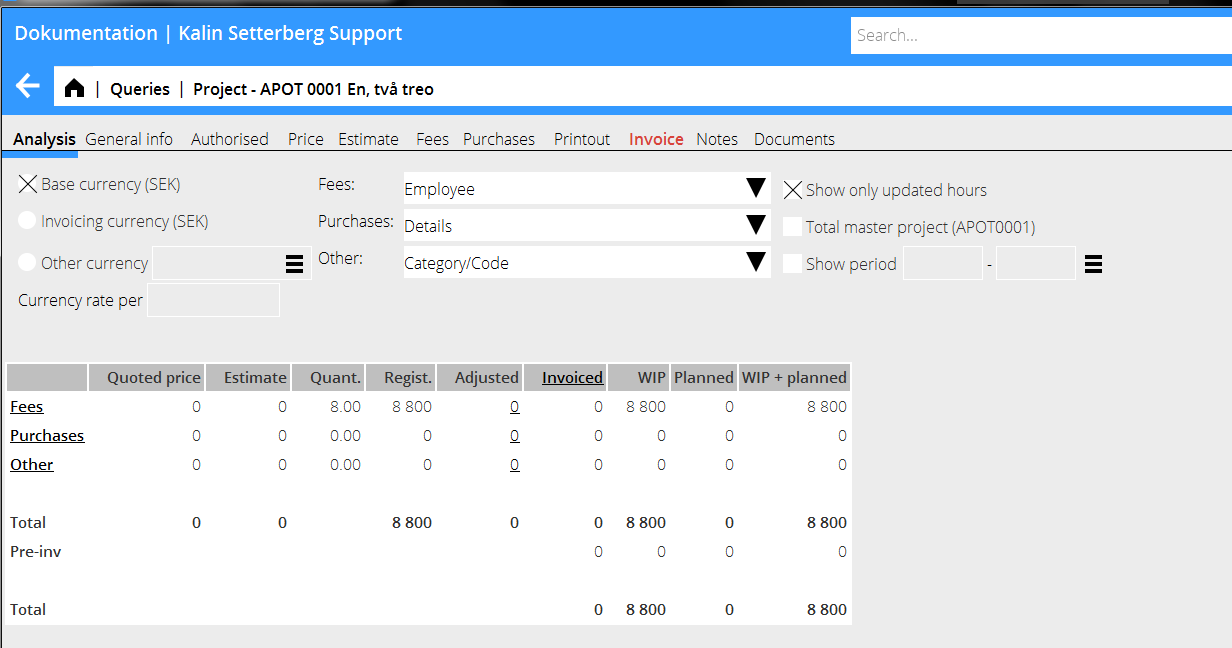
If the parameter ”Show resource planned in project analysis” is checked (in System: Base register/Pro/Parameters/Clients and projects), two columns are shown in the project analysis view: Planned 1 and WIP 2.
Planned shows sales price fees for all future time that has been planned on the project and WIP 2 shows WIP+ Planned.
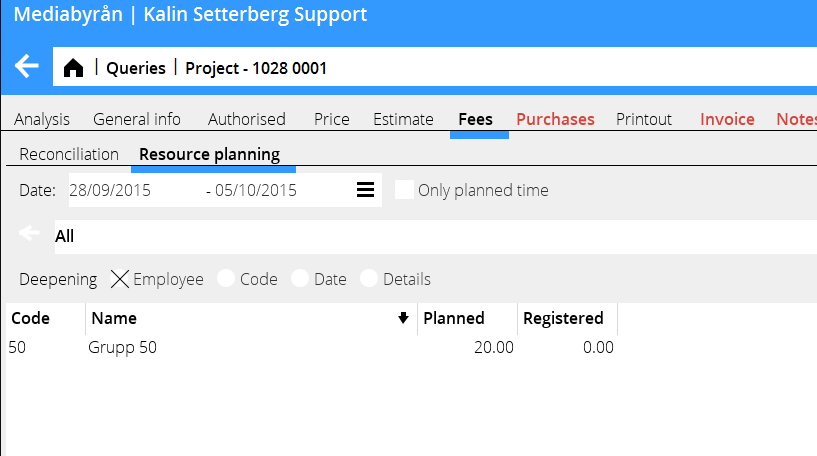
A project’s resource planning is shown in Project: Questions/Project, under the tab FEES. The list shows the planned time and the time so far reported on the project. You can select a time interval and sort the list per employee, code, date or details. You can also use quick search.
Reports
You can activate the data definition “Resource planned time” in Reports and use it as a column in your reports.
