Asiakas ja Projekti
Contents
- 1 Alkusivu
- 2 Toiminnot
- 3 Taulukot Marathonissa
- 4 Suosikit
- 5 Asiakas ja Projekti
- 6 Asiakkaiden ja projektien avaus
- 7 Project printouts
- 8 Reports
Alkusivu
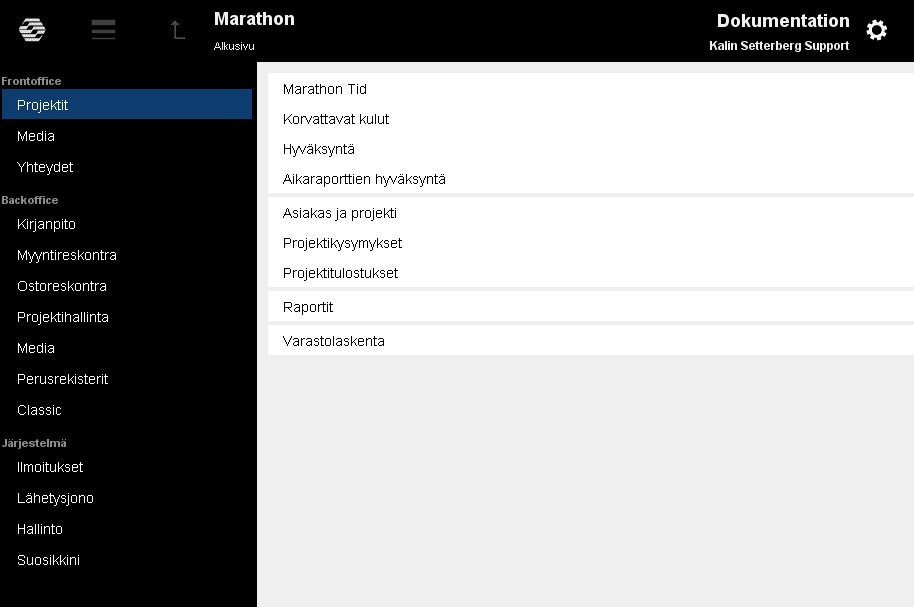
Marathon on jaettu Frontofficeen ja Backofficeeen. Ohjelmat, joihin sinulla on valtuudet, ovat klikattavissa. Klikkaamalla Kalin Setterberg – logoa ylhäällä vasemmassa kulmassa, pääset aina alkusivulle.
Vie sinut alkusivulle.
Klikkamalla tätä symbolia (tai Alt + nuoli alas) näet ne toiminnat, joissa olet ollut etkä vielä ole sulkenut. Jos symboli on keltainen, jokin ohjelmista on sellaisessa tilassa, että sinun on mentävä sulkemaan se ennen kuin voit kirjautua ulos Marathonista. Kun kirjaudut pois Marathonista, lista tyhjenee
Käytetään ohjelmasta poistumiseen
Kertoo, missä kohtaa Marathonia sillä hetkellä sijaitset
Hammaspyörän alla löydät seuraavat valinnat:
| Asennukset | Yleiset järjestelmäasennukset. Asennukset koskevat vain sinun käyttäjänimeäsi. |
| Uusi salasana | Salasanan vaihtaminen. |
| Vaihda yritys | Vaihto toiseen yritykseen samalla Marathon-asennuksella. |
| Käyttötuki | Käyttötukilomake Marathonia koskevia kysymyksiä varten. Lähetetään Kalin Setterbergin käyttötukiosastolle. |
| Dokumentointi | Linkitys Kalin Setterbergin dokumentointisivulle, jossa voit lukea uutuuksista Marathonissa (ruotsiksi ja englanniksi) sekä manuaaleja. |
| Tulostus | Tulostus sen hetkisestä kuvanäytöstä fyysiseen tulostimeen. |
| Tulostus sen hetkisestä näyttökuvasta PDF-muotoon. | |
| Uusi ikkuna | Avaa uuden Marathon-ikkunan. |
| Lisää suosikkeihin | Kun olet sivulla, jonka haluat merkitä suosikiksi, klikkaa silloin ”lisää suosikkeihin” niin ohjelma/toiminto lisätään automaattisesti Suosikit- otsikon alle aloitussivulla. |
| Kirjaudu ulos | Kirjaudu ulos Marathonista |
Oikeassa alareunassa näet punaisella, jos sinulla on raportoimattomia päiviä Marathon Tidissä. Näet myös mikäli sinulla on laskuja hyväksyttävänä tai Marathonista lähettämiä fakseja/sähköpostiviestejä lähetysjonossa. Klikkaamalla kenttiä ohjelma vie sinut suoraan k.o. ohjelmaan eli joko Marathon Tidiin, Hyväksyntään tai Lähetysjonoon
Toiminnot
Taulukot Marathonissa
Marathonin taulukkojen sarakkeita voi muuttaa; niiden järjestystä, leveyttä sekä lajittelua. Asetukset tallentuvat seuraaviin kirjautumisiin.
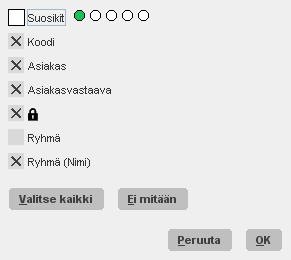
Klikkaa harmaata hakuruutua taulukon oikeassa yläkulmassa tai klikkaa hiiren oikeaa painiketta taulukossa. Pieni valikko avautuu, valitse siitä Sarakkeet. Marathon näyttää silloin mitä sarakevaihtoehtoja taulukolle on. Rastita ne jotka haluat mukaan.
Jos haluat vaihtaa sarakkeiden paikkaa, voit vain vetää saraketta otsikosta ja päästää sen kohtaan, johon sen haluat. Sarakkeen reunoja vetämällä voit säätää leveyden.
Kun klikkaat sarakkeen otsikkoa, näet joko ylös- tai alaspäin osoittavan nuolen. Ylöspäin osoittava nuoli tarkoittaa, että suurimmat luvut näytetään ensin, alaspäin osittava näyttää pienimmät ensin. Klikkaa toisen kerran jos haluat muuttaa lajittelujärjestystä. Kaikki taulukoita koskevat asetukset tallentuvat käyttäjälle.
Suosikit
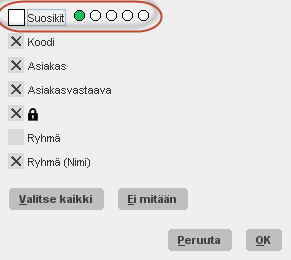
Suosikkisarake löytyy melkein jokaisesta Marathonin taulukosta. Voit nähdä taulukossa vain ne koodit, projektit, yms., joita useimmiten käytät. Tee näin: Sarakkeiden valintaruudussa (jonka saat esiin oikeaklikkauksella taulukossa tai klikkamalla harmaata ruutua otsikkorivin oikeassa laidassa) löytyy valinta Suosikit. Valitse se ja klikkaa tyhjiä palloja saadaksesi esiin tarvitsemasi värit. Paina OK.
Suosikkisarake tulee aina vasempaan laitaan eikä siinä ole otsikkoa. Merkitsemäsi rivi merkitään pallolla. Klikkaa sarakkeen otsikkopalkkia vaihtaaksesi vain suosikkien ja koko listan välillä. Kaikki parametrit toimivat rinnakkaisesti, eli voit esim. käyttää pikahakua myös suosikkilistassasi.
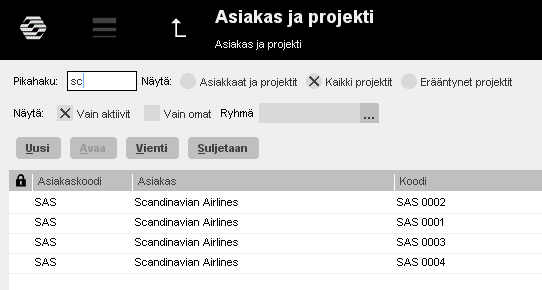
Asiakas ja Projekti
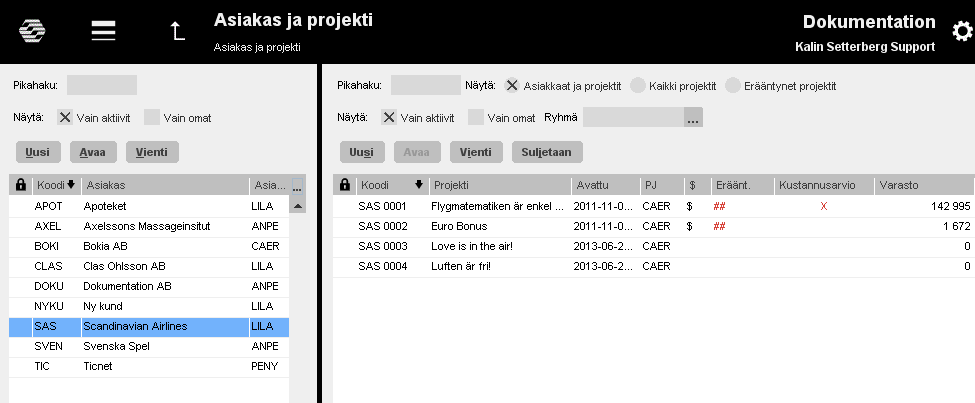
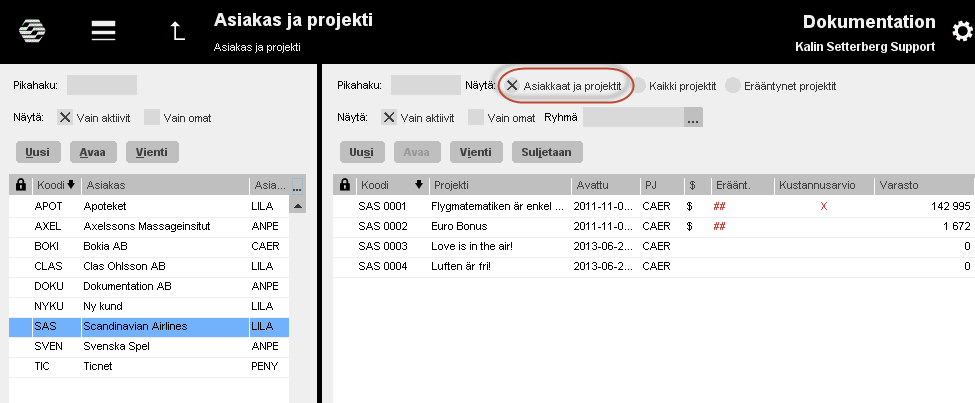
Perusnäkymä (Asiakkaat ja Projektit) näyttää vasemmalla puolella kaikki järjestelmään syötetyt asiakkaat. Valitsemalla asiakkaan näet sen projektit ruudun oikealla puolella.
Jos rastitat ”Kaikki projektit”, näkymä on tämänlainen:
| Erääntyneet projektit | Jos projektille on asetettu deadline, ja päivämäärä ylittyy tai jos sillle on asetettu laskupäivämäärä ja se ylittyy, ne näkyvät erääntyneiden projektien listassa. Tämä näkyy vain projektijohtajilla ja tuotantosuunnittelijoilla. |
| Vain aktiivit | Sekä asiakas- että projektipuolella voit valita näkymään Vain aktiivit projektit/asiakkaat |
| Vain omat | Omilla tarkoitetaan projektia/asiakasta joissa sisäänkirjautunut henkilö on joko asiakasvastaava tai projektijohtaja/tuotantosuunnittelija. |
| Excel | Tulosta haluamasi tiedot Exceliin. Rastita valintaruudusta sarakkeet. jotka haluat mukaan. Jos olet valinnut listassa vain omat/aktiivit ja haluat vain ne tulostukseen, valitse ”vain valitut rivit”. |
| Suljetaan | Indikoi talousosatolle, että projekti on valmis suljettavaksi |
Voit vaihtaa sarakkeiden järjestystä vetämällä ne hiirellä haluamaasi paikkaan. Napauta sen sarakkeen otsikkoa, jonka haluat olevan lajittelua ohjaavan. Valintasi tallentuu käyttäjänimellesi.
| Asiakaslistan sarakkeet: | |
| Suosikit | Voit merkitä usein käyttämäsi asiakkaat suosikeiksi |
| Lukko | Suljettu asiakas merkitään lukolla. Tämä tarkoittaa, ettei asiakkaalla ole yhtään avointa projektia, eikä sille voi avata uusiakaan. |
| Koodi | Asiakkaalle yksilöllinen koodi - yleensä jonkinlainen lyhenne nimestä, max. 4 merkkiä. |
| Asiakas | Asiakkaan nimi |
| As vast | Asiakasvastaavan työntekijäkoodi |
| Ryhmä | Ryhmäkuuluvuus (käytetään esim. asiakkailla, joilla on monelle yritykselle yhteinen projektihallinta) |
| Projektilistan sarakket: | |
| Suosikit | Voit valita usein käyttämäsi projektit suosikeiksi. |
| Koodi | Projektin tunnus; koostuu asiakaskoodista ja juoksevasta numerosta. |
| Projekti | Projektin nimi |
| Avattu | Projektin avauspäivämäärä |
| PJ | Projektijohtajan työntekijäkoodi |
| $ | Indikoi, että projektilla on varastoa. |
| Lukko | Suljettu projekti on merkitty lukolla. |
| Eräänt | Jos projektilla on erääntyneitä laskuja, merkintä on punainen(Yksi merkki 8 päivän jälkeen, kaksi merkkiä 31 päivän jälkeen) |
| Laskuteksti luotu | Rasti indikoi, että projektin lasku-välilehdellä on laskutekstiä. |
| Laskuteksti valmis | Rasti tarkoittaa, että laskuteksti lasku-välilehdellä on merkitty valmiiksi. |
| Tuot.suunn. | Tuotannonsuunnittelijan työntekijäkoodi |
| Varasto | Projektin varaston määrä. |
| Valuutta | Näyttää projektin perusvaluutan. Käytössä vain jos yrityksellä on monivaluuttakäsittely. |
| Projektilaji | Näyttää projektilajit: ulkoinen (E), konsernin sisäinen (G), sisäinen (I), projekti sisäiselle työlle (9) ja spekulaatioprojektit (J). |
| Kustannusarvio | Rasti indikoi, että projektille on laadittu kustannusarvio. |
| Suljetaan | Sarake näyttää rastin jos projekti on ilmoitettu valmiiksi, mikä indikoi talousosastolle, että projekti voidaan laskuttaa ja sulkea. |
| Varasto Oma työ | Osa varastosta, joka on omaa työtä |
| Varasto Alihankinnat | Osa varastosta, joka on alihankintaa |
| Varasto Muut | Osa varastosta, joka on muuta/materiaalia |
| Sovittu Hinta | Näyttää projektille annetun sovitun hinnan määrän. |
| Deadline | Näyttää projektin deadline-päivän (aktivoidaan Perusrekistereissä/Pro/Asiakkaat ja Projekti) |
| Laskupvm | Päivämäärä laskulle, mikäli sellainen on projektissa ilmoitettu (aktivoitava Perusrekistereissä/Pro/Asiakkaat ja Projektit) |
| Laskutettu | Näyttää mitä projektissa on laskutettu (sisältää mahd. ennakkolaskut) |
| Marathon Tid | Rasti tarkoittaa, että projektille voi viedä tunteja Marathon Tidissä. |
| Paikallinen nimi | Näyttää paikallisen nimen, jos sellainen on rekisteröity projektille. |
| Viitenumero | Näyttää viitenumeron, jos sellainen on rekisteröity projektille. |
| Loppupvm | Näyttää projektin sulkemispäivän jos projekti on suljettu. |
| Alkupvm | Näyttää projektin perustamispäivämäärän, jos sellainen on rekisteröity projektille. |
Voit vaihtaa sarakkeiden järjestystä vetämällä ne hiirellä haluamaasi paikkaan. Napauta sen sarakkeen otsikkoa, jonka haluat olevan lajittelua ohjaavan.
Asiakkaiden ja projektien avaus
Asiakas ja projektilistoissa on mahdollisuus rekisteröidä uusia tietoja. Uusien asiakkaiden/projektien avaaminen edellyttää valtuudet. Jos talousosasto yksin avaa uudet asiakkaat, UUSI-painike ei ole aktivoitu. Talousosasto myös valitsee Marathonin käyttöönoton yhteydessä, mitkä kentät rekisteröintinäkymiin tulee; siksi omat kuvanne ja tämän ohjekirjan kuvat voivat erota toisistaan.
Asiakkaan rekisteröinti
Klikkaa asiakaslistan päällä olevaa UUSI-painiketta. Ilmoita asiakkaan tunnus ja paina OK.
| Asiakastunnus | Asiakkaan tunnus voi olla 1-4 merkkiä pitkä. |
| Nimi | Asiakkaan koko nimi. |
| Sisäinen nimi | Sisäistä nimeä voi käyttää asiakkaan tunnuksena omassa järjestelmässä. Sisäinen nimi näkyy Marathonin listoissa, mutta asiakkaalle menevissä laskuissa on asiakkaan oikea nimi. |
| Asiakasvastaava | Marathon ehdottaa sisäänkirjautunutta henkilöä asiakasvastaavaksi, mutta tiedon voi muuttaa. |
| Yhteyshenkilö | Asiakkaan yhteyshenkilön nimi |
| Yliasiakas | Asiakkaita voi yhdistää yliasiakas-käsitteellä tilastojen parantamiseksi. Volvo voisi esimerkiksi olla sekä Volvo Sverigen ja Volvo Suomen yliasiakas. Yliasiakkaat luodaan ohjelmassa Perusrekisterit/PRO |
| Kategoria | Asiakaskategoriaa voi käyttää asiakkaiden luokitteluihin. |
| Alv | Asiakkaan Alv-laji: |
| Kotimaisten asiakkaiden vakituinen Alv-kanta. | |
| Alv-vapaa ulkomaisille EU-asiakkaille. | |
| Alv-vapaa ulkomaisille asiakkaille EU:n ulkopuolella. | |
| Vat | Asiakkaille, joille on Alv-koodi Ulkomainen, on ilmoitettava VAT-numero. |
Voit kopioida toisen asiakkaan tiedot ja muokata ne uudelle asiakkaalle sopivaksi. Klikkaa painiketta Kopioi kohteesta. Huomioi, että kopioitu teksti kirjoittaa yli mahdollisen olemassa olevan tekstin
New project
Select client in the client list, thereafter click New in the project part
If you enter project numbers manually, start with filling in a number. If you use automatic project numbering, this field is not shown and the project is assigned a number when you save it.
| Client-ID | The selected client. Comes automatically. |
| Name | Project name. |
| Project manager | Project manager. Marathon suggests you (thelogged in). |
| Production manager | Production manager. Marathon suggests you (the logged in) |
| Project description | An optional description of the project |
| Type | The different project types are: |
| External | Projects for external clients, chargeable |
| Speculation | Speculation/competition projects. This can be changed to external projects later (in Backoffice). |
| Internal | Internal, not chargeable project |
| Group | External project within the company group. |
| Job type | Defines the type of job. You can select up to three different job types per project. |
| Client contact | The contact person at the client.. |
| Master | Similarly to Collective clients, also projects can be tied together with a Master project definition. That gives opportunity to analyse projects in a broader perspective, as well as they can be analysed separately. |
| Special invoice text | This text will come as a suggestion on each invoice sent within this project, e.g. reference number. When invoicing, you can choose if you want to include the text or not. |
| Our ref on invoice | Fill in, if someone else than the project manager shall be referred to on the invoice. |
| Marathon Time | Tick this box if you want the project to be in the time reporting program. |
| Group | Enter project group. Look for alternatives in the search box. |
| Cost centre | If the project revenue shall be redirected to a certain cost centre |
| Fixed price | If the project has a fixed price, it can be stated here. In the project analysis and in reports, you can later compare what has been registered and the fixed price. |
| Deadline | Possibility to fill in deadline for the project. Deadline is shown as Overdue projects in the lower part of the Marathon window. Deadline can also be shown in reports. |
| VAT | State the VAT type for the project, so that the system can handle taxes on the project. |
| Invoice date | If you fill in the invoice date of the project, it will be shown when due in the Marathon window. |
| Copy from | You can copy previously entered information from another project. Select the project you want to copy from. The function copies all information and writes over earlier entered information. |
Analysis
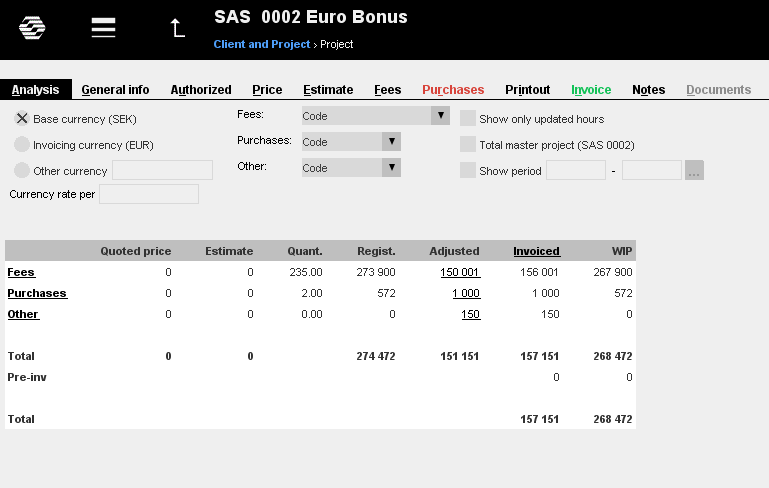
This tab shows the current status of the project. You can deepen into any underlined heading.
| Currency | Marathon supports handling of multiple currencies. It is possible to use other that your base currency; the amounts will then be recalculated with the currency rate stated in Base registers/General/Currencies. |
| Fees/Purchases/Other | In these menus you can choose how you want the information on fees/purchases/other to be shown when deepening. If you choose e.g.Cat/Code/Employee in Fees - Marathon shows you first the information divided per job category. If you click on a certain category, you will see the information divided in job codes. Click on a job code to see the employees that have been reporting time on the code. Finally, by clicking on an employee code, you can see her/his complete time report row including the comments. |
| Show only updated hours | If you tick this box Marathon shows only the hours that have been updated by the Accounting Department. If not, all reported hours on the project are shown. |
| Total master project | If you tick this, Marathon shows statistics for all projects that are tied to different master projects. The master projects are defined in the project registration or in the General information tab at each of the separate projects. |
| Show period | The analysis tab shows normally the current status of the project, but it is possible to write a certain period here, to see only that period’s data. Note that Invoiced shows what has been invoiced of registered during that period. |
| Fixed price | Fixed price can be stated here or in the tab General information, provided that the field is active. |
| Budget | This column shows the total sums of the estimate divided on fees, purchases and other. (If the parameter “Include only confirmed estimates” is checked, only confirmed estimates will be shown here.) |
| Quantity | Number of reported hours, number of purchases and number of other records |
| Registered | This column calculates the monetary value of actual fees, purchases and other.
Concerning fees the value is based on the number of hours multiplied with the hourly rate/code price entered in Marathon. Concerning purchases the purchase price (cost) added to the mark-up defined for the purchase code. |
| Adjusted | Adjustments are normally made in connection with invoicing or when closing project. Click on the underlining to see adjustment details. |
| Invoiced | Shows what have been invoiced so far on the project. Read more about invoiced below. |
| WIP | Amount to be invoiced. The WIP is the sum of registered amount plus possible adjustments minus the invoiced amount. |
| Pre-inv. | Shows if there is any pre-invoices on the project (i.e. not invoiced from WIP) that not yet have been deducted from the WIP. When the deduction is done, the amount shows in the column Invoiced. |
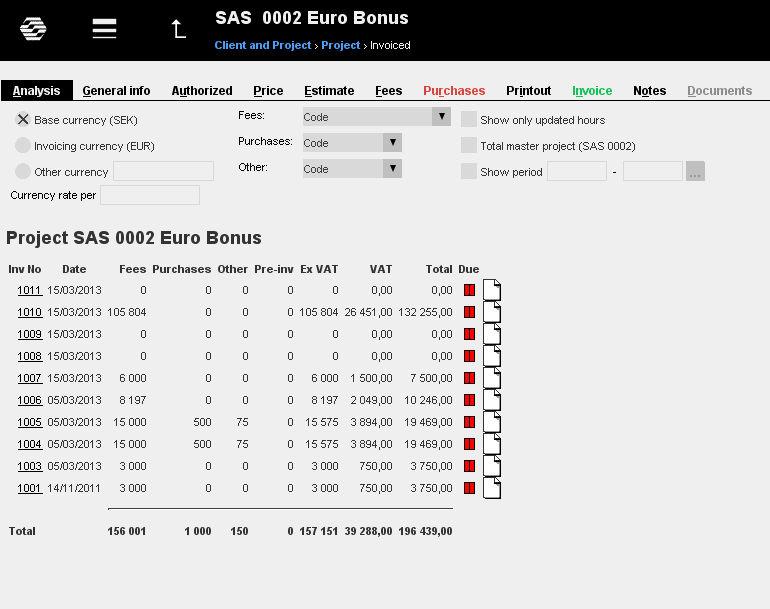
Click on the column heading to see information of what has been invoiced. The following image will be displayed.
The picture shows the invoices behind the amounts. Click on an invoice to see more information about it. If there is a red sign in the DUE column, the invoice is overdue. Click on the sheet on the right to see the scanned invoice in Pdf format.
General information
This tab shows all project information entered at the time of registration or transferred from the client. If you want to change something, click Edit. The window is the same as when entering a new project. If nothing is registered on the project, you can, if you want, delete it.
Authorization
This tab tells who the project manager and client manager are. If the project has limited access you can see here which ones of the employees have access.
Price
The price tab contains information of how the project is priced divided into fees, purchases and other.
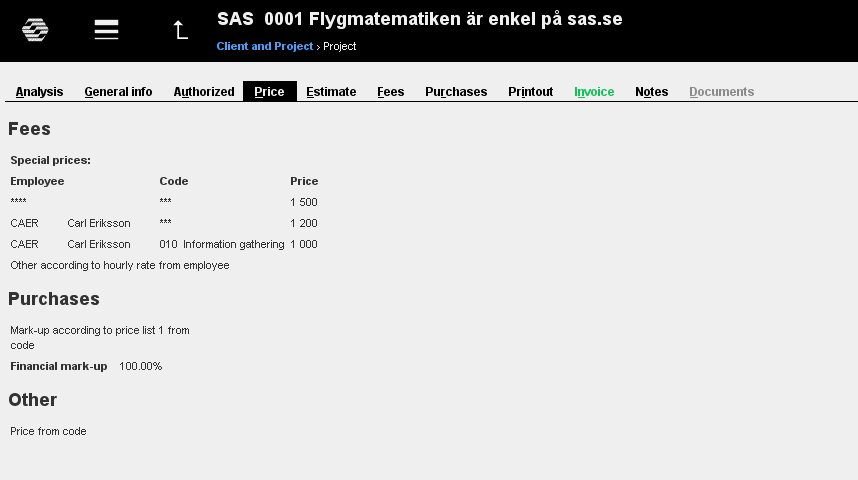
First Marathon tells if there is a fixed price for fees, purchases and/or other.
Then you can see if there are any exceptions from the ordinary rates. The special prices cannot be changed in this tab (They have to be edited in Back office). ****/*** means that the special pricingconcerns all employees and job codes.
The example above shows that all employees, except Carl Eriksson, cost 1 500 on all codes. Carl Eriksson costs normally 1 200, but on code 010 his rate is 1 000.
If you use pricing per job code, you can’t use special hourly rate. In those cases Marathon says that he price is fetched from the code.
Purchases have defined mark-ups per code for different kinds of purchases. Concerning Other in the example above, Marathon tells that there is a fixed price and that the unit prices are fetched from the codes.
Cost estimate
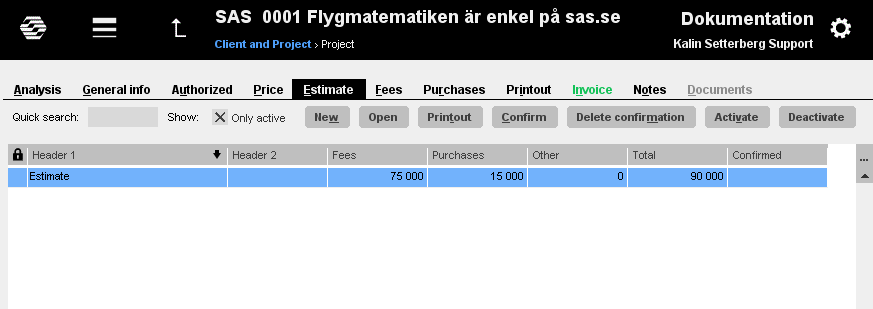
The tab can be used not only to create estimates, but also for writing quotations.
| Confirm | You can mark an estimate as Confirmed. The estimate will be marked with a confirmation date and user name of the confirmer. A parameter in the system(Base registers/Pro/Parameters/Project estimate) defines whether an estimate must be confirmed or not in order to be included in calculations. |
| Delete confirmation | You can also cancel a confirmation- if you must do changes in the estimate. If you confirm the budget again after the cancellation, new date and user name will show on it. |
| Activate | Possibility to activate a deactivated estimate |
| Deactivate | If a project has many estimates you can deactivate the revisions you want to exclude from the project analysis, reports, etc. |
New estimate
Click New to create a new estimate. The estimate has separate tabs for Fees, Purchases, Other and Text & Currency. There are no specific rules of what it must include, you can choose to budget on optional detail leve
Write headings and texts in Text & currency. If you want some text to be printed out after the estimated values, write it in the field Estimate text After.
| Copy from | You can use existing templates or previous estimates in new estimates. |
| Templates | Select template. Templates are registered in Backoffice/Project Accounting/Estimate templates |
| Update prices | If you set an estimate on employee level, and the employee's prices change, you can update the price in order to get the new one into the estimate. |
| Import team | Imports all employee from the project’s team to the estimate. |
Print estimate
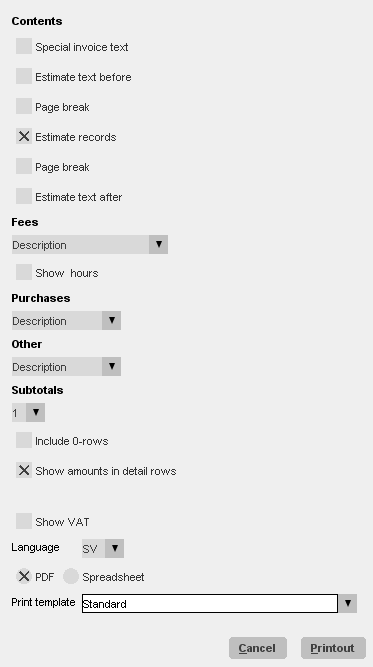
When the estimate is saved, you can print it out. There are a few printout selections to do
| Special invoice text | Text written as special invoice text on the project (e.g. reference number that you want on the client’s invoice). |
| Estimate text before | Text that has been written in the Estimate text before-field in the texttab. |
| Page break after heading | Tick the box if you want a leaf with project information separately from the actual budget. |
| Fee/Purchases/Other | Select detail level in the drop-down menus. If you e.g. select Code/description, the estimate will be divided in codes and you can see comments for each code. If you have just set fixed amounts for fees/purchases/other, Description is the best printing alternative. Note, that even if you have created a very detailed budget, you can still print out one more compressed, e.g. on category level. |
| Estimate text after | The text that has been written in the Estimate text after in the text tab. |
| Show hours | Select if you want to see number of hours for the fee. |
| Subtotals | Select on what level you want to see the subtotals. The higher numbers you choose, the more detailed the subtotals will be. |
| Show 0-lines | Select if you want to see lines with zero- amounts |
| Show amounts on… | When you select this, the amount will not be specified by detail for each record; only the total sum will be shown for fees, purchases and other. |
| Print out VAT | All values in the estimate are exclusive of VAT. If you want to see the amounts with VAT, tick this alternative. |
| Language | You can select between different languages (Marathon is available in several languages - but in order to see your company’s specific fee and purchase/other codes, check that they are translated in Backoffice) Otherwise they will show in your company’s basic language. |
| PDF/Spreadsheet | The destination of the printout; either in Pdf format or as an export to Excel. |
| Printout template | If your company is using different templates for printouts, select one in the menu. |
Fee
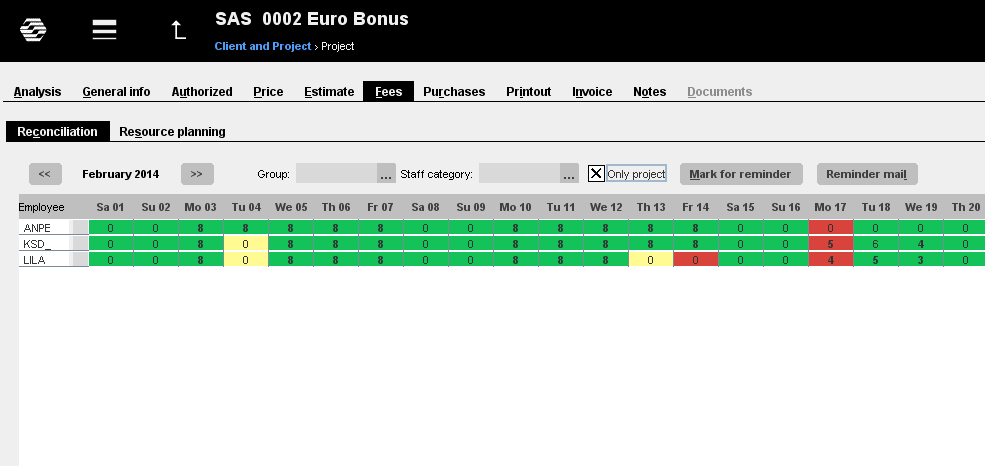
The fee tab has two “sub-tabs”; reconciliation and resource planning.The reconciliation module is the same that is shown in Marathon Time. You can follow the employees’reported hours either per project or total.
The resource planning tab shows how the time has been planned in Back office (Projectaccounting/resource planning). You can select a period and sort the list per employee, code or date.
| Only planned time | Shows only the time that has been planned for the project. |
| Dates | You can select a period. |
| Employee | Shows the planned time per employee. |
| Code | Shows the planned time per job code. |
| Date | Shows the time per date. |
| Detailed | Shows a detailed list. |
Purchases
Inquiries are found in the PURCHASES tab in Client & Project. Inquiries can be sent to suppliers and later be used as a framework for purchase orders. Purchase orders may be created directly from theinquiry, or from the Purchase order tab.
Create a new inquiry. Click NEW.
| Purchase of | Text, which will be shown in the Text-field in the purchase order. It will also be shown in Marathon Approval. |
| Purchase code | Type of purchase. |
| Our reference | Employee in the own company that is in charge of the purchase. Marathon suggests the logged-in employee. |
| Quoted price | Can be filled in when the inquiry has been replied to. It can later be seen as a column in the overview list (and in the inquiries list in Backoffice), which can be used as overview of purchase order recipient’s and also for follow-ups on price developments regarding previous inquiries. |
| Company | Company, into which the purchase goes. |
| Supplier | If the supplier has been registered with address and terms of payment, this information will automatically be pasted to the fields below.. |
| Delivery address | Address, where the purchase shall be delivered. Select between own address, client’s address or write an address manually. |
| Goods label | The delivery’s label (e.g. project-ID) |
| Description text | Text field for notes to the supplier. A purchase order text may be connected to each purchase code. If selected, it will show automatically. |
| Copy from | Information on inquiries may be copied from an already existing inquiry. |
| When an inquiry has been saved it can be printed out to Pdf or be sent to the supplier either as fax or email. When an inquiry has been printed out, it turns inactive. | |
| New purchase order | If an inquiry shall be used as a purchase order, select the inquiry and press new purchase order. The purchase order receives a running number. |
| Open purchase order | Select open purchase order to make complementary additions to the order. |
| Print purchase order | The purchase order can be printed out or sent to the supplier by fax or e-mail. |
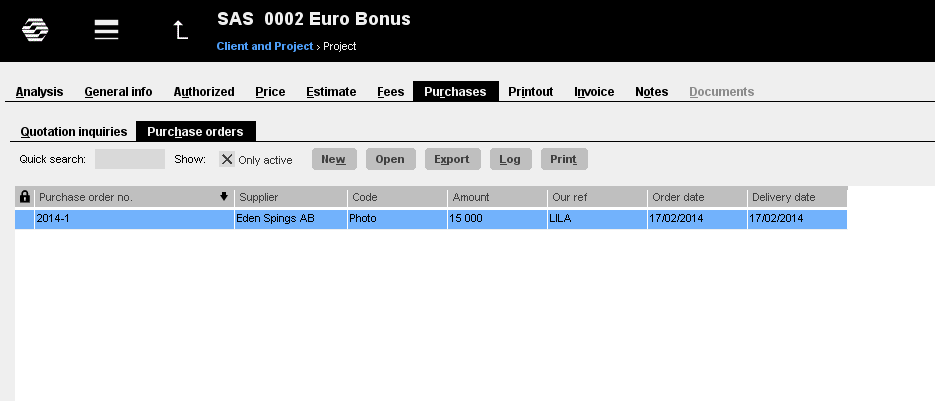
Creating a purchase order for a purchase facilitates the work of the accounting department and approvers, as it is possible to match the purchase order with the invoice later.
If the box Only activeis ticked, the list shows only those purchase orders that has not yet beenmatched with an invoice. Select a line and click openin order to see more details about a specific order.
All of the company’s inquiries and purchase orders are shown in Backoffice/Purchase ledger.
Printout
You can print out project status in this tab. Use the search boxes to see all alternatives. Start withPRINTOUT. If you click SAVE SELECTION, your selection will be saved and suggested to you nexttime you are in the program. Note that only imported hours are shown in the printout.
| General information | Main information about the project, e.g. project manager, start date, client manager, etc. Contains also information about parameters set for the project. |
| Total | Shows total project status, i.e. the same information that you can find in the Analysis tab. |
| Details fee | Shows hours divided according to your selection. |
| List fee | Shows what each employee has reported. The list can be reduced to a certain period. |
| Hide amounts | Possibility to hide amounts in printout. |
| Details purch | Shows purchases according to your selection. |
| List purch | Detailed list of all purchases. |
| Summarize purchases… | Summarizes purchases whose WIP: s are invoiced or adjusted away. |
| Mark accumulated… | Marks the time reported as accumulated project time. |
| List orders | A list of all orders on the project. You can choose to exclude the matched orders - select Do not show binding purchase orders in the menu. |
| Details others | Shows other records according to your selection. |
| List others | A detailed list of other registered costs. |
| Summarize others… | Summarizes other-records whose WIP: s are invoiced or adjusted away. |
| List invoices | A list of all invoices on the project. |
| Invoice draft | Shows the current amount in WIP to be invoiced. The detail level is according to settings on the project. The numerical codes will not be visible on the real invoice. |
Invoicing
Determine in this tab what to invoice and the appearance of the invoice. There are different ways of prparing an invoice. Here is three methods.
New invoice – only text
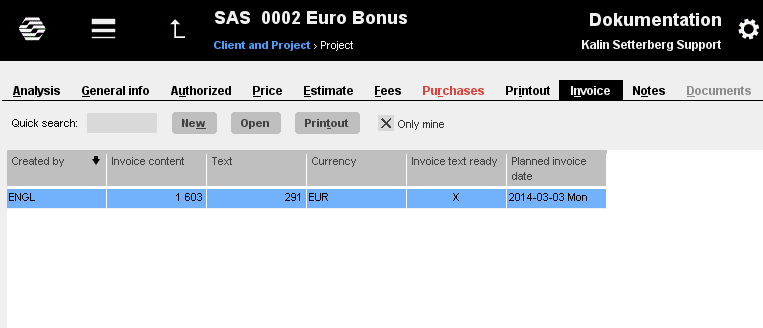
Prepare the invoice text in Client & Project. The actual invoicing is later performed by the accounting department, who is using the text that is prepared and the instructions that have been given. Select New to create an invoice. You can create several invoices on one project.
Text
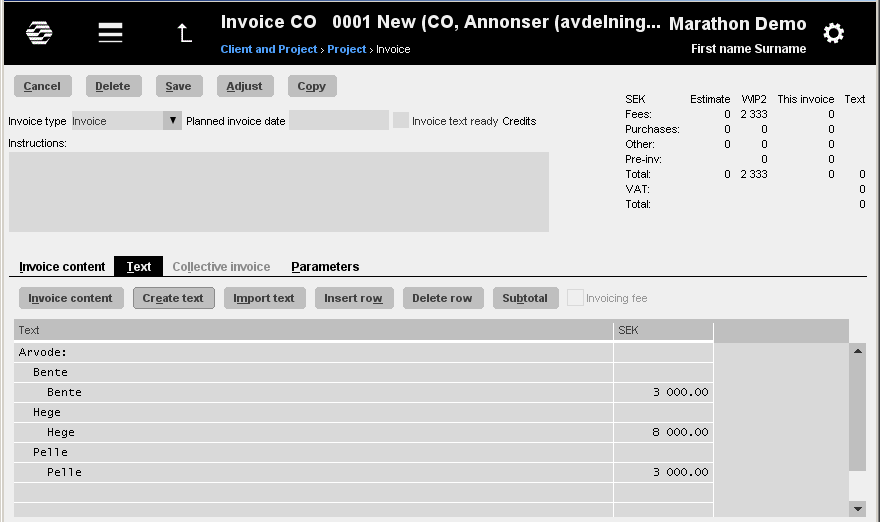
Create text in the Text tab.
| Create text | Click Create Text if you want to use the project's WIP or to invoice from the cost estimate. Select first if the amounts shall be based on estimated values (and in that case select estimate) or onthe project's actual wip. |
| Itemiz. level | Select level of details for fees, purchases and other. |
| Subtotals | Select how you want the subtotals. |
The suggestion can be changed. You can add own rows and subtotals and write a new text andamounts. Down right you can see a summary of the amounts and possible pre-invoices waiting for deduction.
| Instructions | If the amounts are changed, it is very important to instruct the accounting department what shall be adjusted and what shall be left in WIP, etc. Use the field Instruction; it will not be shown on the invoice. The instructions are shown in the Analysis tab, under Invoiced, for each invoice. |
| Import text | If the invoice is similar to a previously created one, you can import text from old invoices and adjust the text to fit the actual one. |
| Invoice text ready | When the invoice is ready, tick the box Invoice text ready. |
| Invoicing fee | If invoicing fee is set, click the box if you want invoicing fee on this specific invoice. |
| Planned inv.date | Write a date. |
| Printout | When the invoice is saved you can print a test invoice. Select printout template. |
New invoice – text and content
Prepare invoice text and content in Client & Project. The actual invoicing is later performed by the accounting department. Select New to create an invoice. You can create several invoices on one project.
Create text by following instructions in the chapter above ( 1. New invoice- only text).
Create content; please request a separate invoicing manual for instructions.
New invoice – collective invoice
Collective invoicing means invoicing several projects for a client on the same invoice. It is requested that:
The projects have the same client code
The projects have the same client number
Collective invoicing is allowed on the projects.
That the projects have the same invoicing currency at the time of printout.
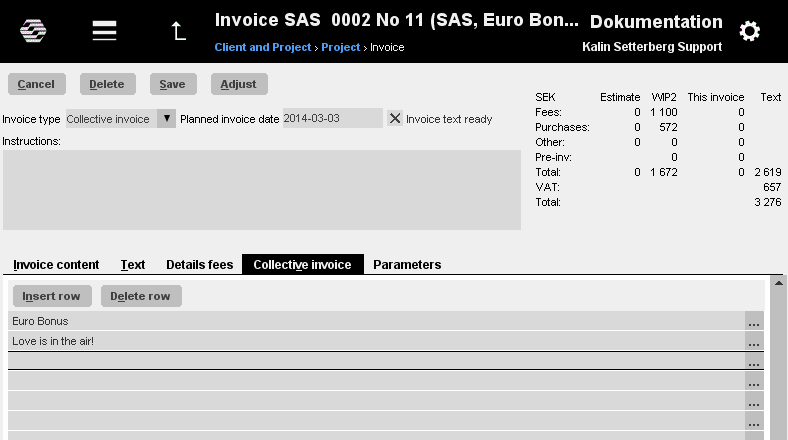
Open one of the invoices and select Invoice Type Collective Invoice. Go to the tab Collective Invoice and fetch all the projects that shall be included, also the one you currently have open. In the Content tab you now see the WIP from all projects. Select what to invoice.
Invoice client
If the project has another rinvoicing address than the client, use a invoicing client on it. Fetch invoice client from the tab Parameters.
Notes
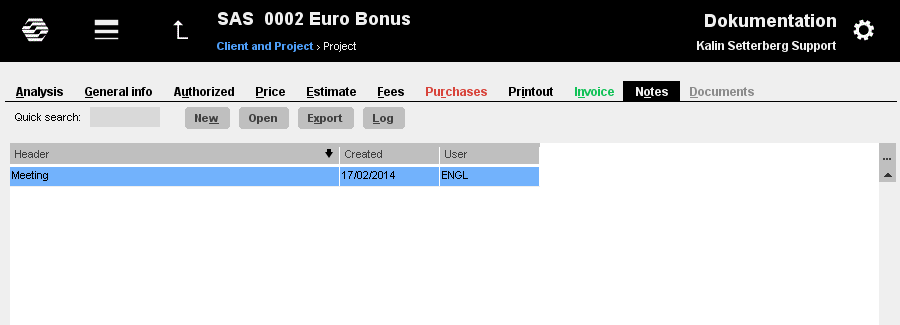
You can gather all notes about the project in this tab so that all colleagues can read it and also fill in their notes. A note is automatically marked with name and time.
If you want to write a note, click NEW to open a box, fill in heading and the note - you can also copy from a previous note, then Save.
Documents
Here you can make a connection to your ordinary file server. That means that you can quickly get access to documents that are connected to the project. The files are stored in one folder per project. Contact Kalin Setterberg for more information.
Project printouts
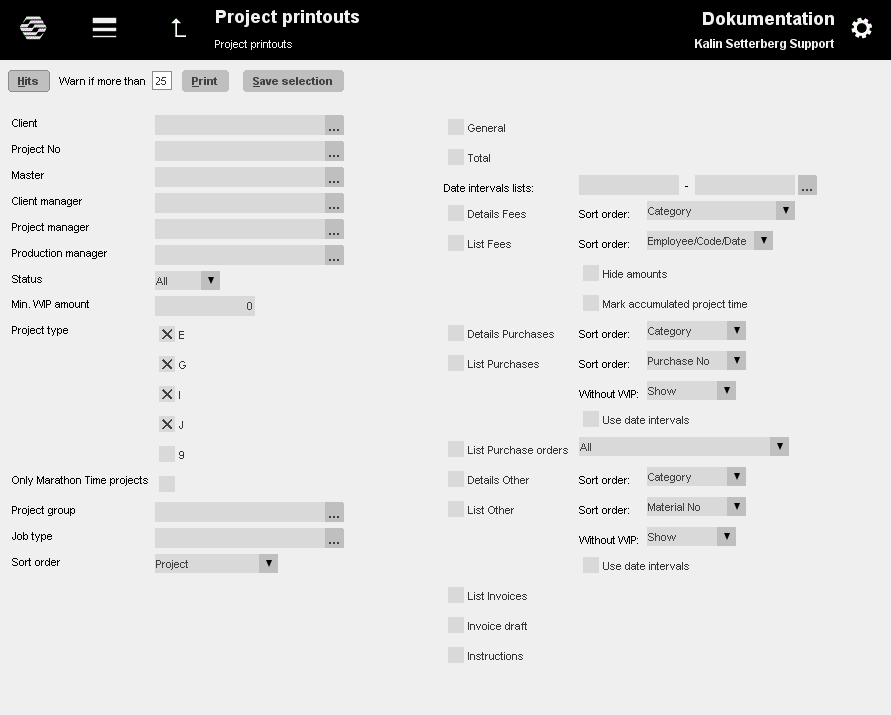
In this module you can print out different kinds of statistics about several projects at the same time. Select projects in the left part of the screen and the information you wish to include in the right part. The right part is similar to the printout tab in the separate projects.
| Hits | If you want to check the number of projects found, click HITS |
| Print selection | |
| Save selection | You can save your selection |
| Master | If you use Master projects for grouping projects, you can select to sort by master here |
| Status | If you want to see projects with a certain status, select:
|
| Min WIP amount | You can select projects that have WIP exceeding a certain amount. |
| Marathon Time proj only | The list shows only projects that are available for time reporting in Marathon Time. |
| Sort | A menu to select sort order of the projects, e.g. project name, project manager or start date. |
Reports
This is a module where you can print out and create reports. There are a few standard reports in the module but you can also create own reports. Please request separate manual fo creating reports.
| Print out report |
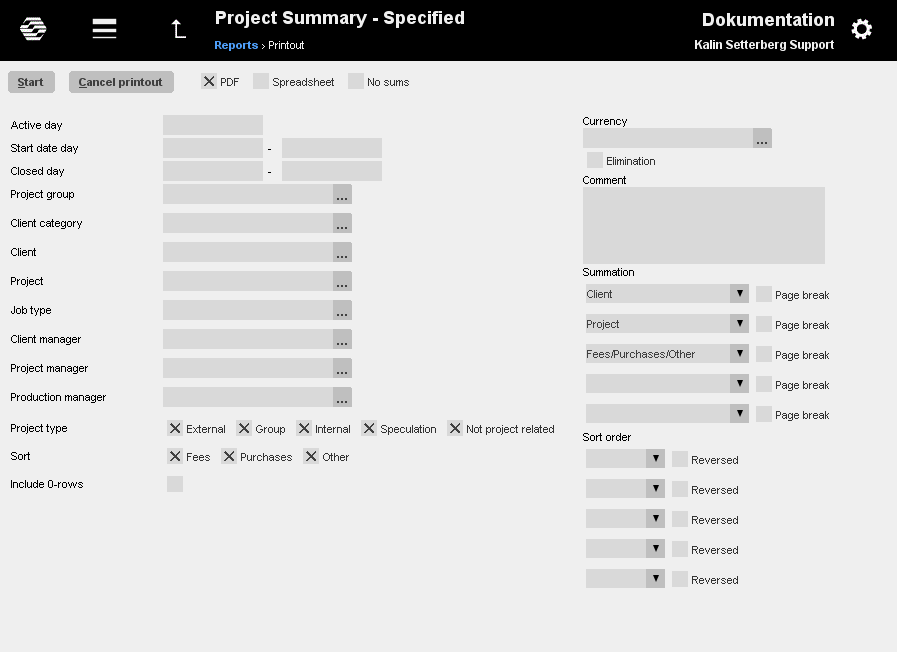
Select a report and click Printout. A selection window opens.
Make the selection on the left side. The selection possibilities may vary from onereport to another. The columns are already in the report template
| Summation | Summations (subtotals) determine how the report shall be presented. |
| Sorting | Sort order for summation levels. ngsordning för respektive summeringsnivåer kan väljas. Click Reversed if you want the biggest amounts to be presented on top. |
| Print destination | The report can be printed to Pdf or Spreadsheet. |
| No sums | Printout without summarizations |
| Start | Start printout |
