Difference between revisions of "Invoicing/fi"
(Created page with "{{ExpandImage|PRO-IN-FI-grafik2.png}}") |
(Created page with "=== Muokkaus ===") |
||
| Line 39: | Line 39: | ||
{{ExpandImage|PRO-IN-FI-grafik2.png}} |
{{ExpandImage|PRO-IN-FI-grafik2.png}} |
||
| − | === |
+ | === Muokkaus === |
You can adjust the actual WIP so that the values agree with the amount that shall be invoiced. An adjustment is thus an appreciation or depreciation of the WIP. |
You can adjust the actual WIP so that the values agree with the amount that shall be invoiced. An adjustment is thus an appreciation or depreciation of the WIP. |
||
Revision as of 14:26, 5 January 2016
Contents
Ennen laskutusta
Tarkista ensin, että kaikki tunnit on päivitetty. Käytä ohjelmaa Projekti: Raportit Tarkistuslista Aika. Päivitä sen jälkeen Oma työ, Ostot ja muut ohjelmassa Projekti: Rekisteröinti, Korjaus ja Päivitys.
Luo lasku
Erityyppisille laskuille on eri menetelmiä. Menetelmä poikkeaa myös, jos käytät Projekti: Kysymysten Lasku-välilehteä laskun luomiseen, ks. erillinen kappale. Lasku koostuu laskutekstistä ja laskun sisällöstä ja niiden pitää täsmätä keskenään.
Luo laskuteksti kun laskuteksti on valmiina
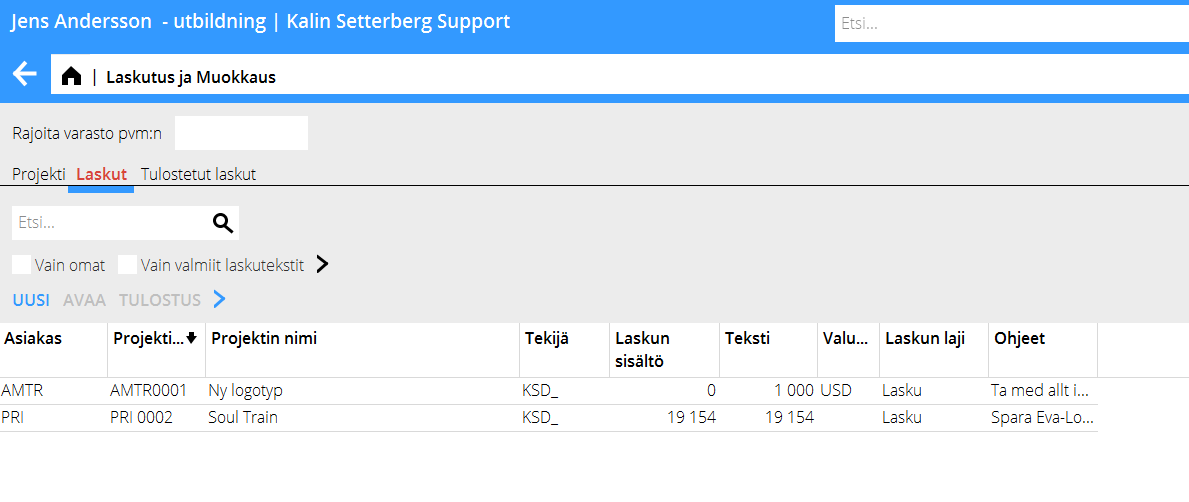
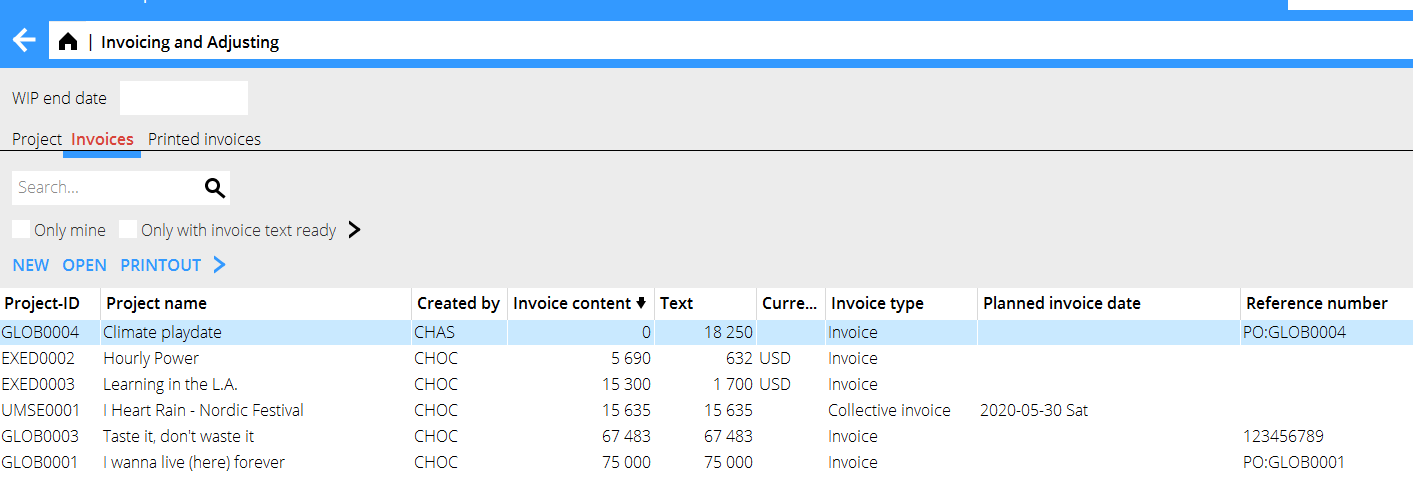
The tab Invoices is shown in red when there is one or several invoice texts created in Project: Queries and/or when there are unprinted invoices on a project.
Mene lasku-välilehdelle ja paina Avaa.
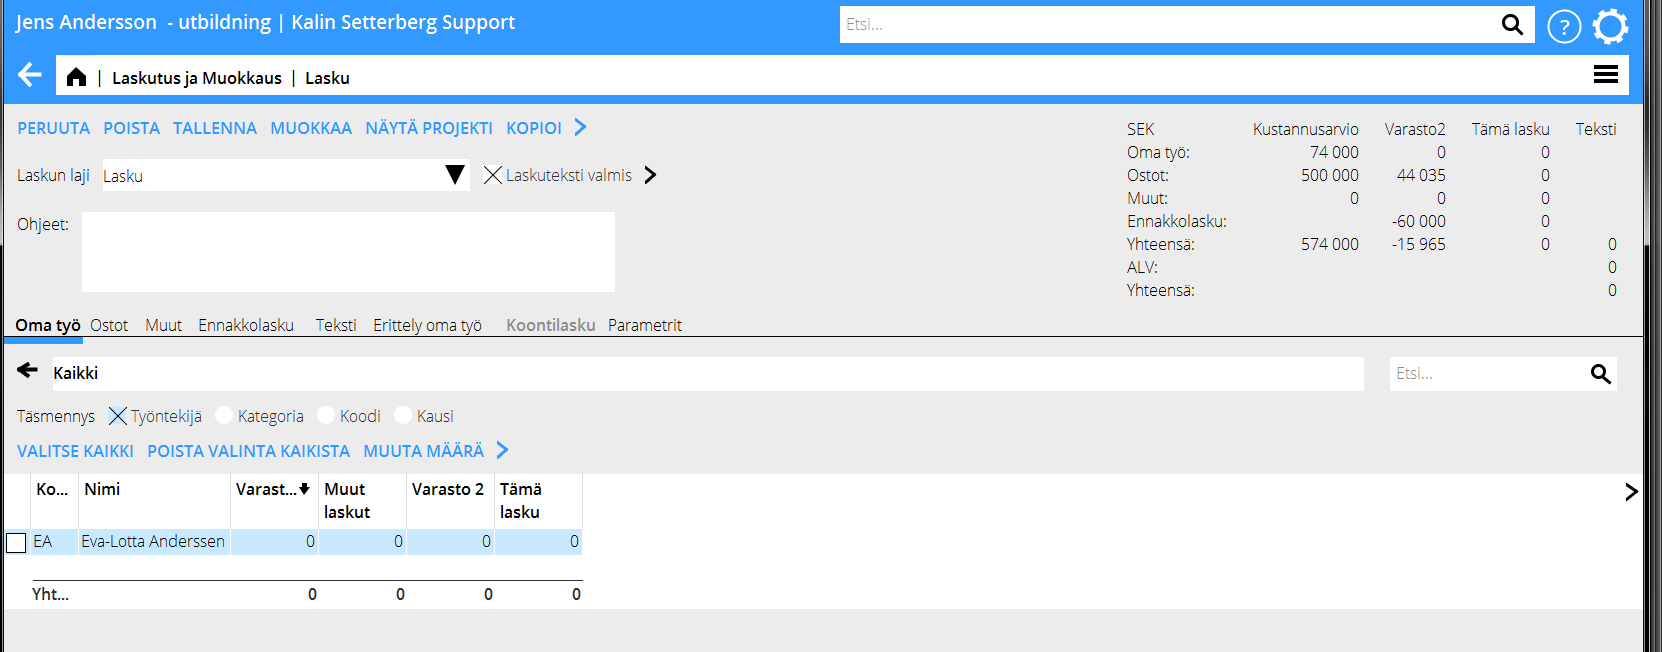
Sisältö
Valitse laskun lajiksi LASKU kuvan yläosassa. Laskun sisältö-välilehti näyttää oman työn veloituksen, ostot, muut ja varastossa olevan määrän. Valitse rivit, jotka haluat laskuun mukaan. Voit syventyä hintariveihin. Koko varastomäärä siltä riviltä siirtyy sarakkeeseen Tämä lasku. Ellei kaikea laskuteta, valitse rivi ja Muuta määrä. Kirjoita laskutettava määrä kenttään. Voit syventyä työntekijöihin, kategorioihin, koodeihin ja kausiin.
| Select all | Marks all rows. And moves amounts to This invoice |
| Deselect all | Undoes selection. |
| Change amount | You can save amounts in WIP by lowering the amount. State the amount to be invoiced, the remaining amount stays in WIP. |
| Excess invoicing | Can only be used in excess invoicing is allowed (parametric setting). State the excess invoice code, unless it is not pre-set and amount to be invoiced. |
Muokkaus
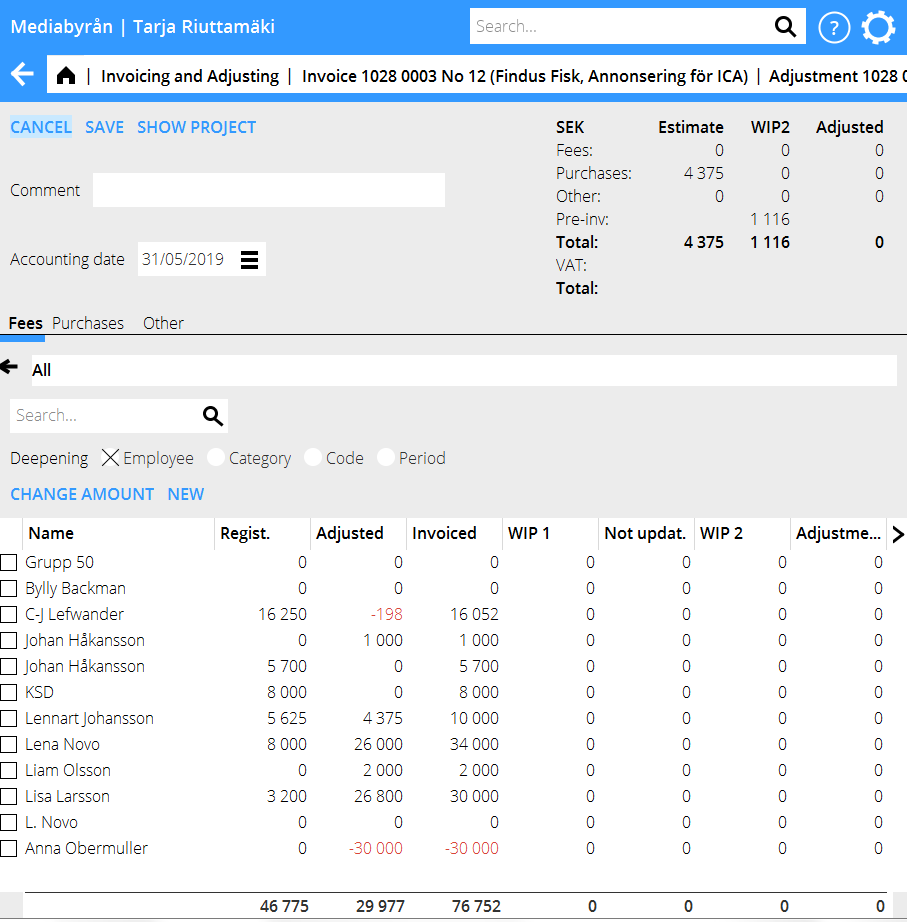
You can adjust the actual WIP so that the values agree with the amount that shall be invoiced. An adjustment is thus an appreciation or depreciation of the WIP.
If you are in an invoice, click Adjust. If you are in the list of projects, click New adjustment. Depending of if there is any WIP to adjust, do the following:.
| Change amount | Select a row and click on Change amount. Change the amount that shall be adjusted (+/-) or state the amount that shall remain in WIP in the WIP row. Select several rows if the adjustment shall be done proportionally against the value in WIP. |
| New | If there are no WIP or nothing is registered on the project – or if an adjustment shall be pointed to something else than WIP/registered, use New to make an adjustment. Fill in fields for Employee, Code, Period and Amount. |
| Comment | Possibility to write an adjustment comment. |
| Accounting date | Mandatory date for adjustments. |
| Registered | Registered on the project |
| Adjusted | Adjusted on the project, total. |
| WIP 1 | Registered and adjusted but not invoiced. |
| Invoiced | Invoiced on the project. |
| Not updated | Amounts in invoices created but not printed. |
| WIP 2 | WIP 1 minus Not updated. |
| Adjusted | Shows possible new adjustments that have not been saved. |
Print invoices
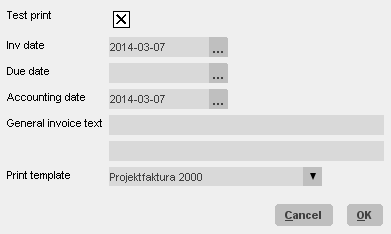
Save the invoice when the text and the invoice content are ready. Saving takes you to the Invoice tab. Select Printout. You can select several invoices (by pressing down the Ctrl key while selecting and print them out at one time
| Test print | Make a test print to check how the invoice looks. |
| Invoice date | Today’s date is suggested. |
| Due date | Fetched from the project, but can be overwritten |
| Accounting date | Today’s date is suggested. |
| General invoice text | An optional text to be printed out on all invoices. |
| Printout template | Select your company’s template |
Go to Project:Invoicing-Adjusting. You can either open the tab Invoices and select New for a new invoice or open the tab Project and make a selection in the list:
| Smallest WIP amt | The WIP can be limited to a smallest WIP amount. |
| WIP 2 | Shows the total WIP minus the amounts released in other |
| Status | Choose between all, active, invoice released, pre-invoice released, collective invoice released. |
| Invoices exist | Choose between none, started and ready. |
| To be closed | Choose if you want to see projects that have been marked with “To be closed” in Project: Queries. (This is a message from project managers to the accounting department that a project is ready for closing.) |
Use the > at the far right in the heading row to select the columns that you want to see in the project list. The columns you have selected will be saved on your user name.
| Show project | Link to the analysis view in Project: Queries. Edit general project information under the tab General. |
| Test invoice | Shows what there is in the project’s WIP on an invoice printout. |
| New adjustment | Possible adjustments of the WIP in order for the values to agree with what shall be invoiced (read more in the chapter Adjustment). |
| New invoice | Start working with the new invoice if the invoice text not is created in Project: Queries. |
| Change status | Close, deactivate or activate project. Before a project can be closed, WIP has to be zero; there may not be any not deducted pre-invoices or not updated time or purchases on it. |
Select New invoice to create a new invoice. Follow the instructions about Invoice content and Adjustment, and create an invoice text with help of the following chapter
Text
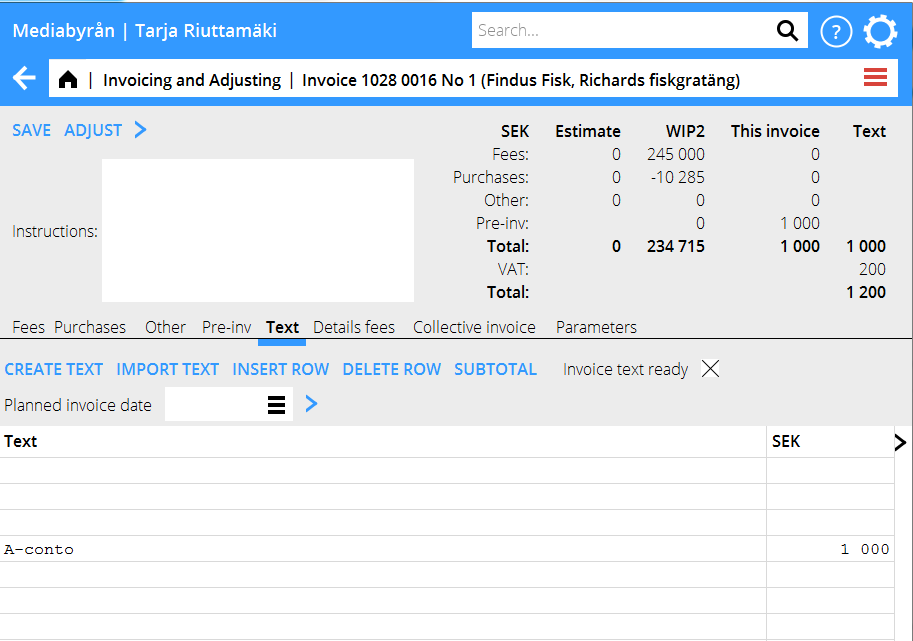
You can either write own text and amount or use a text suggestion. You can edit the suggested text. You can also add own rows and subtotals and write new text and amounts.
| Create text | Choose this if you want to catch up the WIP on the project or to invoice from the cost estimate. |
Select first if the amounts shall be based on estimated values ( and in that case which estimate) or on the amounts that are actual in WIP. You can also select amounts based on Invoice content.
| Detail level | Select level of details in the invoice concerning fees, purchases and other. |
| Subtotal | Select subtotal levels. |
| Import text | If the invoice shall be similar to a previous invoice, you can import text from it. Then you can edit the text and amounts to fit in the new invoice. |
| Instruction | The project managers can write instructions as complement to the invoice text. The instruction is not shown on the invoice, only in the analysis tab in Client and Project for each invoice respectively. |
| Invoicing fee | If an invoicing fee has been set and shall be charged in this invoice, check the box. |
Create pre-invoice
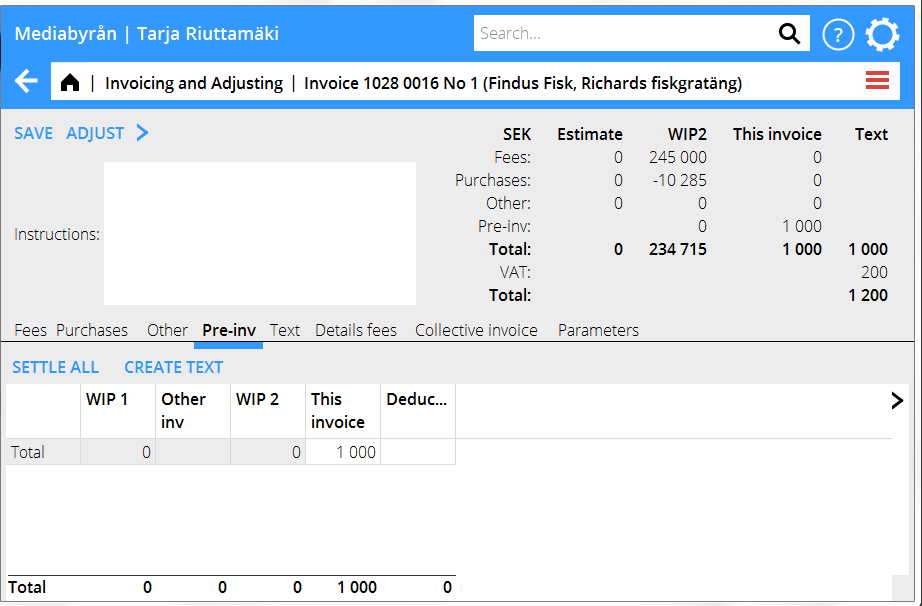
Under the pre-invoiced tab, you can register the amounts that shall be pre-invoiced as invoice content. State the amount to be invoices in the column “This invoice”. It is possible to invoice pre-invoice amounts together with amounts from WIP in the same invoice.
If pre-invoicing has been set to be divided in fees, purchases and other (in the parameters), they are separated. This can be of interest in different reports
| Pre-invoice deduction | Open the tab Pre-invoice and fill in the amount to be deducted or select “Deduct all”. The amounts to be deducted are shown in the tabs Fees, Purchases and Other. The process is the same as in standard invoicing. |
Create collective invoice
Collective invoicing means that you invoice several projects on the same client on one invoice. The requirements are::
That the projects have the same client code
That all the projects have the same client number.
That collective invoicing I s allowed on the project.
That the projects have the same invoicing currency at the time of printout.
Go to one of the projects that shall be in the invoice and select Invoice type “Collective Invoice”. Open the tab Collective invoice. Then fetch the other projects that shall be in the same invoice. Select also the one that you currently have opened. In Invoice content you can now see all the WIP: s of the projects together. Select what to invoice.
Note, that possible adjustments on the projects involved have to be made before they are put together to a collective invoice. To make an adjustment, mark the project in the search list in the Project tab and select “New adjustment” (read more in Adjusting).
Merge invoices
An alternative for collective invoices is that you prepare all invoices separately, and then merge them. This method is usable for example when you use excess invoicing, or when the project managers are writing invoice text in Frontoffice, when collective invoicing is not possible. The invoicing process is the same as when making standard invoices. When the invoices are ready, , select them and click on the button Merge. Select project. In the text tab you have now a section per project, with project name and code as heading for each section. The text is editable.
Parameters
If the project has another invoicing address then what is stated on the client, use an “invoicing client”. Invoice clients can be fetched in the tab Parameters on the project.
If you wish to allocate fees, purchases and other tyou can select a period in the Parameters tab. Note, that the function “Automatic transfer to S/L” has to be checked in System: Base registers/PRO/Parameters, under the tab Invoicing. Otherwise period cannot be chosen here. Also state an account for periodical allocation in the same tab.
Reprint invoice
It is possible to reprint invoices under the tab Printout
| Only mine | Shows the invoices you have been printing out. |
| Group | You can select to see a list with only invoices for a certain group. |
| Printout | Reprints selected invoice. |
Select which invoices to show in the dropdown menu according to printout time. Use the quick search field for free text search
Credit invoice
To credit an invoice, go to the tab Printed invoices. Find the invoice and click on ”Credit”. A similar invoice is created, but in credit.
Select possible test print. Today's date is suggested as credit invoice date, but it can be overwritten. Select printing template and then OK.
